I’m brand new to 3D printing and have been trying to customize some existing files I’ve found in Bambu Studio. All I’m trying to do is add a name to the bottom of a coaster and I can’t seem to get it to show up.
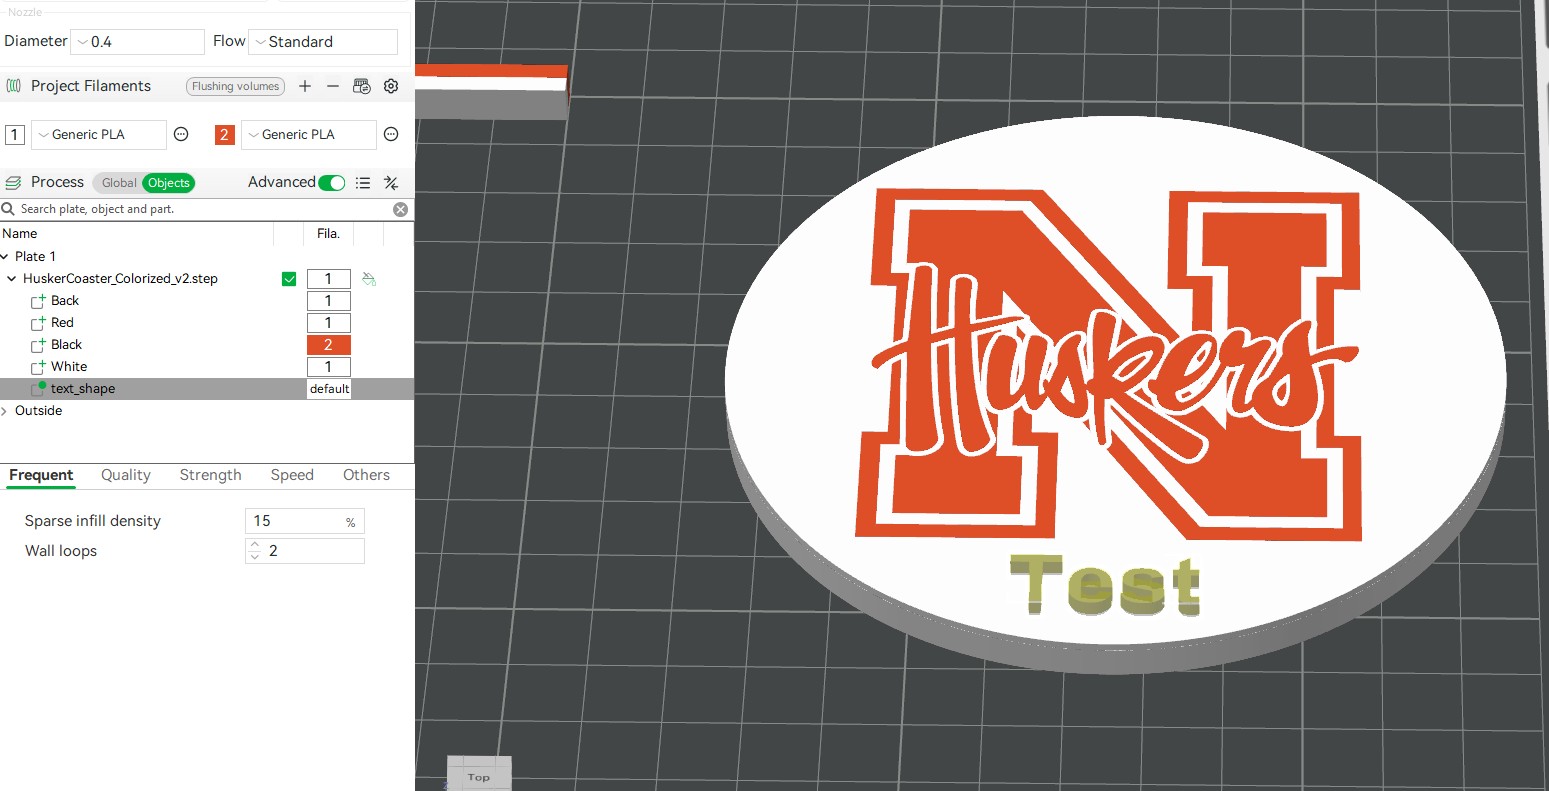
I’ve added the text, changed it to an object (and adjusted the filament color) as well as changed the depth to 3.0. But when I splice it, the text is covered up another layer. I’ve tried flipping the image, I’ve tried altering the depth, changing the type to embedded… nothing I’ve tried will put the text on the topmost layer.
I’ve combed reddit and this forum - as well as watched a dozen Youtube videos but nothing is covering my particular problem. Any sort of help our guidance would be very much appreciated.
Great tip and something I hadn’t tried yet… I gave it a shot and unfortunately it didn’t work. It’s like between step(?) 18 and 19 it just overrides the text and prints on over the top of it.
Try changing the thickness to 3.5, which should make it taller than the top layer, then under the objects tab, select the “text shape”, right click and select change type, select modifier, click ok, and slice.
Still not working - I thought it might be something to do with how the file is created but when I try another random coaster it does the same thing so I have no idea. I don’t know why this is giving me such a difficult time, feels like it should be a fairly easy addition to an existing file.
Thanks for all your help. I’m using version 2.0.3.54 for reference.
A couple things about what you sent over:
It looks like you kept it as “part” rather than changing it to an object. (which seems to keep it visible but not entirely what I’m shooting for)
The file printed with the text raised ever so slightly above the surface layer. Given it’s a coaster my goal is to have an entirely flat surface.
The text is embedded way further into the object than the actual logo creating excess time and materials in printing.
At the end of the day - I’m way ahead of where I started so thank you for sticking with me. I’m still looking for a way to get the text to print “at the same time/level” as the logo on the surface layer.
If you (or anyone else) has any ideas on what I should try next I’d really appreciate the help.
To do this, set the text depth to around 0.60. Then, right-click the text and change its type to ‘Negative Part’. After that, add a modifier cube over the text so you can change its color to orange.
I think I’m still doing something wrong. I got the depth and the negative part situated and it’s now sitting below the surface (Thank you!!)
However, I’m stumped on the modifier cube - I added one and got it to scale but even when I change the filament color it’s still showing up as a negative space.
Appears to be the same result. When I splice it I’m just seeing it run the outline and on the prepare page it’s just grey text. I’ve tried moving Z axis up and down and played with several options of thickness but I’m still not able to get it to show up as a different color.
Correct - when I slice the plate it shows the object box as an independent item beneath the text. When I print it I’m just left with a negative space instead of color (and a rectangle of red in the middle of the print)
I won’t be back in my office until next week to check why it’s not working. In the meantime, could you upload the 3MF file so I can take a look and try to figure out the issue or another forum member can help also when they can see the file.
Thanks for the response! I tried changing it to an object but I don’t have an option to change the color. It just has the “default” label next to text shape.
I ran across something which stated some layers are “painted” - I don’t know what that means but could this be the case here in where the entire logo layer isn’t able to be edited and that’s why I’m having such a hard time?
Right click on “text_shape” in the object tree. The pop-up contains “Change filament”.
Then, you need to move the modifier downwards into the part using the move tool at the top of the screen. 0.4mm should be enough against a white background. The common volume of the modifier and the overlapping object will have the filament change applied.
You may also want to use the Arachne wall generator for better text.
Finally, for a really good top, consider flipping the assembly upside down and printing on a smooth plate.
First off - This is WAY more complicated than I thought it would be so thank you so much for your help (I’ve got a lot to learn!).
Second, If I’m wanting to do this with other coasters - can you point me to a tutorial or a guide I can reference to follow the steps you took in removing the painted layers (or is this just something you’ve learned independently?)


 &

