X2D Manual Aux fan control in cooling mode and disable autocooling for PETG+PLA

I’m having the same issue when printing PETG with PLA interface supports in my X2D. Aux fans ramp up to 80, 90 or 100% once PLA is extruded for the first time. For those of you who do not want to deal with custom G-code, @rinkel found that raising the PLA softening temperature stops the aux fans from spinning up, and @FedX’s analysis shows the auto-cooling thresholds are driven by min_vitrification_temperature (the internal name for that field). So in theory all you have to do is edit the PLA filament settings (preferably create a custom one for supports use), and change the Softening temperature from the default 45C to 60C (the same value PETG uses). I also lowered the Auxiliary part cooling fan setting from the maximum of 70% to 40% (the same value PETG uses).

Will report back once I try this settings myself, need to wait for a long print to finish.

Confirmed, aux fans don’t go over 40% now, no custom G-code required, and automatic chamber temperature management will still work if required.

Yes.. but the softening temperature of pla is far lower than the softening temperature of petg. By ramping up the softening temperature of pla the software will not warn you if the chamber temperature gets too high and there is a risk of heat creep which can cause a serious issue with the hotend.. I would not recommend to set ist up to 60°c.. reaching 50°c chamber temperature will definitely higher the risk of heat creep when using PLA.

Without any gcode changes, you can set the fans to 0 and they’ll run at 20%. In case 40% is too high still.

I just want to clarify something.

Bambu printers don’t have any “magic” built into them. They simply execute the G-code they’re given, whether it’s written manually or generated by the slicer.

Bambu added some G-code to the slicer to make printing more beginner-friendly, since many new users aren’t familiar with cooling requirements and other printer settings.

If you want full manual control over the fans, you’ll need to remove or comment out the specific G-code that controls them. You can’t manually control something that’s also being controlled automatically.

I think the confusion comes from not realizing that the slicer is inserting this G-code automatically. In this case, I’d recommend leaving it as Bambu designed it. Their default settings are well-tested and, for the vast majority of prints, will work in your favor.

This statement in general make sense but as you can see in the forum many people including me see in case of X2D that the aggressive fans are causing problems like warping and inconsistent transitions between different areas. And this makes A1 much better printer for PLA and PETG currently.

So this should be either fixed so it will really work well or should have manual control, like in the filament settings. Which then is used to generate the G code.

any way to highlight your changes – looks like there’s been some updates to the defaults since your post – so I’m having trouble telling what’s you and what’s bambu

https://text-compare.com. 25 charactersss

For that I’d need a copy of the gcode that was default at the time to compare against the gcode of the default now. Bambu has made changes to the gcode since then – specifically there’s some July changes.

So instead of trying to guess which changes were needed to get the Aux Fans to behave compared to what’s default now – I asked. Yes I did a diff on the gcode from now and the stuff that was posted.

here
Cube.3mf (26.7 KB)

I was hoping that was the current gcode for the x2d with the layer temp/fan stuff – that’s the defaults.

I wonder if what I’m seeing is because I updated to the beta Bambu Studio? Do you have gcode edits that are dated in July? I think I can identify what’s different between the gcode that was posted back in May & June in this thread, not that I really understand it :smiley: – I see the general gist of what FedX was proposing with is min temp/fan settings. I noticed that even with the gcode changes the aux fans ramp up while printing the PLA interfaces. From my last attempt, I did not notice any warping or pulling away from the PLA like I had previously, there’s still problems that I’m not sure what can be done about it. For instance, while printing the model walls ontop of the PLA interface the speed was really slow allowing good placement and adhesion in those areas – I’m guessing this is controlled through the Interface Speed setting. However, if more supports were printed ontop of of the PLA, which for this model it wanted – that PETG printed at full speed and didn’t stick to the PLA, but only on the left side. Thinking back, almost all my problems are on the left side. I do have 45deg deflector on both sides.

I also noticed that filament color seems to be a factor too…I don’t have nearly as many problems printing Black PETG with the different PLA’s I’ve tried. But this BBL Gray PETG on the other hand is very picky.

I have a feeling you are looking in the wrong palce, Check user presets.
Here are exported printer presets: Download PrinterPresets.zip | LimeWire

I ended up using heating mode (chamber temp set at 40C) on the PETG profile, which disables the aux fans. Unfortunately it caused the PLA to swole and clog the aux nozzle, so my final solution was to use the main nozzle also for the PLA (from the AMS), which forces the PLA to fully retract after being used. That fixed all my issues but of course increased the print time and it’s a shame that I’m not using the aux nozzle of the X2D. Maybe with Bambu’s Support for PLA/PETG filament it could work? Not willing to expend the money for that right now, but maybe it will not swole as bad.

Most probably it will have no such issues as even the recommended drying temp for PETG/PLA support filament is 70C which is higher then the usual PETG temp, let alone the PLA drying temp.

I am wondering in cooling mode if you open the box from every side what is going to happen, does it kick the super mega cooling again?

That’s a great piece of info about the Support for PLA/PETG filament. I could not find anything about the softening temperature of it, and in its default filament settings on Bambu Studio it is set to 45C (same as PLA Basic), but maybe the drying temperature indicates that it’s probably more heat resistant…

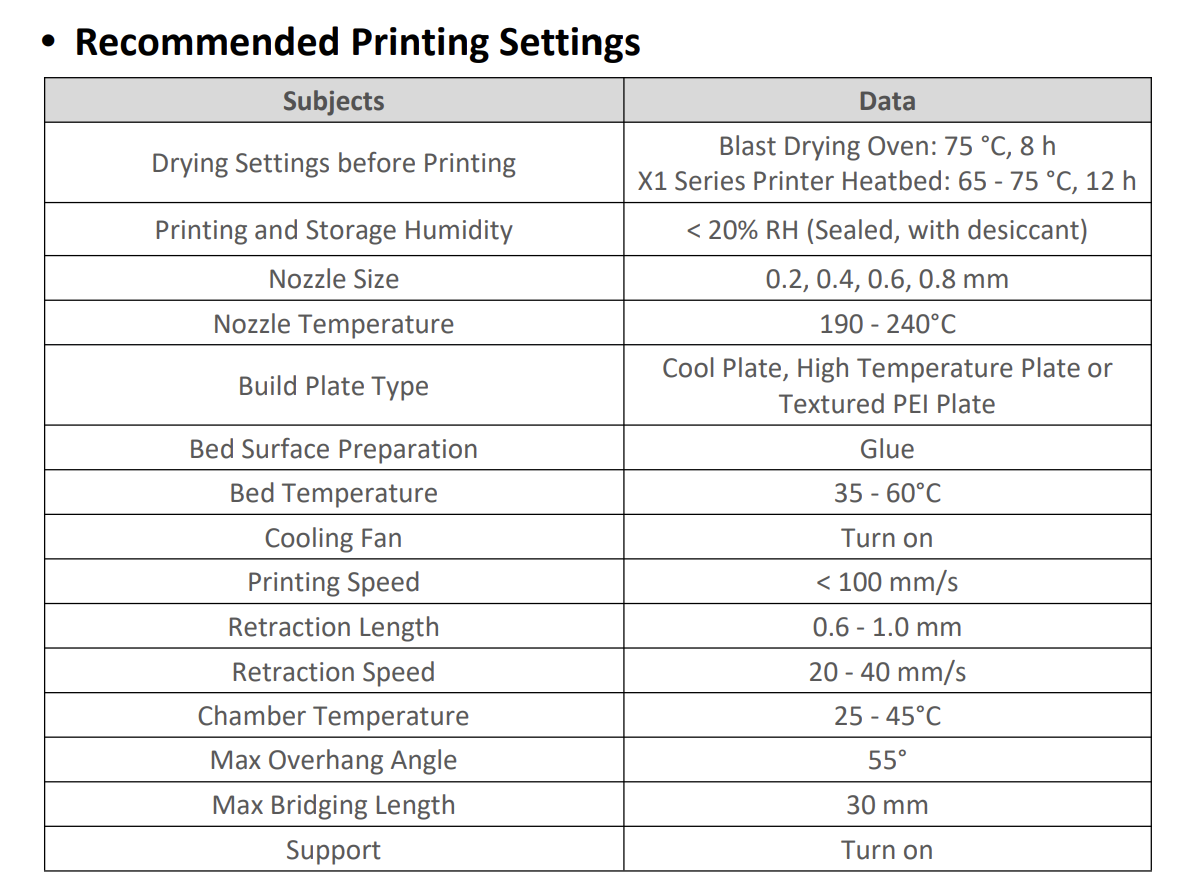
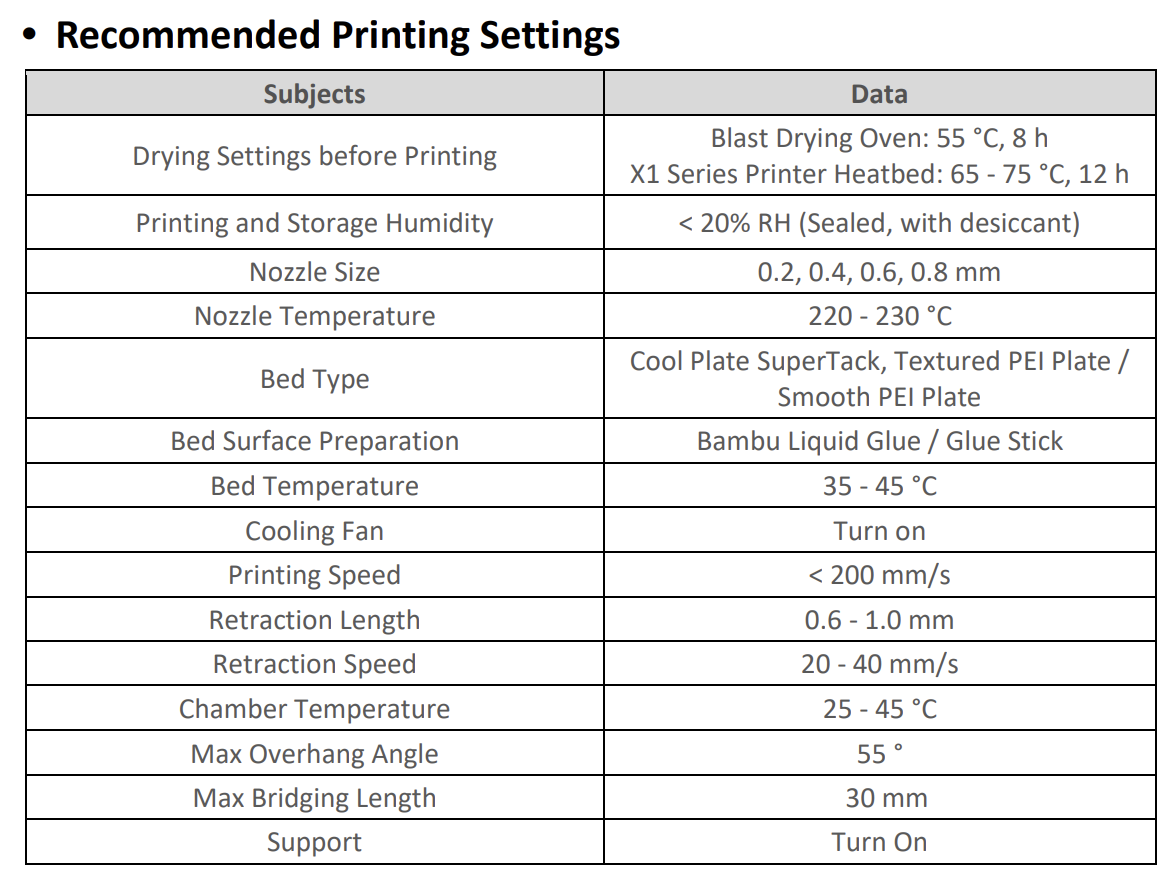
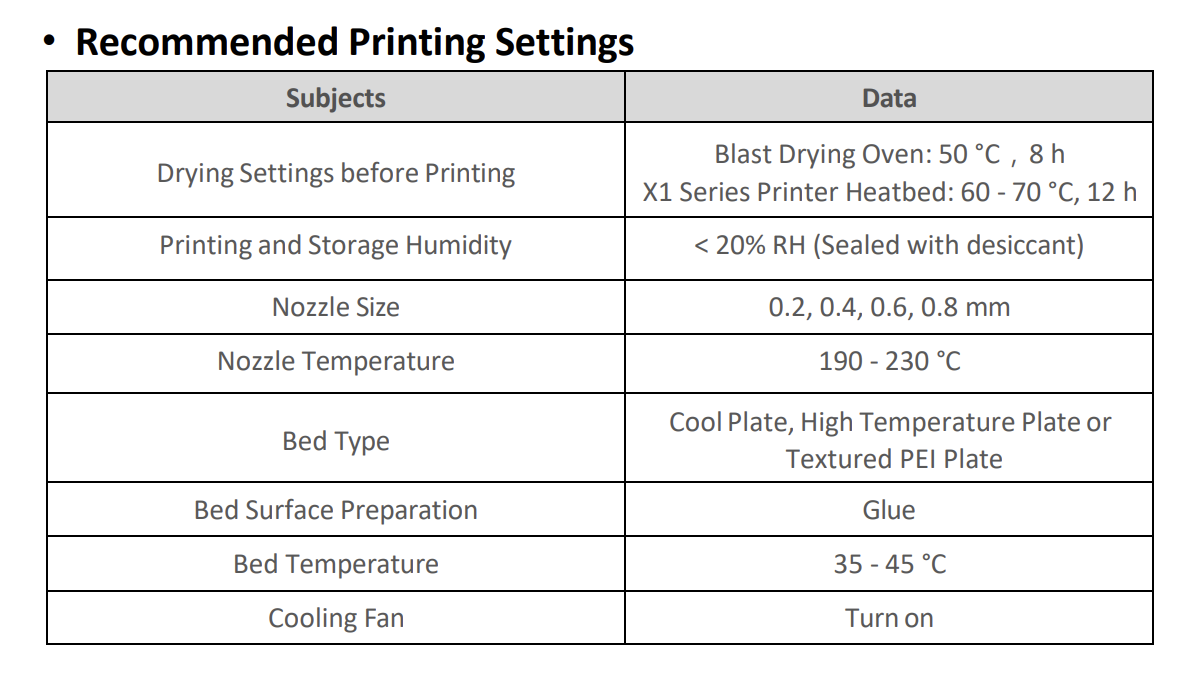
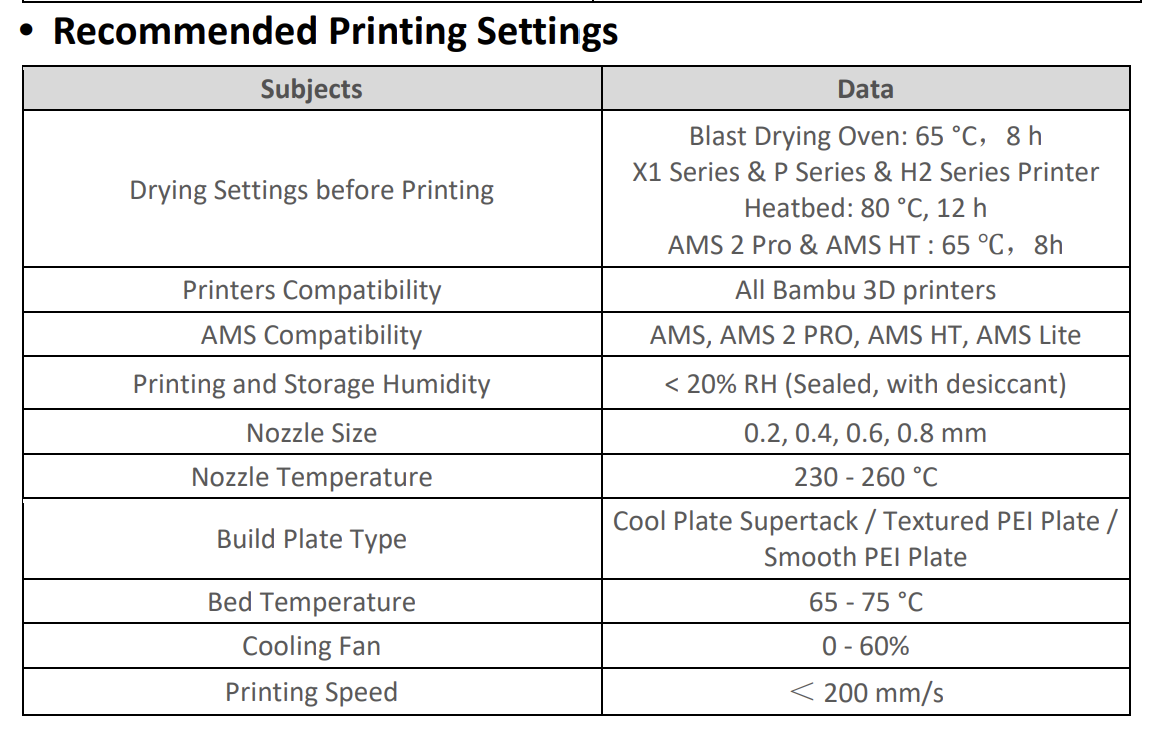
I can not see HDT either but drying temps are high:

Support for both PLA and PETG filament:

For comparison support for PLA only:

PLA Basic filament:

PETG Basic filament:

So blast drying seems to be highest on the combined support for PLA and PETG. And nozzle is up to 240. As far as I know this is a kind of composite material around PETG.

So I’m having similar issues, but not related to PLA/PETG, but to PA12 and PC printing which warps a lot.
I did have an P1S earlier which printed perfectly fine. Heatbed preheating, Darkmoon Satin plate and go. No problems or warping.

No with the X2D the massive amount of fans, even though combined with a chamber heating leads to massive warping.
Blowing 60 °C hot air over my print is worse than just not blowing any air over it, while the temperature right above the heatbed is probably higher than 60 °C.

So I’d like to disable ALL fans on my X2D except the part fan. I already changed the settings of airduct mode and min_vitrification_temperature section, but nothing helped. It still blows at 100 %. What am I doing wrong?

I want:
Aux left and right: off
Chamber fan: off
Chamber heating: ONLY at the beginning until temperature is reached, then turn off.

PETG on PLA support interface — measured root cause + working fix (X2D)

Same problem as others here: PETG object on a PLA support interface, the PETG lifts off the interface. Slicer fan settings seemed to do nothing — AUX ramped to ~90-100% no matter what. I spent a day measuring instead of guessing (MQTT sniffing on the printer, counting the actual G-code). Here is what is actually going on, and what fixed it.

Why your AUX slider does nothing

The filament profile’s aux fan value only survives until the first M142. The X2D machine profile re-arms chamber autocooling on every filament change:

M142 P1 R40 S45 U{max_additional_fan/100.0} V0.5 O50

With 72 tool changes in my file, that line appears 66 times in the sliced G-code. After each one the printer regulates the AUX itself — your M106 P2 from a layer-change custom G-code gets overridden at the next tool change. I verified live over MQTT that manual values do hold between tool changes, and get re-armed at each one.

Two profile values feed that line:

  1. U = your “Auxiliary fan → ramp up to” value, taken as the maximum across all filaments. Mine was 100% → U1 → autocooling may go to full.
  2. Which R/S branch you get depends on min_vitrification_temperature — the lowest softening temp of any filament in the print. PLA (45) ≤ 50 → the whole print runs the aggressive PLA cooling branch (R30 S40). 4 g of PLA interface forces 180 g of PETG into PLA cooling.

Fix (all in profiles, no machine G-code edits needed)

  1. Copy your interface PLA profile, set Softening temperature 45 → 51. The print then gets the PETG branch (R40 S45 V0.5 for third-party PETG) — autocooling starts at 40 °C chamber instead of 30.
  2. Set “ramp up to” on BOTH filaments to your ceiling (I use 50-70%). This becomes U and caps the autocooling.
  3. PETG profile: Fan speed for overhangs 90 → 20. The bridge layer over the interface counts as ~100% overhang, so it was getting the full overhang fan. (Note: it floors at your normal “Fan speed min”, so set that too if you want below 40%.)
  4. Bridge flow 1.0 → 1.15. I measured the extrusion cross-section per feature in the G-code: the bridge layer over the interface was getting less material per mm (0.0726 mm²) than an inner wall (0.0782). PETG cannot bond to PLA chemically — the only grip is mechanical squish into the interface lines, and the leanest extrusion on the whole layer was exactly there. 1.15 brings it to 0.0835.
  5. Optional, per-change fan control that actually survives: append to the filament change G-code (after the M142 block):
{if (filament_type[current_filament_id] == "PLA") && (filament_type[next_filament_id] == "PETG")}
M106 P2 S128
M106 P10 S128
{endif}
{if (filament_type[next_filament_id] == "PLA")}
M106 P2 S{additional_cooling_fan_speed[next_filament_id]*255.0/100.0}
M106 P10 S{additional_cooling_fan_speed[next_filament_id]*255.0/100.0}
{endif}

This throttles the AUX exactly when PETG starts printing onto the PLA interface and restores it when PLA prints again. Placed after the M142 it does not get overridden until the next change — where it runs again.

For reference: M106 P2 = left AUX, M106 P10 = right AUX, M106 P3 = chamber/exhaust — confirmed live against the airduct state the printer reports over MQTT.

Result: first print where the PETG stays put on the interface and the walls above it come out clean. Previously failed at the same layer every time with stock cooling.

Hey Sebo, quick question on this since I am planning to use the machine preset for a larger print where I have these warping issues in the interface layer: This means my filament settings for the aux fans will be ignored and I can just change the aux fan on the X2D manually after the print starts and it will stay like that for the duration of the print? Are your presets a good starting point for PETG with PLA interfaces or do you adjust with each print? And another question: do you by any chance have a similar profile for other filament combinations? Specifically PET-CF with ASA interfaces?
Thanks for the great help, this thread was really valuable to undestand my encountered issues.