I wouldn’t use support in those horizontal holes. They won’t be fun trying to clean out support in that length of a hole. I would suggest printing them as is and then running a drill or better yet a reamer down them to clean they up post print.
Here is a video about using modifiers in Bambu Studio that is a very similar use case to what you are printing and wanting to achieve.
that is bad, slow than man first Temp, K(Advanced pressure/ Dynamic Flow calibration) and Flow calibration and make sure drying ASAThis is a must
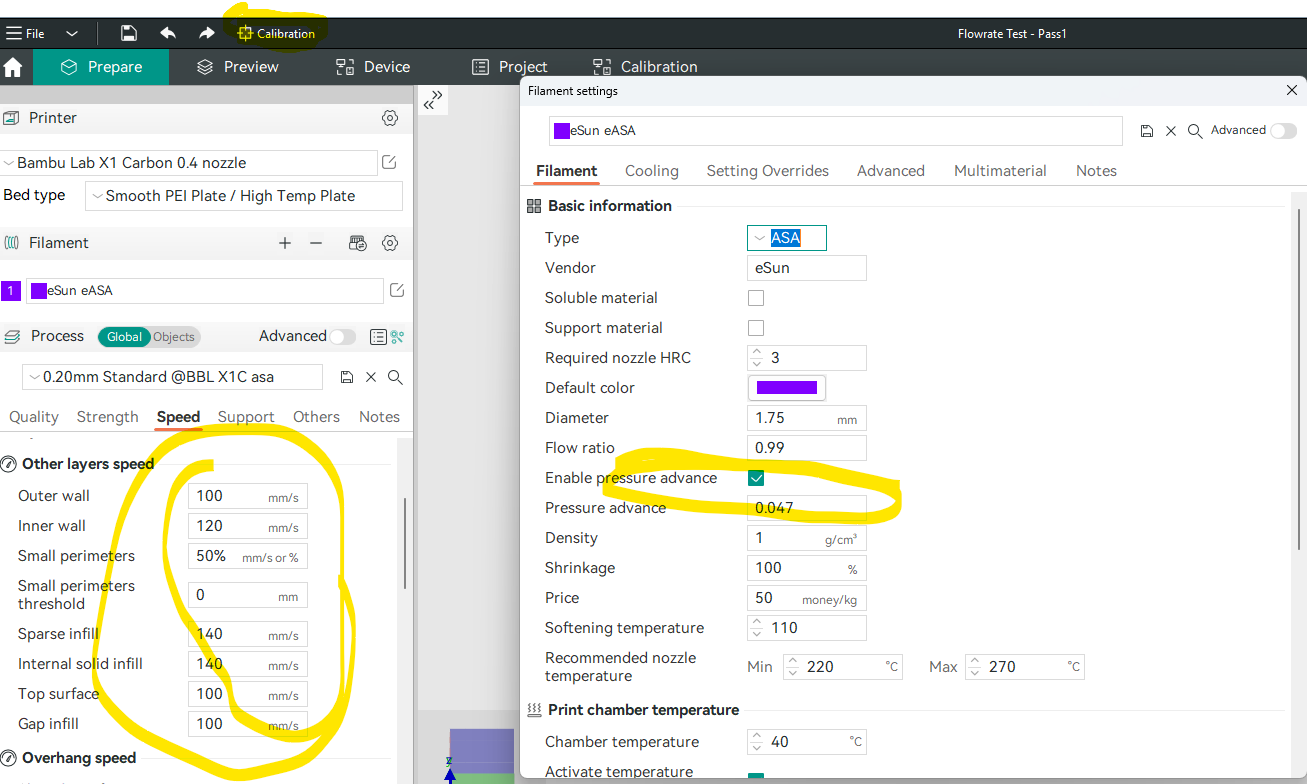
ah and speed bellow 150mm/S everywhere
Talking about the actual surfaces and calibrations
All of the above changes and tries will not drastically improve until you do the above
Set the Temp to Max of the Filament type or 5-10C bellow max , i am using 255C and very often go above max for ABS
Bed Temp at 110C this is my max , but US models have 120C
then suggest you to follow the following
do Flow first Pass 1/ Pass 2 - kinda you can skip Pass 1 if you have an idea where you are , usually i do only Pass 2 for ASA setting it to 1 , result usually is around 0.94-0.99
do K
Repeat Flo Pass 2 again with a bit higher value from the first result for ASA thsi fine tunes it
if change the Print temp you need to do it again but depending on the barnd and type around 5C-10C does not change enough to affect the print , in this case i do not bother too much with K unless changing temp a lot and do not do the fine flow repeat
you can try Orca Slicer instead of bambu slicer and K and FLOW are relatively easy to tune and straight forward with Orca slicer
Tutorial
note that both bambu Slicer and Orca slicer has a nice new Auto Flow calibration which is very accurate and i kinda like it lately better than the normal manual from Orca slicer but is a good exercise to go through the manual ones . The Auto K calibration is still not good enough of the Bambu slicer
For K Calibrations and printing after that this must be off:
Only for some Prints with warping usually big prints , now i use it with everything
high chamber temperature 50C+ usually close to 60 , achieved with Bed Temp 110C and initially i was covering the printer with a blanket for some real big ASA/ABS Prints, but since @NeverDie or some one else suggested cheap method to cover it instead of Active heating i just glued 5mm insulation material on top and sides externally with out the door and now no problem with Warping and getting around 60C , with out the blanket hassle
For all the prints initial heat up, Before send the print job:
move the bed high almost touching the nozzle
turn on the bed to 110C
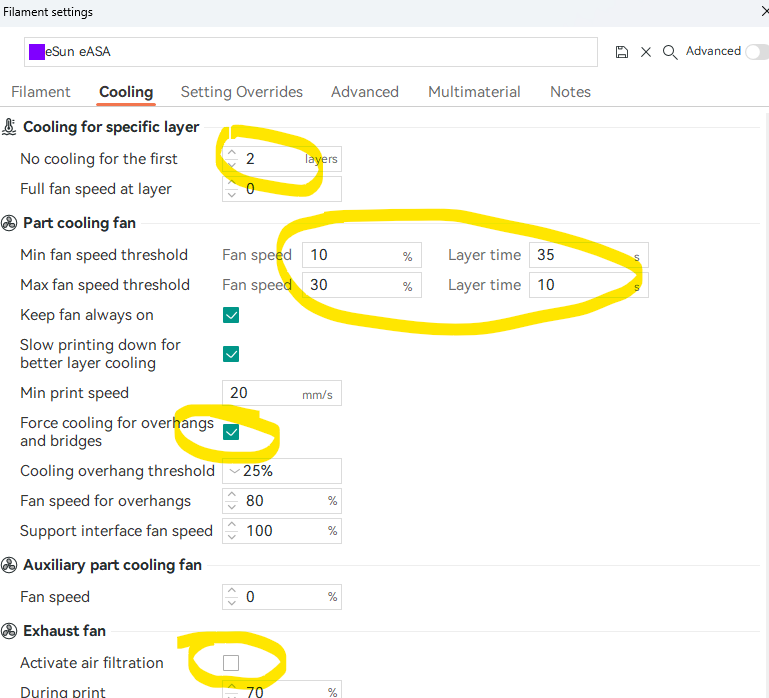
Turn on the Part fan - i am doing it to around 70% as it is getting old and a bit noisy at 100
wait at least 5 - 10 minutes the chamber temp will reach 50C even with out any insulation or close
send the print job it will reset the above any way
do not open the door or use AUX fan until the Chamber and plate are very close to room temp - long time - i have seen some slightly bigger parts how warp in front of my eyes after been impassioned or forget that using ASA /ABS
ok done a lot of printing using the info from here and I have done all of the calibration and flo testing and understand that better. and I have increase my temp from 260 to 275 and wow, has seemed to solved the problem of the bad surface problems I was having. I really appreaciate everyone’s imput on this. It has been a big help.
It’s a small nit, but the 20mm/s “Min print speed” can and will override the “Layer time 10” on small parts, whereas probably what you really want is for the “Layer time 10” to dominate. I don’t see that “min print speed” has ever been helpful to me, so I reduced that field to 1mm/s (effectively disabling it) so that it won’t interfere with the “Layer time 10” setting.
One note regarding the Pressure Advance (Factor K). In both Bambu Studio and Orca you can go to the Calibration tab, then Flow Dynamics. Click Manage Results and you can add or edit Factor K values on the printer
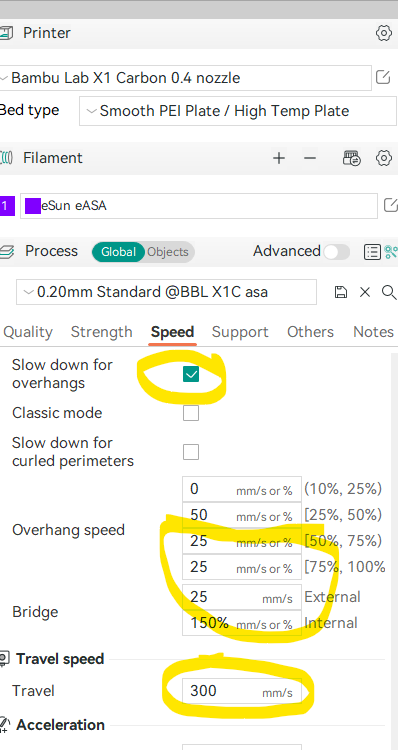
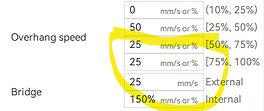
@neverDie thanks for pointing , for the other people would be good to know. for some reason if i print eSUN eASA bellow 20mm/S on overhangs does not get a good result . Not sure why, but i discovered that when was tunning the overhangs as you will see there it is 25mm/S as that is the speed for me with best result. And in saying that have not tested specially for small perimeter flat probably does not matter so much. and after a few nights and tests of 5mm to 50mm on each angle, stack with 25mm/S and for this one just reverted to defaults
Also the bridge speed not tuned to perfection , but as it is ok ( and tired from too many tests ) , if you or some one has different bridge speed would like to know about it @all if some one is using for ASA overhangs different speeds and cooling profiles - from defaults and mine , please publish
EDIT: @SimEyeSee i prefer the old method in each filament file . As clean clear and is filament specific and some times i have for the same material 2 or 3 files for testing or some strange scenarios. Personally the way Bambu decided to do the PA(K) storage is wrong , but that is my personal opinion
If it differs from one filament to the next, seems as though overhang speeds should be part of the filament profile, then, doesn’t it? As is, I guess one has to have a separate process profile for every filament? Then I think, “Well, surely that can’t be right…” But if not that, then what?
A bit off topic @NeverDie Agree as i have printing settings for ASA /ABS( fast /slow) the separate PETG separate and PLA separate and for TPU i have machine and printing and filament profiles separate. but no so many variations on filament level in terms of PETG to PETG color/type . I think the BAMBU/Orca Slicer is well organized apart from the PA-K(bambu only) , But if they had hierarchical Override on each level would be best , the same as what is for the Retraction Overrides but for everything or almost everything . But the current layout is not bad . Also one great feature would be instantiations on a basic filament type Like ASA->eSUN ASA->White eSUN ASA , and be visible what overwritten different only. and changing the basic to be applied to overwritten settings down the tree .
But this may become too difficult for Entry level users