I can get any filament to load. This particular error is displayed. I have opened the extruder, there is no filament stuck , the machine is clear everywhere but this error persists - I’ve tried a factory reset.
I’ve opened a ticket but as you know that’s a slow process

2 Likes
Hi. Did you ever figure this out? I am having the same issues and it is driving me nuts.
Not quite . I have a ticket open .they told me try the external spool as opposed to AMS. That works so need to see what the next steps are. I’m at least up and running
Unfortunately I have sometimes the same issue ![]() because of filament break inside the filament hub and the sensor detects it or the break part is stuck between the extruder and the hotend.
because of filament break inside the filament hub and the sensor detects it or the break part is stuck between the extruder and the hotend.
My only solution to resolve this is to carefully remove the hub without damaging the electronic cable and sometime unmount also the hub sensor. But it should not be the solution especially when it happening after the print started.
It already happened to me a couple of time ![]()
1 Like
I was able to fix the problem and I’ll describe how, briefly.
The problem was the filament was jammed in the filament hub.
Solution.
- Remove the tube from the filament hub.
2, Change to maintenance mode
3、Press the extruder’s extrusion button while pushing the filament from the filament hub by hand
4、When the jammed filament comes out, remove it.
I’ve taken a lot of things apart, but you don’t have to do that to solve this problem.
I think this problem occurs when using filament that is prone to breakage
Hope this helps someone!
6 Likes
Where is the “extrusion button” ?
Hello you have to do open the middle part of the hub and take out the dust
This worked for me – looks like I had a piece of filament stuck in the hub. I pulled a couple feet off a spool, disconnected all the PTFE tubes, then manually extruded (and physically pushed) filament into each PTFE connector, just to be safe.
I had this problem, but it was showing other error messages. I didn’t use the A1 Mini printer for four days, and it always showed an error when I started printing. I disassembled the entire hot end and found no filament stuck. Until I watched the video below, I understood that the filament sensor was indicating that something was stuck, but it was empty.
The sensor on the base has a magnetic lock that activates when the filament enters, so I disassembled it, opened the fitting a little more, lubricated it and made sure it was working. It worked!
Here in Brazil I need to import it and it costs a lot and takes time to arrive. That’s why I got it.
Solution:
Youtube: Search I FIXED My Bambu Lab A1 Mini!
Replace the filament base sensor where the magnetic lock is located
1 Like
I am having the same problem but I can’t seem to find your video that you say is below. Sorry I am missing it but can you post the link here?
Here is the video. This was the problem with my A1. There was a piece of filament stuck below the part the 4 tube attach to. At 3:30 in the video, remove this part, and look down in the hole. I could see the filament in there and used another piece of filament to push on it while I rotated the extruder wheel by hand. The short piece came out of the bottom and I reassembled everything. The nozzle needs to be removed to do this, just like in the video.
Hope this helps.
So I see I cannot post links. Search for this on YouTube rmBp0hgwZHg
I was looking for this for days… Finally! Thank you!
I’ve been having this same error as well. I do think it was originally a nozzle clog, but I was able to clear that with the cold pull method (yank the filament out while the nozzle is still around 100C). I then took apart the whole extruder, did find a small broken piece of filament below the extruder gear, and cleaned some debris out of the extruder gear teeth.
However after reassembling, I’m having the same error. Loading filament without AMS works fine - it’s pulled in and easily flows through the nozzle. But the unloading step fails, the printer seems to fail to detect that the filament has been removed from the extruder. I’ve double checked that the hub is clear by inserting filament from the bottom, and I’ve even tried this with the hub not installed.
Any suggestions? Does anyone know how the filament sensor itself works? I know the hub has a magnet that’s used detect high friction in the feed tube, but I don’t know if there’s an additional filament presence sensor, and knowing how that works might help troubleshoot.
1 Like
I have exact same issue day one with device . Working with bambu but will be days since New year , i may just try to exhange wirh store bought from.
I actually have a solution to this, I’ve been meaning to upload a YouTube video, let me see what I can get done in the next ~30 min.
But TL;DR take apart the entire filament buffer including unscrewing the filament sensor as if you’re going to replace it. A tiny lever that is pushed aside when there’s filament present may have gotten stuck out of place.
Hey everyone,
I recently ran into an issue with my A1 where the AMS wasn’t detecting filament correctly—and I managed to find the cause, so I’m sharing in case it helps someone else.
As eecharlie mentioned , the problem turned out to be the lever mechanism, but more precisely, it was the tiny magnet attached to the lever arm.
Here’s what’s going on:
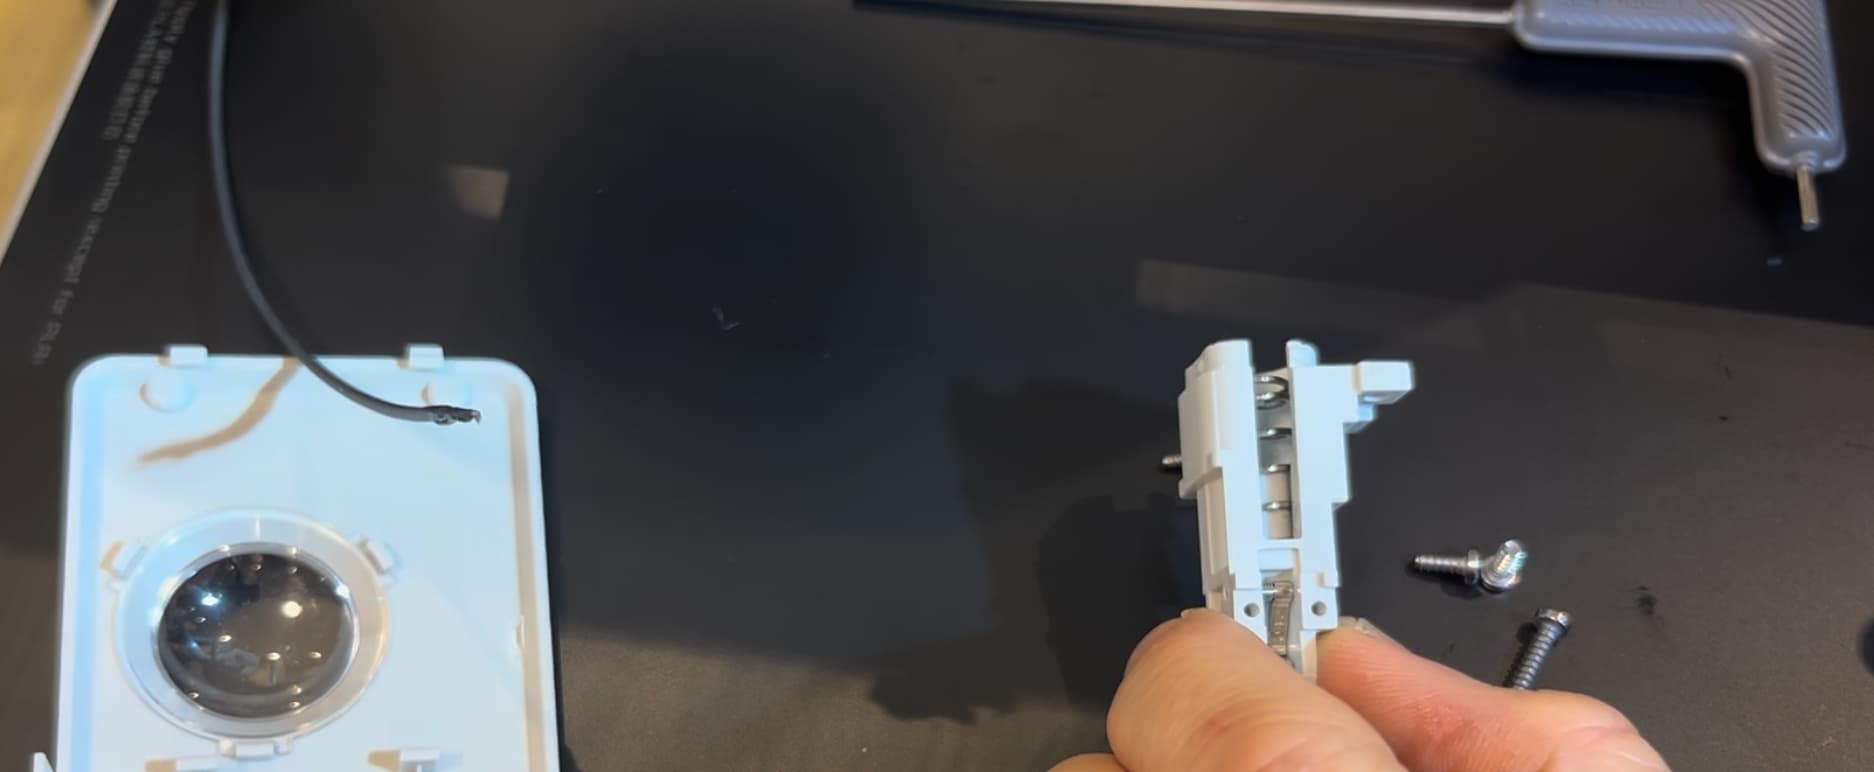
There’s a Hall sensor on the small board (see attached image), and it reacts to a magnet embedded in the lever. When filament is inserted, the lever moves and brings the magnet closer to the sensor, which then registers filament presence.
In my case, the magnet had come loose from its slot on the lever. It was still inside the AMS and sticking to the lever, but not positioned correctly, so the sensor wasn’t being triggered.
Here’s what I did:
-
Sanity check: I used a small spare magnet to test whether the sensor was working. You can check this by going into the Control icon on the printer and looking at the green dot on the extruder icon. That indicator will change when the sensor is triggered.
-
Repaired the magnet placement:
To fix the magnet back in its proper place, I first removed the tiny spring from the interior wall where it’s latched. Then I carefully removed the pin holding both the lever arm and the magnet, took out the arm, and placed the spring somewhere safe—you do not want to lose this spring, as it’s likely impossible to replace.
Once the arm was out, I removed the magnet (it was just loosely sticking to the arm), then applied a bit of superglue activator to the magnet slot on the arm. Using tweezers, I dabbed a tiny amount of CA glue to the side of the magnet that still had glue residue, placed it back into its slot, and held it in position for a few minutes. After that, I reassembled everything and tested the Hall sensor again—before fully screwing everything back together.
And voilà—that fixed it for me!
It’s a bit fiddly because the magnet is really tiny, but totally doable.
Hope this helps someone down the line!
Here’s the full details on the problem that I had, which was different from the previous poster.
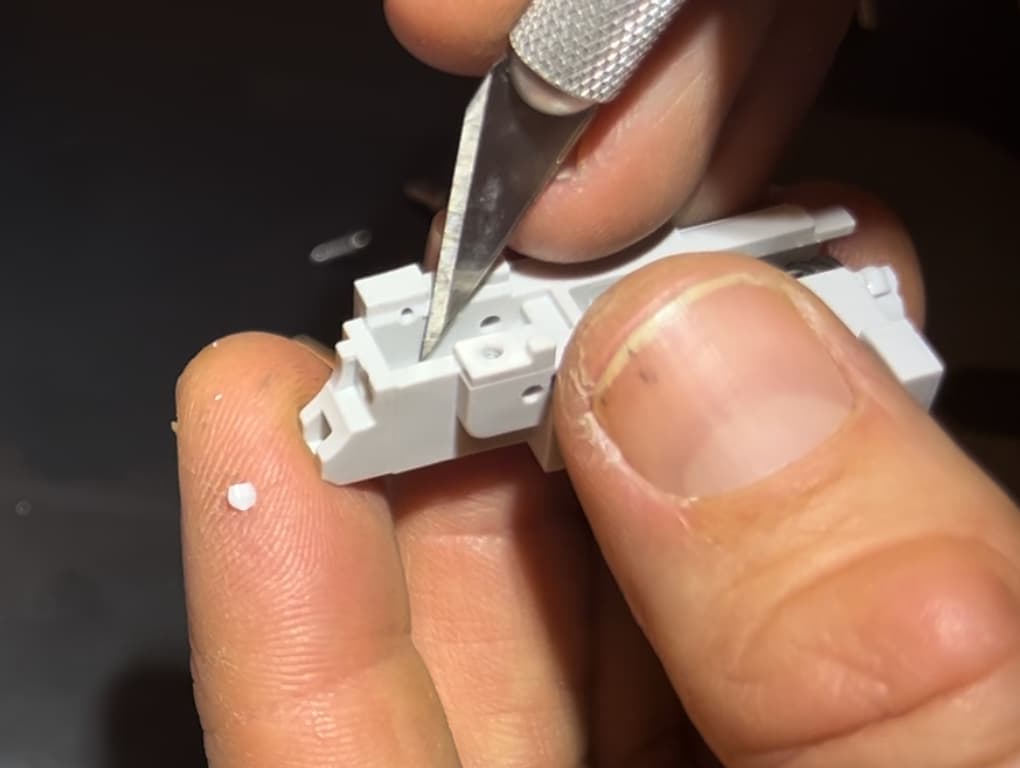
There’s a little lever the filament pushes off to the side as it enters the extruder head, and that lever acts as a switch to detect whether there is filament in the extruder or not. Due to the mechanical design, this lever can get hung up on a ledge and stuck in the deflected position, causing the printer to think there’s filament present when there’s not. You can temporarily solve this by taking it apart, and permanently solve this by shaving off a bit of plastic to eliminate the flat surface the lever can get hung up on. A warning that taking that part apart is delicate, and putting it back together is a PITA because you have tiny spring-loaded lubricated parts that need to be wrestled into place at the same time. Below are some photos showing the major steps - the 3rd is exactly where I shaved off some plastic to permanently fix the problem.

I have never had the problem again since doing this. However, I suspect that if you don’t do everything described above, but just firmly flick the spring-loaded manifold just below the Bowden tube connectors, in the X-axis direction (so towards the back of the printer if you’re looking head-on at the extruder), it will hopefully shake that lever loose so it can reset and stop falsely detecting filament present. If you look down into where the filament feeds, you should be able to see a shiny metal thing in the way of where the filament needs to go. If you don’t, it may still be stuck off to the side.
I made two YouTube videos, one shows a quick full assessment of the extruder head to diagnose potential filament pathway problems, and the second shows the full detail of the modification/fix that I made to keep this problem ever happening again.
Diagnose A1 Extruder problem
Fix A1 Extruder Filament Sensor Design Flaw