I have downoalded an object from MakerWorld in Bambu Lab.I want to change the color of a pre-painted object. If I select the object I can easily change the color of the object, but what i must do to change only the color of the painted part?
You can do this by just changing the filaments in the filament window.
If you have used auto-sync to select the colours of filament you have, you can swap these around in the slicer (so they don’t actually match you AMS) then when you hit print you can manually assign the correct filament to the right slot.
That is a poor solution, as people use filament in strange ways, like using two colors, A1 and A4. It would be much nicer if you could swap filament for paint color in the Bambu-studio.
You can do just that as @Dylan.evans explained. Change the colours of the filament in Studio. The location slot in Studio doesn’t need to match the location slot of the filament on the printer. This is matched when you send the print to the printer.
Welcome to the forum.
I know that. But what happens if you have different materials in the AMS? The material is considered in the slicing process, so you can not just change the location slot when you send it to the printer.
But you can?
I design objects that use multiple colors - typically 4 to 6 colors. In my design software I create multi-bodied objects, with each body individually assigned a color/filament. This is why I always use .3mf rather than .stp or .step files - to better encapsulate the entire assembly as a multi-bodied object rather than as a collection of objects.
In Bambu Studio, selecting the objects option shows the objects as assemblies with bodies, each of which is assigned a filament, among other settings. To change the color and/or filament for each element, one only need assign a different filament to the corresponding body. Assigning all bodies to the same filament has the same effect as if all the bodies had been merged into one. In my opinion, organizing colors by bodies is much more controllable and predictable than painting in Bambu Studio, and easier to alter. Even though it requires a few more steps in the design process, the benefits are worth it.
In my case, it was not so. In the model, white and black filament was used and it was in A1 and A4 in the studio, while A2 and A3 were occupied by filament not used in the model. I had black filament in A2 and I moved it to A4, but let A2 empty. After slicing it was assumed that A4 is external filament set to TPU. So I have only a choice of A1 white and TPU (nonexistent) when I want to send the file to printer. There was not an option to switch TPU with A4. So I had to fill the empty slot with random filament and slice it again. It would be much nicer to select painted colors in Bambu-studio and assign them to AMS slots.
Actually its a solution as far as you do not sync or resync the AMS info on prepare screen. If you do that then you have to find the colours again in order to much the original file. In some cases also you will loose paint information. So is there any way to real edit colour painting or support painting on a pre painted project?
Be aware that when you change colors in the send to printer window that the purge volumes do not change to reflect the new colors. You can end up with a lot of color bleed in your model. Change from a couple of similar colors to black and white, for example, will probable get you a black and grey print.
Yeah. This is great when I have a 4 slot AMS and the original file has filaments 1-10…
Try sending a msg to the designer if their 3mf has tons of extra unused config.
garbage in, garbage out
3mf file format lets all sorts of local config leak out if the person exporting it and uploading it chooses to
I could do that. But really, the correct answer here is to repaint! Unfortunatley…
It was awesome the way the designer put the necessary filaments in slots 7 and 8 which don’t exist for most users.
You said earlier the model has ten colours, do you mean they are shown on the top left or are they in the model and used to decorate the model?
Or does the model use less than colours, possibly just four?
If the later, you do not need to repaint anything.
There are two solutions and sync is nit one of them.
- Filament setup
- Work out what colours the model has and which colours you prefer to use
- Go to the device tab
- Select the printer you have from the drop down (even if you have one printer)
- Repeat the step above once more (important)
- Using the prepare tab filament chooser
- Select the first matching colour of the model from the chooser and select its drop down, change to the colour you want
- Do not look at the model as your colour choice may confuse you
- Repeat the two steps above until all colours are swapped, likely 4.
- Print dialog
- Do not care what anything says anywhere
- Slice the model
- Select print
- From the print dialog, select each thumbnail in turn and swap the existing colour you do not want for the one you do want from your AMS
- Repeat the step above for each swatch, likely 4.
If the model has more than 4 colours, you may select more than one from the model to match duplicates in the AMS.
EXAMPLE 1 - 4 colours in model
- Red > White
- Green > Blue
- Blue > Silver
- Yellow : Orange
EXAMPLE 2 - 7 colours in model (4 colour AMS)
- Red > White
- Orange > White
- Yellow > Red
- Green > Yellow
- Cyan > Red
- Blue > Yellow
- Purple > Green
Obviously, concertina model with more colours to one with less colours as you do not have enough AMS slots or you simply wish to use less will have a different outcome than using the original number.
Thanks for the reply, but I don’t think that works. When you change the model color you loose the painting information if the paint used higher number slot than you have available. i.e if the body was printed from slot 3 but then painted from slot 6. There is no way to put a new color into slot 6 when you have a 4 slot AMS.
Contrary to your example, what if the model has 2 colors but those colors (with the second color painted on) are slots 6 and 7?
You are confusing the project’s filaments and those in your AMS.
These are two different things and have no direct relationship.
If someone adds 20 filaments to the project filaments (to the filament chooser) and uses just the last 4, ANYONE with a SINGLE AMS can easily print these.
The project filaments are essentially “I have these here, I have used at least one, but YOU control what YOU use in YOUR AMS”.
A filament labelled 7 in the project’s filaments is not in any way linked to the 3rd slot of your second AMS.
I strongly suggest you read what I wrote and try it.
The second example will give you the easiest way to understand this as I took pains to explain in detail.
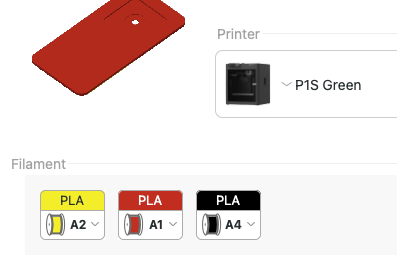
Look at these screenshots:
A perfect match, as I planned it as such.
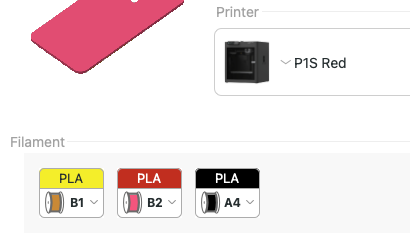
A close match as the swatches did a closest match equation.
The original screenshot with an expanded AMS window, letting me choose that the model RED could use any one of the colours form those I have available.*
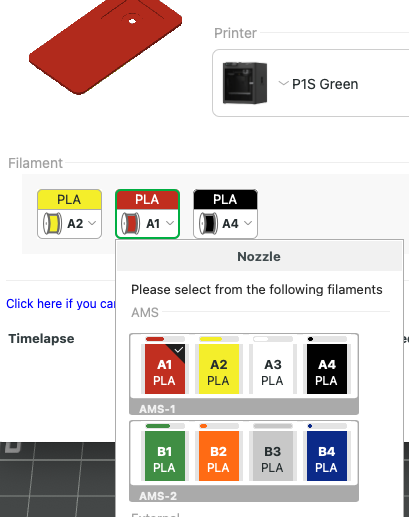
*If you have only four, the logic is identical, it just means you have four to choose from, but, again, YOU choose.
Everything I said works.
Nope.
The original model, with a palette of 8 colours in the project filaments.
You will note it is painted (the paint icon on the right of the model).

I am showing the available choices from the drop-down, as I wish to change the purple to orange.

I selected orange, which you can now see uses the slot purple previously had.

The model and slot now show orange, exactly as I said.
Now, when I go to print, the orange is selected; this is the way my first example explained, again, in great detail.

But, yet again, I can use my second example in this mix.
I have changed my mind just before I print and decide the orange I ONLY just chose, needs to be red.
I use the orange thumbnail and tell it to use the red from the AMS.

As you can see, the orange from the model is now red from the AMS, and the preview shows the frog as red.
We have gone from Purple to Orange to Red, all without repainting anything.
Both of the very detailed methods I explained were used just now, and both were used in the final set of screenshots.
EXACTLY as I said.
Actually, try what I said rather than assuming my help was pointless.
Explore the software you have.
Thank you for the detail. For the US audience, what is a “concertina model?” I see what you are trying to show here and I have learned something from this. I did not even realize you could change filament from the print dialog box! I apologize if I underestimated your knowledge on this subject. You do see a lot of unhelpful suggestions sometimes. I wish Bambu had made the filament mapping more obvious. I know a lot of people are confused by this.
Why did you use a different symbol for Yellow: Orange? Is that a different operation or a typo?
- Red > White
- Green > Blue
- Blue > Silver
- Yellow : Orange
A typo.
I wrote that on my iPad and my eyesight is shot, and I have tremors.
Obviously, converting a model with more colours to one with less colours as you do not have enough AMS slots or you simply wish to use less will have a different outcome than using the original number.
That was a basic typo, the characters are in the same key.
This wasn’t me being flippant.
I learned every software package I ever used by trying everything, clicking everything even if it didn’t look like it should be clicked.
I used test files, I wasn’t stupid.
Understood.
I still don’t fully understand this even after playing around with the app. It looks like there are at least 3 ways to change the filament that gets printed. Redundancy of function generally creates unnecessary complexity (and clearly confusion in my case) although there may be more opaque reasons for this being the available.
Changing the filaments from the Process box>Objects in the Prepare tab, does not work correctly. I was able to get it to work as in your first example.
Just follow the two ways I detailed with a suitable test model.
Do that a few times with a few different test models.
Get used to it.
Remember that painting a model, or selecting the colour of distinct parts, is you choosing what you want the model to look like.
This does not mean this is how it MUST look.
In my frog example, it went through three different colours, nothing broke, and three different choices.
When you go to print, you can still change your mind.
It might be best to think of it differently, as I suspect you are not designing your own multiple colour models right now.
The designer chose what they wanted when making the model. You choose based on what filaments you have available.
These two things could be the same, slightly different, or very different.
I hope you have learned that there is no forced link between the project filaments, which are simply a palette of choices for what you have loaded in the AMS.