This exactly. For those who know, understand, and accept the risks, go get on with your bad selves. There are a lot of people here who are young, use these in home settings, possibly children/pets around, and don’t have industrial/laboratory experience and may not be aware of the differences, dangers, issues, or whatever.
That’s who I’m trying to help with this stuff.
Anyone who knows the hazards and accepts the risks, happy printing.
Thanks, @TheGenerals, that was exactly the case. Cheers!
Desiccant beads with cobalt present a possible health hazard because you might breathe or ingest microscopic cobalt dust particles, which can be created by damaged beads. The heat does not present a problem; a domestic oven cannot reach cobalt’s vaporization temperature.
I wear a dust mask while handling loose desiccant, and place the beads in heat-resistant nylon containers. These can be recharged without emptying. I do not use the convection feature of our oven to prevent blowing dust around, and wipe it down with damp paper towels after a drying session. Wash up after handling desiccant.
and it makes drying in just two hours incredibly easy and convenient. In theory we should be able to print our own columns that leverage the same dryer, but as yet I haven’t seen any such models posted to makerworld, printables, or the like.
Some of mine do, Robert. For example, my hub mounted desiccant holders have a screw on top, while others have a hole a round Hydrometer snaps into. Others, like in my AMS have a slide out panel to access the desiccant chamber. All of which I printed on my printer, BTW.
While others I seen folks using, like the Damp Rid units are self-contained and disposable. I prefer to use desiccant beads because I’m familiar with them.
There are lots of different ways to handle recharging desiccant beads, and the method you choose would depend on 1) your specific situation, and 2) the equipment you have available. Outside of an Industrial setting, no one method is the “best” and each is going to have pros and cons.
All methods work fine as long as you spend just a little bit of time considering how each method works for your specific situation. There are a multitude of solutions available from the community.
For example, as someone with a PhD in a medical science that has over 20 years of experience handling Biohazardous material, I have chosen to use a filament dryer as my “oven”, rather than a microwave.
I did some testing in a low temperature filament dryer that had a max temperature of 65C, and found that if I put ~130g of wet desiccant into a sachet, and heated it at 65C, I could eliminate most of the water content in 4-6 hours. Obviously, thats way longer than I would have liked. However, I wanted to start printing some filament types that required higher drying temperatures, and purchased an AMS HT, which can go to 85C.
Once I had that, I found that I was able to print a spool-shaped desiccant holder (Henryk’s excellent model: Silica Dryer Spool for AMS 2 Pro / AMS HT - Free 3D Print Model - MakerWorld ) using ASA filament (which is heat tolerant to at least 90C, higher than what the HT is capable of) and could dry nearly a kg of desiccant at 85C overnight. Added benefit that there is very little moisture in the AMS HT once drying is complete, so you can let the desiccant cool in place without risk of it re-adsorbing moisture from the air.
This system lets me 1) use equipment I already purchased for 3d Printing, 2) dry my desiccant in large batches overnight “hands off”, so I’m not constantly drying small amounts here and there.
If I’m thinking about this right, you can, more or less, rely on the color change to tell you when the desiccant is dry, for the same reason the same color indicator is deceptively late in telling you when it should be recharged. Maybe not bone dry, but probably close enough for what most people are using it for.
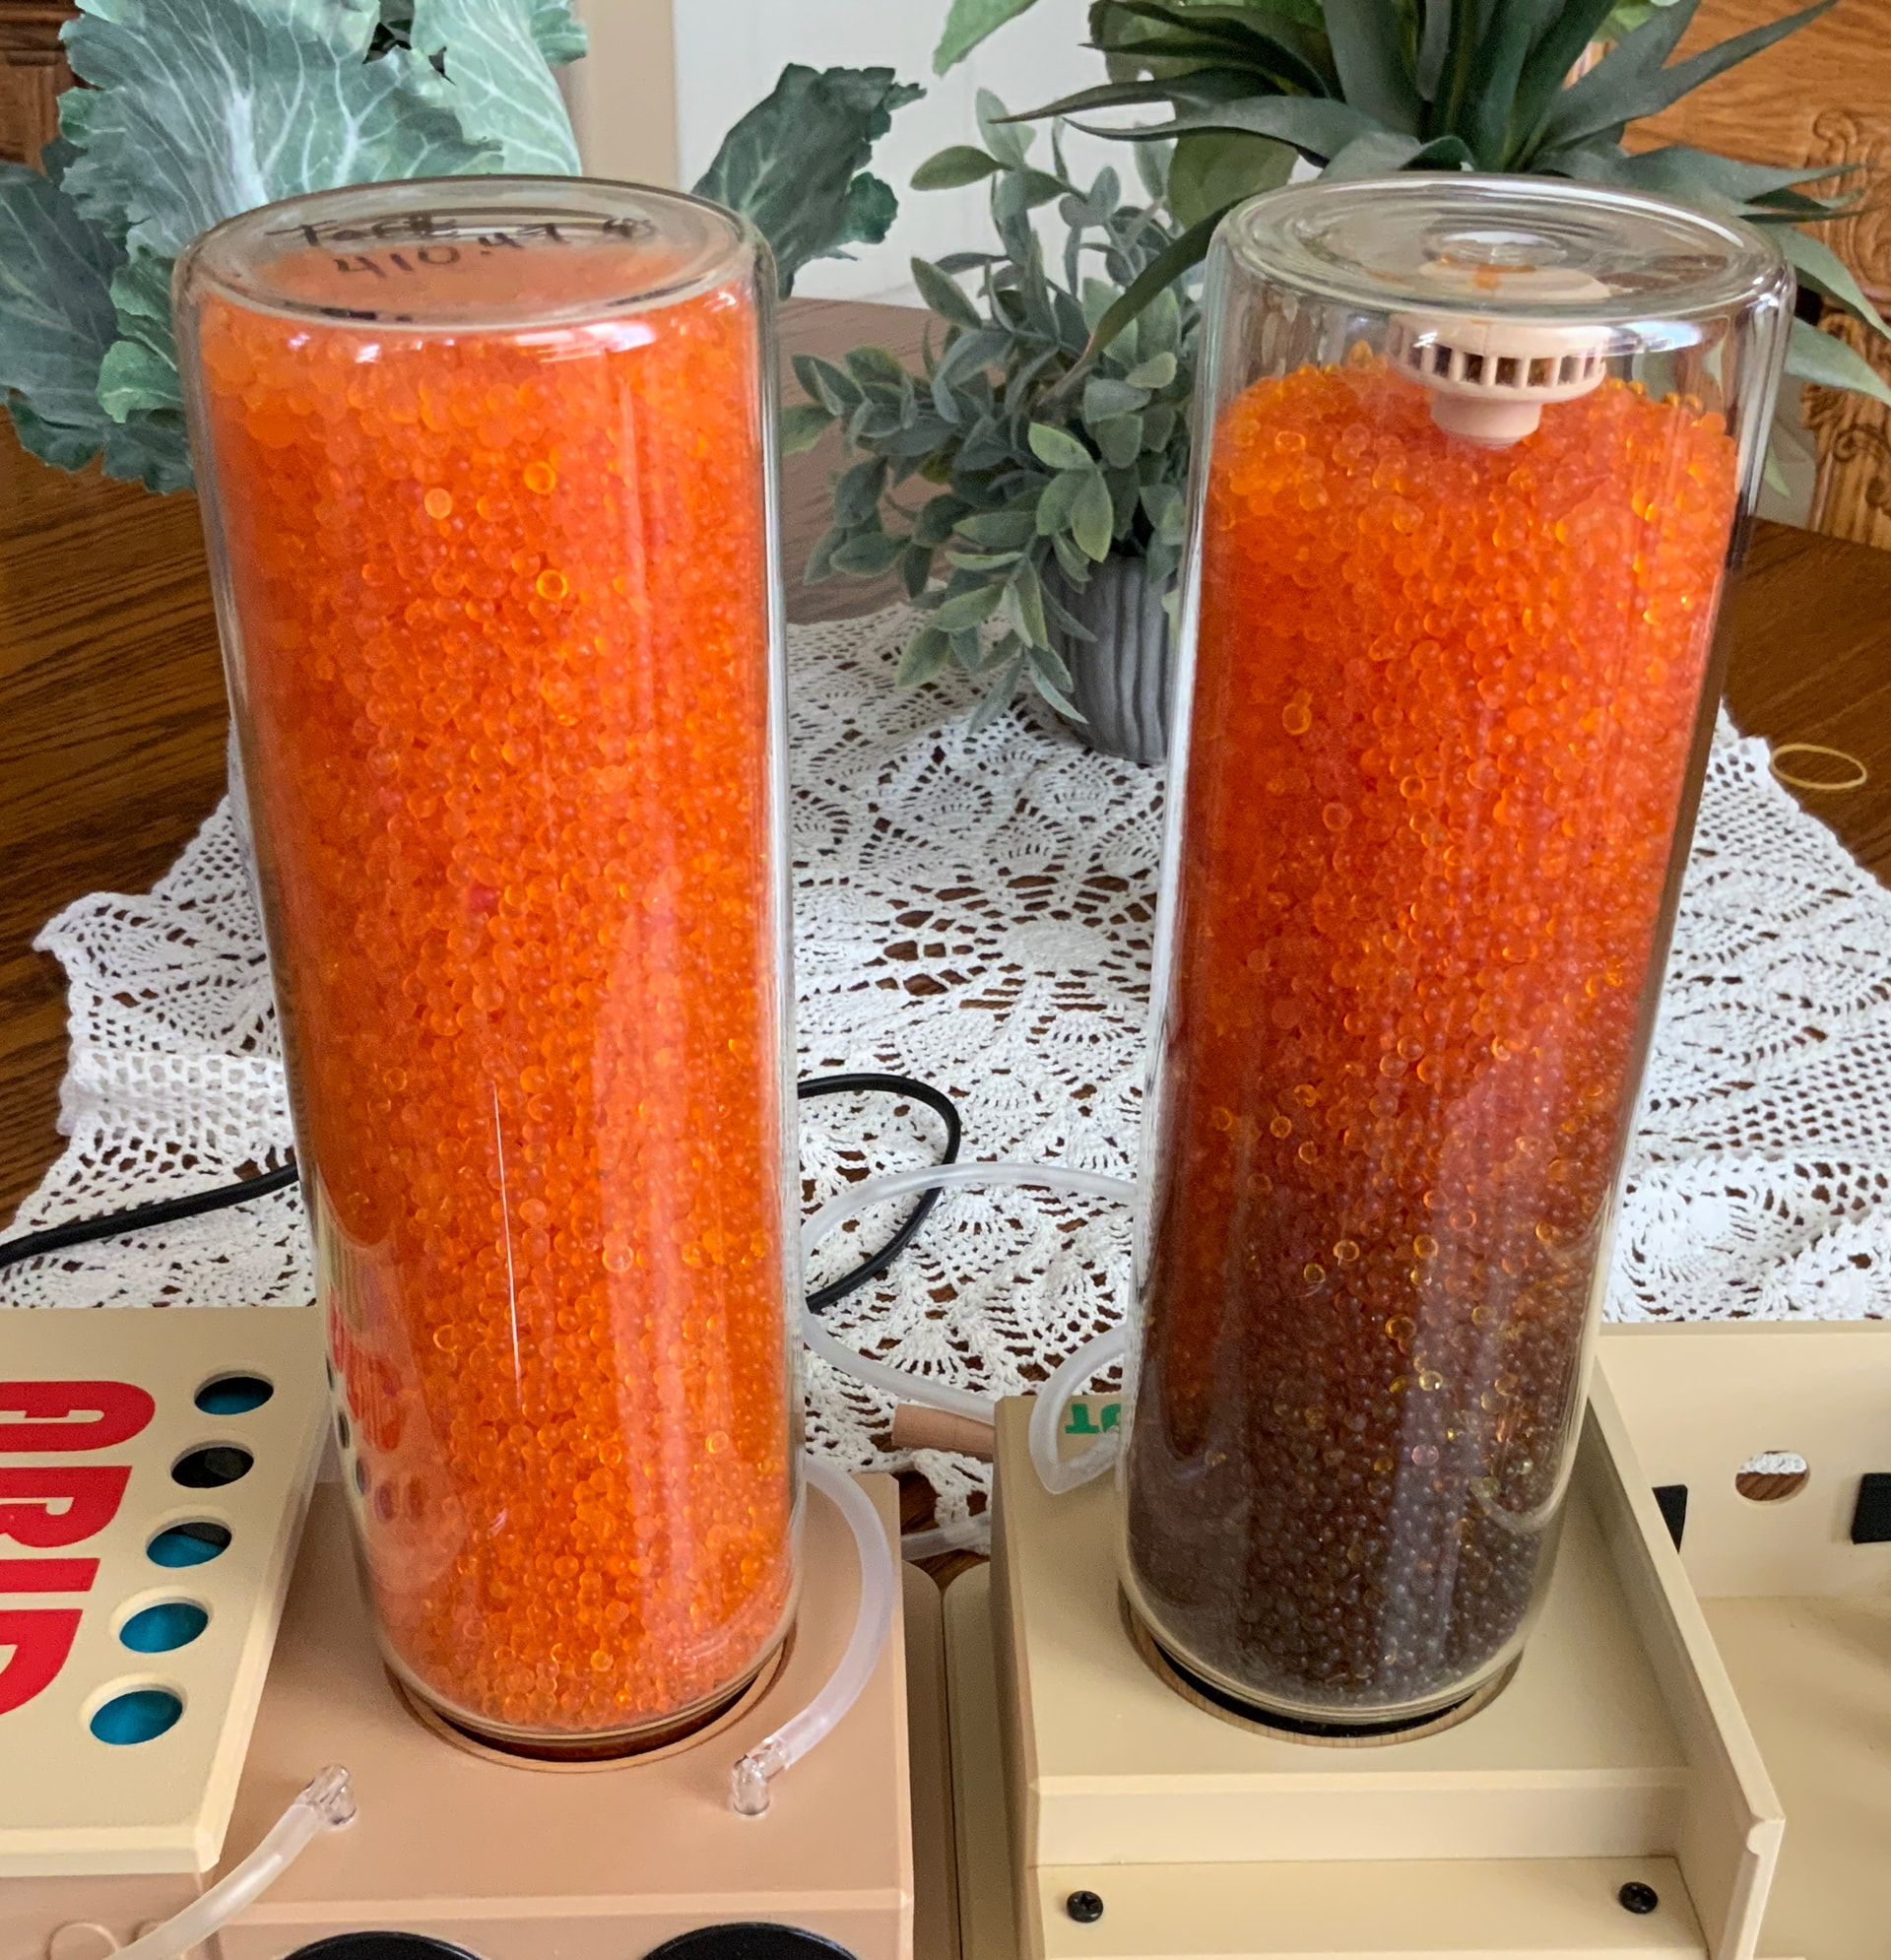
I believe you probably can rely on the color change. My dry air column is starting to be used up and the color change has a very visible gradient. Photos don’t give you the same view an eye has, though. Only thing is you’d probably need a color reference card since it’s not very strong at low humidity. The best way would be to use a little solid state spectrometer and look at the two colors directly and quantify them if you need accurate numbers. It would be much more sensitive and accurate than by eye.
It’s still putting out air that pegs the outlet hygrometer at 10% but by watching it, the color change started hitting the top of the column at least 3-4 spools ago. It’s easier to tell by comparing to fresh/dry beads. There the darkening at the very top starts getting more noticeable.
This is back with a used column and brand new dry beads and you can see the difference. The right column was still putting out air less than 10% humidity but you can see it’s a little darker at the top (exit) end.
Pardon my California French… We, me, myself, and I….
The ideal is to stay at/below ■■% of RH. Right now, my AMS Hydrometer sez… 20%. So I think it’s good enough. My prints are coming out to my liking. And really, if I’m happy nothing else matters. Ah, bliss!
This is assuming you can trust these little cheapo Hydrometers. They ain’t lab grade, Rufus. But they are better than nothin. My outside humidity is 17%, at 103°F. About time to move my filament out and put it in my smoker to let it dry for free.
Yes, that’s an exemplary photo: I can see the color differences at the top between the two columns, just as you mentioned. And therein lay the rub: when I pull a tray of drying silica gel out of the blast oven, if it’s green then it’s obviously too wet, but if it’s orange, it’s not obvious just how brightly orange it is. As you suggest, a reference card would help. I don’t really trust my eyes to decide though, but it would probably help. Maybe a color meter.
I suppose this is where bagged desiccant has a clear advantage: you could weigh and label it when it’s bone dry, and then measure against that in the future when trying to make a drying termination determination. Or you could do the same with your columns as the separators.
What’s worse is that I think I may be gradually destroying the brightness of my color indicator with each drying, so it’s becoming less useful except as an “obviously wet” indicator.
And that number will depend to an extent. People are able to tune out minor water effects but printers also seem to have some variability. At any rate, i have my own guidelines for PLA (25%) and PETG HF (20%) at room temperature. Even at those numbers I still see some issues, but I can always revise them as I get more data. A spool of PLA doesn’t print well at 23%? Maybe I should lower my no-go to something below 23%?
If you are seeing good prints at 20% you have a stake in the ground. If you find 22% is ok too, maybe that’s your new limit? The key thing is knowing some value where you’re good below and need to dry above. That’s useful.
No, they aren’t lab grade but the ones I use in my filament storage do have specified accuracy - +/- 1.5F and +/- 3% RH and I qualify them before using them by just putting them all on a table together and making sure they are within accuracy. When I let them equilibrate for a while they are within less than 1 F and 1% RH.
My name isn’t Rufus. I take that as a derogatory and will block you if you you do it again.
Following the Manufacturer of the desiccant I’m usings recommendations is working great for me so far. And that is tempered with my background is using desiccants for maintaining a lowest moisture content for sensitive equipment.
For the enlightenment of a few, I’m also considering using a solar dryer to see if I can’t easily develope a better mousetrap.
Oh, I graduated Kindergarten a long, long, time ago. And following a manufacturer’s directions has never been a bad idea. Afterall, they have to answer to Government Standards to stay in business.
For those who couldn’t master tying their own shoes Velcro has been included.
I also went down that path. I have been using 50 gram Dry & Dry desiccant packets. Fully saturated they can weigh as much as 70 grams although I tend to recharge them when they reach about 60 grams. A packet weighing 60 grams, after about eight hours in an AMS HT at maximum temperature will weigh around 53-54 grams. It takes another eight hours to get the weight below 51 grams.
However, about 16 minutes in the microwave set on defrost will reduce them to under 51 grams. 16 minutes vs 16 hours.
But be wary of indicating silica gel, though. The blue is a cobalt compound and not food safe. The orange indicators are designated food safe but aren’t supposed to directly contact food, at least from what I read.

 We, me, myself, and I….
