I would like to test the max volumetric flow for my filaments. In my previous machines I used Orca Slicer which has this calibration automatically added, but since my H2D forces me to use Bambu Studio (which doesn’t have all the calibrations), is there a easier/faster way to test the max volumetric flow without having to mess up with gcode or having to introduce layer modifiers for different speeds (and having to calculate the volumetric flow?)
There’s a neat trick. Add a non bambu printer to bambu studio, like a creality S1 Pro for example. Now look on the top row and you’ll see an extra calibration menu. From there select max flow and you’ll get the usual model you’re used to. Now on the left change it to your H2D and Bob’s your uncle.
20 Likes
Thanks Supa_Koopa ![]() nice trick.
nice trick. ![]()
Just ran the retraction test and it worked just like in the good old Orca days.
1 Like
That’s brilliant! Thanks a lot for this tip, this is exactly what I was looking for to save me the hassle!
It just bugs me why Bambu hides this menu though. At least make it available if you tick “Advanced” mode or something because I understand these tests can create some problems if you dont know what you’re doing/setting!
3 Likes
You may have to increase the outer wall speed after switching back to the H2D profile for the test to go up to its set max.
1 Like
Yes, that part I’m aware. I normally just increase the layer height to make sure I’m not crossing any speed limitation.
Tried. Still not showing with my studio
1 Like
I was going to try this - have some filament types that Bambu doesn’t offer and would like to improve the printing results. What problems can this cause? Or what gotchas should I look out for? Thanks!
1 Like
Nothing really, if you set some wrong value worst case scenario it will fail or error out, nothing you can do to hurt your printer. In fact you are supposed to test it to failure point, that is how you know the max flow rate.
For H2D HF hot ends with PLA or ABS I like to set start at 20mm³/s and go up to 70mm³/s in 1mm increments so its easy to measure afterwards.
Ive heard of thus trick before aa well. I never see any extra calibrations when non bambu printer selected
1 Like
This trick is new to me, can you elaborate on what changing the layer height does?
You may have to increase the outer wall speed after switching back to the H2D profile for the test to go up to its set max.
Where should it be set? I mean where and to what value? New to Studio, and excited to find this hack. Anything else need to be tweaked? Would it matter what printer is selected before the swap back to Bambu? I’d think whatever printer is selected in the first place, it will pickup that printers settings.
Under the speed tab, you should see a selection for outer wall speed. Just need to set it higher if needed. You’ll have to judge this by what the speed and flow previews look like after slicing.
I can’t say too much though, I haven’t been able to setup one of these tests to my liking but I also haven’t messed with it too much lately. I’ll have to dive in again soon.
1 Like
You can verify if this trick is working by slicing the racetrack model, and then selecting “flow” in the slicing result dropdown visual menu:
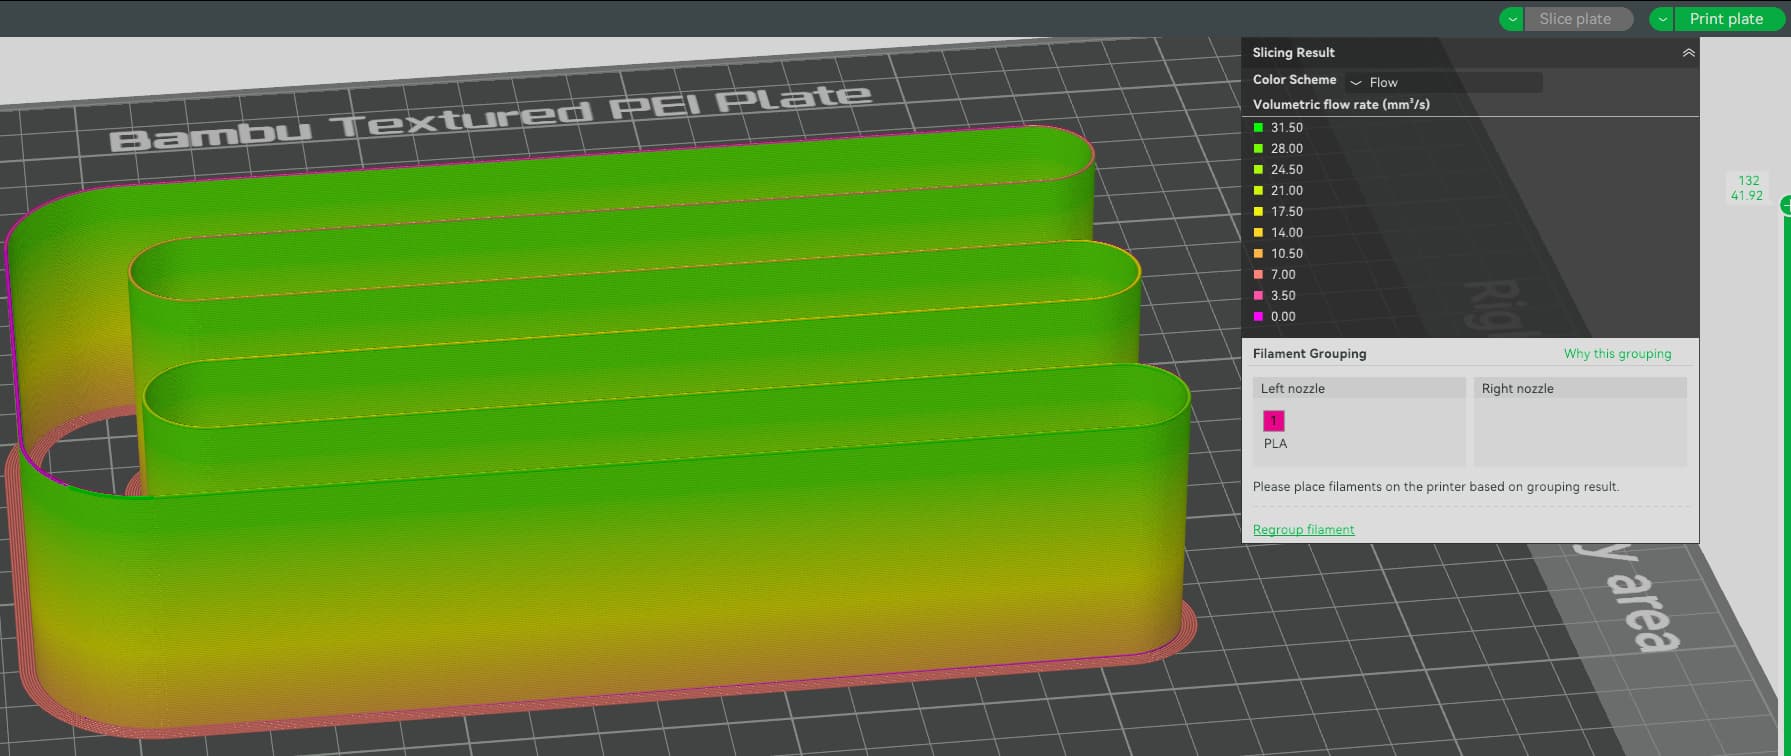
If done correctly, you should see volumetric flow rate increase as the layers go up.
1 Like
Check the speed preview too. Make sure it’s not topping out half way through
1 Like
Does this trick “need” you to have one of those printers?
With a Creality or Qidi added and selected in Prepare tab, I still only see in the calibration drop down is the same two options. I have no “device” of those types however.
No. The new option is on the menubar right at the very top, not the regular spot.
1 Like
Yes it is! ![]() Thank you. Its actually in a muted/lowkey color.
Thank you. Its actually in a muted/lowkey color.
1 Like
Hey getgray (or anyone) when doing these calibrations, each of the ones work after like a charm (temptower, flowarte1/2, pressure, retraction) after switching back from a creality to bambu. Except for Max Flowrate. The max flowrate walls print perfect no matter how large (5-50) I make it. I can only assume its not transferring the adjusting walls with it when I click back to the bambu printers.
Has anyone else encountered this?
1 Like
We’d need to know the gcode for that setting then we could set manually. I have no idea what that is. I know how to apply it.
1 Like