Hello everyone. This might be a little long but here it goes.
Ive veen trying to calibrate PETG for prints in my X1C. The sad thing is I had my settings dialed in which I pulled from various postings around the interwebs.
I was finally able to get my items to print to satisfactory levels (functional prints for my grow tent/hydroponics).
But i loaded a new project and like an idiot chose not to save my settings.
So yesterday i started over.
Ive done everything from flow dynamics, line calibration, temperture towers etc etc and had that dialed in.
I ended up with my best print yet (Barinna t8 light clips) akd everything went perfect. My previous prints had one side slightly warped but was god enough to use. Today i printed that same part and to my surprise i told myself wow ok, weve got this thing dialed in.
I went to print a different part and ended up with spaghetti printing - i was so confident it was going to work - but it didnt. So now im back asking for help.
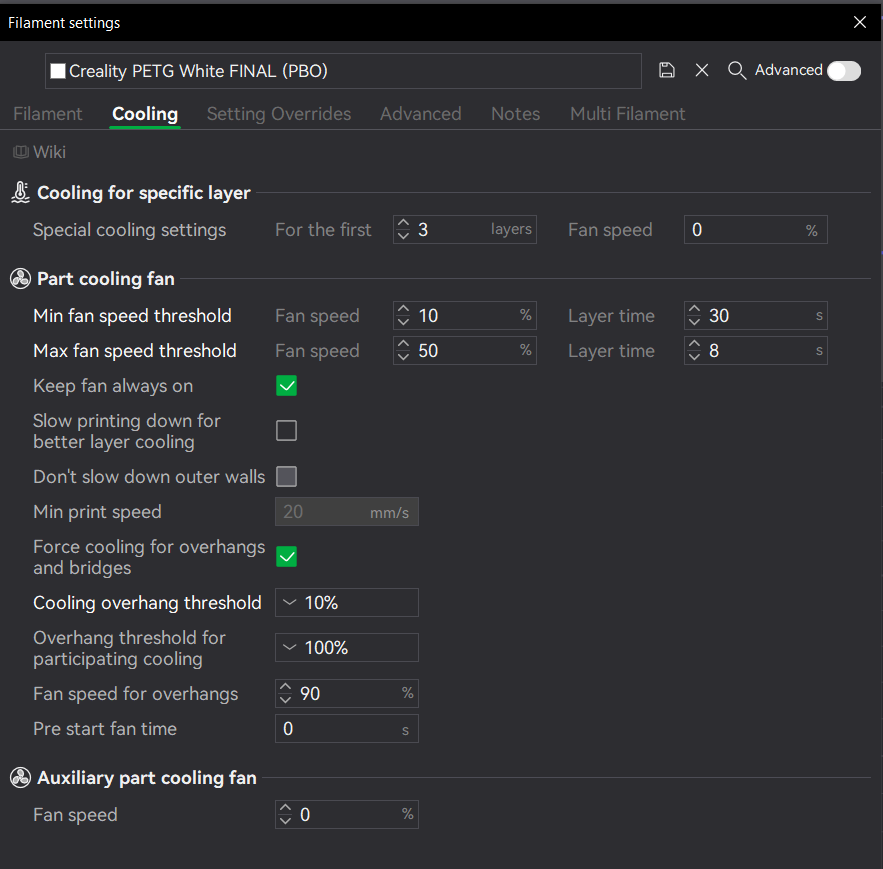
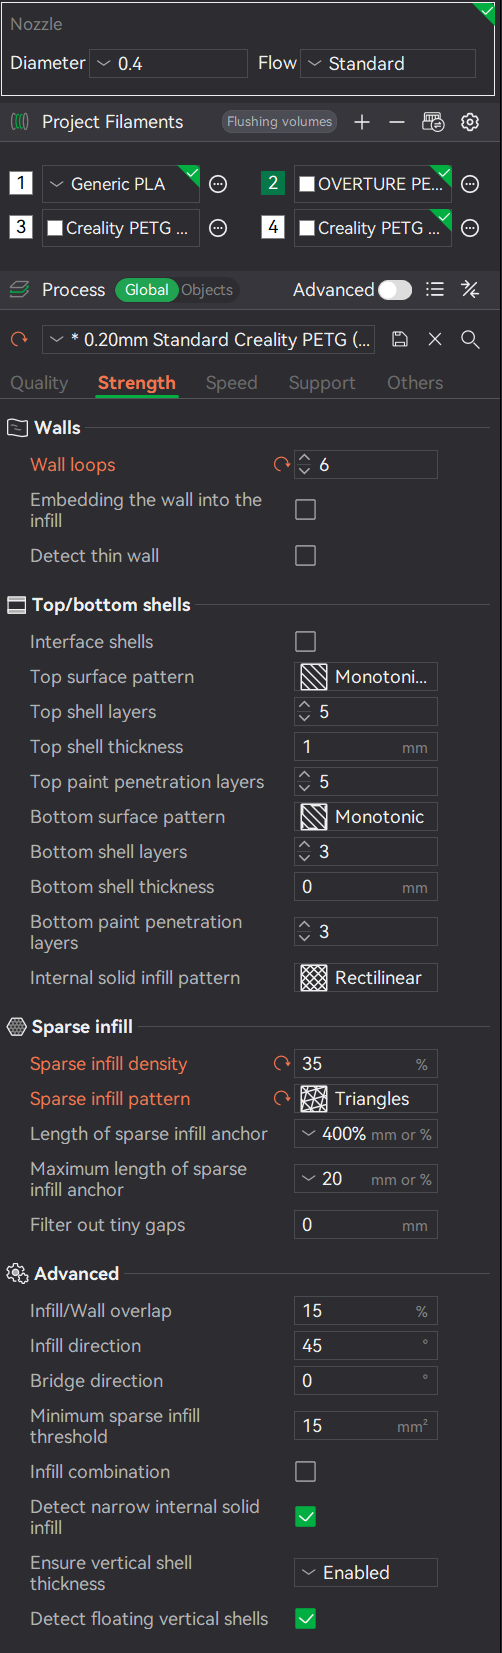
Ive posted photos of my settinfs etc hoping to get some direction.
Things ive messed with - nozzle temp, bed temp, setting the k value, adjusting cooling settings (this is the hardest for me), set flow to 10mm3/ms, settings over ride.
Based on my settings can someone give me some guidance?
I feel as though ive done everything i can on my own thus far. Although i havent tweaked quality or speed settings amd ive seen others with vaslty different values than mine. Im assuming the odd outer and inner wall values changed on their own from adjusting the K value.
I am not going to address your filament calibration settings directly, but I can offer some broader troubleshooting guidance that applies not just here, but to filament tuning in general. In short, you’re on the right track but there are some techniques that may help which I will address later.
I often say: “If you can master filament calibration, every $10 spool can perform like a $35 spool.” The point is that when filaments are evaluated under controlled, repeatable conditions, the differences within a material class are usually smaller than marketing claims suggest. As I noted in a post here last year, many filaments share effectively identical base formulations, with differences largely limited to branding and packaging.
For example, Bambu does not operate its own filament foundry. Prusa, by contrast, produces its own filament and includes a factory process ticket with each spool that can be scanned to see its production history. That does not automatically make it better filament, but it is an interesting level of transparency.
Spaghetti
Based on what you shared, spaghetti in cases like this is almost always caused by separation from the build plate. That’s relatively easy to troubleshoot: either the filament separated because the build plate temperature/filament temperature was too low, or the build plate was dirty. Since you are printing in the correct temperature ranges within ±20 °C, my money would be on the build plate not having been cleaned properly. The most reliable method is to use very hot water and clean it with dishwashing detergent like Dawn (US/Canada) or Fairy Liquid (UK/EU) - it’s the same soap under different names. That method will completely degrease and remove material that is interfering with first layer adhesion.
But don’t take my word for it, try it for yourself. Right-click in the slicer and select cube primitive and size it to 200x200x0.2mm. This will produce a 1 layer filament over the bulk of the plate - size to preference if you want to test just a portion of the plate. If you don’t get a complete coverage and there are voids in the material, there’s your smoking gun. Here’s an example of what that looks like where I deliberately contaminated both a textured and smooth plate. Texture does not reveal fingerprints but smooth does, however, the first layer test reveals the problem immediately:
Forget the models you download unless it can prove that it has the correct Gcode setting. That would be either a GCode or 3MF file - STLs only contain geometry. Orca generates those on the fly. Forget about K factor tests in Bambu Studio, that is a blunt instrument.
Here’s an example of what I mean. A temp tower generated by Orca where you can see the changes in temp VS just an STL model called a temp tower that was downloaded. Once you flip on the Temp indicator from the drop-down preview menu, if you don’t see a temp gradient, all you have was a pretty lump of one temp plastic which tells you nothing.
Although the Butter Pocket Prints videos lineked below is a bit older, it’s still relevant and I found that his methodology is easy to follow. There are other YouTubers who also cover calibration but I think his videos are clearer and shorter. Note: Bambu has cut off access to Orca if you are running firmware after 1.08, however, you can still output to GCode file and move it over manually via an SD card. Pain in the butt, yes but still better than Bambu Studio.
The forum software appears to be acting wonky when I posted this so if the YouTube links don’t come across correctly, here are the manual text for copy and paste just in case.
IMO this is “uncommanded extrusion”. Filament oozes out in a wavy, irregular noodle because the pressure that’s driving it is low and variable. The drive motor isn’t running. The pressure that’s driving filament out is moisture in the filament. You listed all the things you tried, and none of them included “drying the filament”. I would speculate that this is the problem.
I print a lot of PETG. Getting good clean prints depends on doing a good calibration for flow and PA (run the manual cals, not the automated ones), and making sure it’s nice and dry. If it’s not nice and dry, you won’t be able to do a good flow and PA cal.
With PETG, any excess flow tends to build up on the nozzle. After a while (depending on how badly calibrated the flow is), a nice big blob gets left behind on the print. It cools off and solidifies and the next time the nozzle comes around and hits it, it rips up what’s been printed (if it’s the first few layers) or knocks it over (if it’s tall already).
Give drying a shot, and then do the manual cals for flow and PA, before you start working on the substantially more comprehensive reply that’s above mine in this thread.
Thanks for the reply, I actually did dry it at 65 for 10 hours, my AMS is filled with desiccant pods, and the hygrometer in the AMS says 10%.
I’ve had some successful prints and lost the settings. Also to add I cant print multiple objects at the same time - I’ve been printing by object rather than by layer.
The reason I started to deep dive settings is that I dried my filament and the results were horrible haha. If you see on the left side of the photo you can see the support tabs end up printing really well, and then when it comes time to print the actual item it starts to spaghetti.
Hey thanks for the really in depth reply - I use reverted my printers firmware and hooked it up to Orcaslicer. I’m going to run through these suggestions right now and see if I can get it sorted, thank you!
Thanks for the response. No its quiet dry where i am at the moment. The basement is around 35% the AMS is 10% consistantly.
The nozzle does not ooze unless there is left over filament dried to it which i pick off. I did a temperture tower which resulted in 245 degrees as the best result.
The long droop line you see is because i stopped the print when i checked the camera, thats all.
Thanks for taking a read.
I’ve been frustrated trying to print this model - the V2 Version to be specific.
I’ve been learning to calibrate from scratch (nice learning process) I went all the way to the retraction step.
I then printed these light clips which turned out great. Its been my first time being able to print by layer with PETG. I’m really glad with the way they turned out.
I then attempted to print the model I linked, and had a failure. So I went back to change my settings and slowed down the print speed and also reduced cooling a little bit as well as changing the temp plate up a little bit.
Important Information:
Printer X1C
0.4mm Nozzle
Textured PEI Plate (Washed with Dawn, dried with microfiber towel)
Creality PETG Filament white (dried with a filament dryer, and AMS Hygrometer showing 10% Humidity)
Calibration Tests done before:
Temp Tower
Max Volumetric Speed
Pressure advance -Twice first at 0.1 increments, than at a smaller increment by .0001mm - Then using the formula to dial it in
Flow (two rounds)
Retraction
Order of Events:
After Calibration, I finally attempted to print multiple things by layer rather than by object. This was done with the settings shown in the photos. These are basically light hangers for my grow lights (T8 LED lights) for my hydroponic lettuce. It came out great I was super surprised. No slight warping as last time printed perfectly. No stringing blobs or anything.
So now that everything has been going well I thought I’d move onto the big challenge i’ve been having (The link above). I’m assuming its because it has overhangs and is printed at a 45 degree angle, on top of me not having speed and cooling dialed in (something I still find confusing)
I start the print with the settings show in the photos and it starts off well, and then I noticed part of the piece gets knocked over and starts stringing so I stop the print.
I then adjust speed settings to
First Layer: 30mm/s
First Layer Infill: 60mm/s
Outer wall: 35mm/s
Inner wall: 70mm/s
First Layer Textured PEI: 80
Other Layers 75
Cooling:
Min - 20 layer 20
Max - 40 layer 10
Aux: off
Slowdown Print for better layer cooling off
So with these new settings I printed again and here is a video of the print going wrong
Problems I see:
Corners warping upwards
As the printer goes around the corners you can see the nozzle pushing on the edges (Ive seen a setting or term about ironing and was unsure of whether this is suppose to be happening or not since the beginning phases has overhangs until the piece connects) I was also under the impression that printing layer by layer would been everything should print flat - so I’m not sure if its by design or not.
Any ideas as to where I’m going wrong, or what more calibration I need to do/tinker with?
I’m just assuming here - that this is a harder print? As I had just had a successful and clean print right before, for a different model. But then again what do I know!
FWIW, I found that if I put my focus first into producing a perfect first layer, then generally pretty much everything else falls into place.and/or not much tweaking remains. It definitely gets me in the ballpark, so maybe it will for you too.
i have a much easier time getting high quality print results using PETG on my H2D than I ever did on my X1C. In fact, one of the biggest threads (in terms of view counts and posts) on the entire forum is about how to get the X1C to print PETG well. I don’t yet own an A1, but I’ve also heard it prints PETG a lot easier on the X1C.
Well, OK, so what’s a tip you can use? IMHO, it’s far, far easier printing high speed PETG on the X1C than just regular PETG. Three that seem to “just work” on the X1C are Elegoo Rapid PETG, Sunlu HS-PETG, and Bambulab High Flow PEtG. So, my recommendation would be to switch to one of those, which will be easier to dial in, and then either decide you like it enough that you just stick with it, or else use what you learned to get some other PETG dialed in. It’s just a whole lot easier to start with something that’s already working and tweak from there than start with something where nothing seems to work.
Warping usually comes from multiple factors acting together. Build plate contamination is a common one and is often mitigated - not cured - by brims. If the plate is not clean, adhesion will suffer regardless of other settings. With higher-temperature filaments like PETG, PC, Nylon, and ASA, these effects become more pronounced, and plate hygiene and brims will only take you so far.
Rather than trying to explain all of the physics here, this short video from Stefan at CNC Kitchen does a good job of showing what is actually happening in under two minutes:
It is worth watching for understanding, even though it does not go deep into remedies. Think of it as a mental model, not a checklist to immediately act on.
Another useful resource is this video from CHEP, which covers practical countermeasures like brims, mouse ears, temperature, airflow, and speed:
This one is intentionally broad. My advice is not to try everything at once. Pick one variable, test it, observe the result, and move on only when you understand what changed and why. Your curiosity is a strength, but it is very easy to disappear down a tuning rabbit hole and lose track of cause and effect.
You are asking the right questions. Just take it one step at a time and you will learn far more than by changing five things in a single print.
I may have missed it but didn’t see mention of cleaning your plate. Sometimes we get so wrapped up before double checking the basics.
Make sure your plate is freshly clean with Dawn dish soap. When I do that and use standard Bambu settings for Bambu PETG I have no issues. If I don’t clean my plate before PETG I have issues each time. Issues are the same you are reporting corner lifting and coming off plate. This is on an X1C.
Then is try brims after trying the above first.
Be sure to change one thing at a time so you can track down what truly worked. Hope you get it resolved!
Slowing prints down alot (under 150ms)
Printer Cooling set to 0% min to 20% max
100% Aux fan and 100% chamber fan by adding this gcode to the starting gcode
“M106 P3 S255”
First time ive been able to have perfect (almost) PETG prints printing multiple objects.
Thanks for the help and responses from everyone else, I learned quite a bit!