The Bambu Wiki page “How to Create Custom Preset” describes how to create a Printer “System Preset” definition.
The Bambu Wiki page “Create a Custom Printer or Nozzle” describes how to create a Printer “User Preset” definition.
Neither page provides a simple list of operations needed to add or delete a printer User Preset or System Preset. Hopefully this topic addresses these issues.
There are 2 types of printer definitions:
- A “User presets” printer definition.
- A “System presets” printer definition.
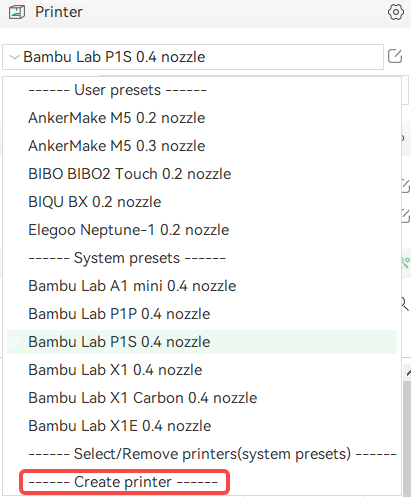
The Bambu Studio “Prepare” tab, “Printer” section, printer dropdown list.
In the Bambu Studio “Prepare” tab, “Printer” section, select the printer drop down list to display the available printer preset definitions, e.g., “Bambu Lab P1S 0.4 nozzle”. There are 2 preset groups and 2 commands shown in the list.
“------ User presets ------” List of all user defined printers.
“------ System presets ------” List is created initially when you install your printer, but entries can be added or deleted using the “------ Select/Remove printers(system presets) -----” command…
“------ Select/Remove printers(system presets) -----” This command allows you to add or delete System Preset printer definitions.System Preset printer definitions are based on printers that have been characterized by Bambu Lab.
“------ Create Printer ------” This command allows you to create a User Preset printer definition.
1. To create a “------ System presets ------” printer definition:
Note: This option only allows adding or deleting printers from the “------ System presets ------” list.
1.1 Select the “------ Select/Remove printers(system presets) -----” command. Selecting this option brings up the “Printer Selection” dialog box, which displays a list of all the Printer/Nozzle options that Bambu Studio has default settings for.
1.2 If your printer is in this list, click on the nozzle size(s) for the printer
1.3 Click on the “Confirm” button. This will add the printer(s) to the “------ System presets ------” list
2. To delete a “------ System presets ------” printer definition:
2.1 Select the “------ Select/Remove printers(system presets) -----” command. This displays the “Printer Selection” dialog box.
2.2 On the Printer Selection dialog box, uncheck the printer/nozzle that you want to delete.
2.3 Click on the “Confirm” button. This will delete the printer from the “------ System presets ------” list.
3. To create a “------ User presets ------” printer definition:
Note: This option only allows adding or deleting printers from the “------ User presets ------” list.
Note: The Bambu wiki for this option is here.
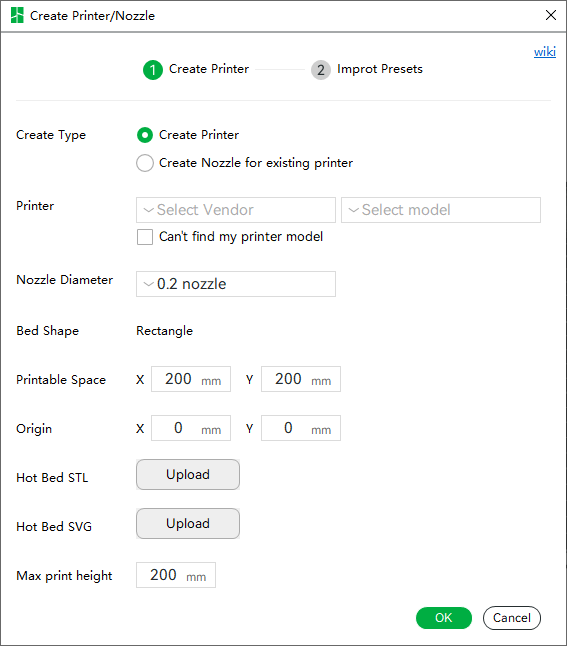
3.1. Select the “------ Create Printer ------” command to display the “Create Printer/Nozzle Create Printer” dialog box.
Note: There are 2 “Create Type” options on the “Create Printer/Nozzle Create Printer” dialog box: “Create Printer” and “Create Nozzle for Existing Printer”.
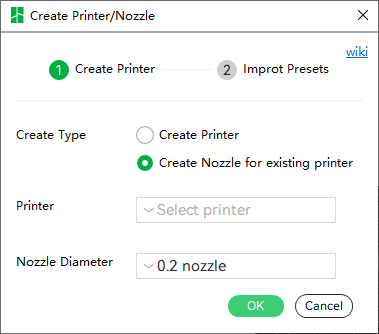
3.2 Create Nozzle for Existing Printer:
3.2.1. Checking the “Create Nozzle for Existing Printer” checkbox, reformats the “Create Printer/Nozzle Create Printer” dialog box, to only show the “Select Printer” and “Nozzle Diameter” widgets.
3.2.2 For version 1.8.4.51, the “Select Printer” dropdown does not appear to work. No list of printers to select from is displayed! And clicking on OK, displays the message “You have not yet selected the printer to replace the nozzle, please choose.” The only way out is to select Cancel or close (X) the dialog box. Is this a BUG? Or did I miss something?
3.3 Create Printer:
3.3.1 Checking the “Create Printer” checkbox displays the (default) “Create Printer/Nozzle Create Printer” dialog box.
Note: “Bambu” or “BBL” is not in the list displayed by the “v Select Vendor” dropdown list box. It appears that this list is a superset of the “------ Select/Remove printers(system presets) -----” defined options. I guess there is an expectation that Bambu printer definitions are created using the “1. To create a “------ System presets ------” printer” method, described above.
Note: The “Create Printer” checkbox is selected by default.
3.3 2 Set the Nozzle Diameter of your printer.
3.3 3 Enter the custom printer vendor and model names.
3.3.3.1 Check the “Can’t find my printer model” checkbox if your printer is not displayed in the “v Select Vendor” dropdown list and enter Printer Vendor and Model names.
Note: The names entered in these fields are concatenated and displayed as the name of the printer in the “------ User Preset ------” list.
3.3.4 Enter the Printable Space (Print Bed width and depth), Origin, and Max Print Height (Z) for your printer. These values will override those defined by the “v Select Vendor” selection in step 2.5,
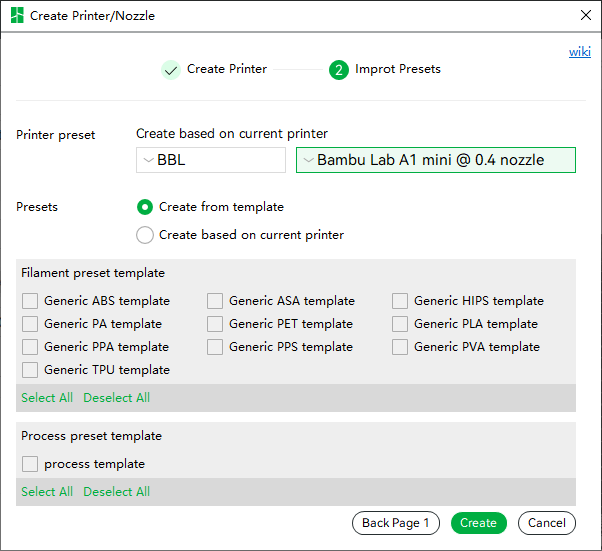
3.3.5 Then click OK to display the “Create Printer/Nozzle Import Preset” dialog box.
Note: The “Create Printer/Nozzle Import Preset” dialog box is shown here.
Comment: Above the “Printer Preset” “v Select Vendor” and “v Select Model” dropdown listboxes, it says “Create Based on Current Vendor”, which would seem to imply that the “V Select Vendor” and “V Select Model” dropdown list boxes apply when the “Create Based on Current Printer” checkbox is checked. It doesn’t. You always need to select Vendor/Model to use as a starting point from the list that Studio knows about. Note that Bambu (BBL) is displayed in this list.
Note: The Filament Preset Templates and Process Preset Templates will be populated after you select a Printer Vendor and Model.
3.3.6 Select the Vendor/Model that ‘best matches’ your printer. Don’t worry, you can adjust the settings later if your printer is not an option in the “v Select Vendor” or “v Select Model” dropdown list.
3.3.7 You are required to select at least one of the displayed Filament Preset Templates and Process Preset Templates.
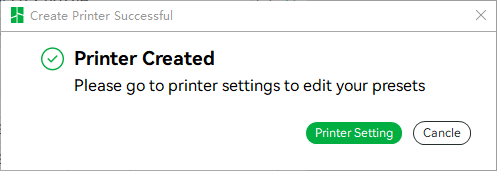
3.3.8 Clicking on the OK button brings up the “Create Printer Successful” Message box.
Note: The “Create Printer Successful” Message box is shown here.
3.3.9 Here you can click on the “Printer Setting” button to bring up the “Printer Settings” dialog box.
Note: Using the “Printer Settings” dialog box, you can customize any of the Presets that were not set correctly by the Vendor/Model selected in step 2.5.1.
4. To delete a “------ User presets ------” printer definition:
4.1 Select the “User Preset” in the “Printer” dropdown listbox.
4.2 Click on the “Click to edit preset” button (to the right of the listbox). This displays the “Printer Settings” dialog box.
4.3 Click on the “X” icon (between the Save and Search icons) on the “Printer Settings” dialog box. This displays the “Bambu Studio - Delete” message box. Do not use the ‘X’ on the dialog box title bar (top right)!
4.4 Click on the “Delete” button.
4.5 The “Printer Settings” dialog box then switches to the next Printer. Close the dialog box (“X” on the dialog box title bar (top right)).
5. “------ User presets ------” names:
The name used to save a User Preset definition will be displayed as the name of the printer in the “Prepare” tab, “Printer” section, printer drop down list.
e.g. If you had 3 Bambu printers with device names “Moe”, “Curley”, and “Larry” ( as displayed on the Device tab), you could save User Preset Definitions with the same names for the respective printers. And these names would then be displayed in the “------ User presets ------” list.
Note!: Selecting a printer preset on the “Prepare” or “Preview” tab (e.g. Moe) does not make that printer the “current” printer. e.g., Filament Sync is always performed for the “current” printer, irrespective of the printer name displayed on the “Prepare” tab. The current printer must be set on the “Device” tab by selecting a “My Device” or “Other Device” option (in the upper left corner).


