I wondered if anyone can help. I’m printing a fairly big flat piece and I cannot get consistent ironing across the piece. I’ve printed this on two different P1S now and get the same problem. The corners have a bubbling (please see pics) and completely ruin the aesthetic, while the rest of the piece looks perfect. I downloaded an ironing test and chose what looked like the best results for my settings. Can anyone point me in the right direction of what the issue might be? Thanks! My settings:
Printers: P1S
Slicer settings: 0.12 Fine
Ironing: Top Surfaces/Rectilinear/Ironing Speed 40/Ironing flow 40/Ironing line spacing 0.15.
Could the object have lifted off the build plate in the corners due to shrinking and warping? If it didn’t (and you’re sure it was stuck down well), is it possible the build plate corners lifted off the magnetic bed?
A troubleshooting step might be to iron some smaller (say 50cm) test objects of similar construction in each of the build plate’s corners to see what the result will be. If you get good ironing, then it could point to a heat related warping problem with the single large object.
Many thanks. I’ll try that experiment. I’ve certainly printed smaller items and they’ve come out good, but not in the build plate corners so I’ll check that. Thanks!
Just like how worker smooths out concrete surface, It should be one continuous movement for the best result. If the movement was disrupted and nozzle had to lift up then go back and forth, there is high change you will have artifact on the top surface.
Anyhow, ironing flow default is 10%, let say you have done flow calibration that make the top surface 100% perfect, no overextrusion nor underextrusion. Then 10% flow added to the top surface has to go somewhere yes? Now you see the problem.
If I have to do ironing, I would do underextrusion by 8%, say flow ratio of 0.87 (calibrated flow would be 0.95). Then add 10% flow from ironing on top of that make it overextruded by 2%. Well, I say 2% overextruded is better than 10% overextruded. Just a suggestion, I just make up the number so it might not work for you.
Thanks very much for the explanation. That makes a lot of sense. I’m going to experiment with that, as you say and hopefully work out a setting that gets that balance right. Many thanks again!
I am just new to the scene and just started looking into ironing. On the Bambu Lab Wiki site, it talked about ironing inset. It stops the ironing process just before it gets to the edge of the print. It appears if you iron all the way to the edge, it is pushing the hot filament as in the dozer pic above. When it gets to the edge and changes directions, it leaves some of that “dozered” pile on the edge. I just saw that today and haven’t tried it yet but could be a solution. Inset distance can be set from 0 (none) and up. Bigger number, it stops further from the edge.
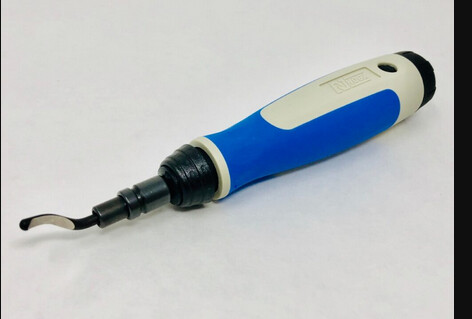
Depending on your models complexity, the “overflow” off the side might be able to be cut off with a deburring tool really easily, giving you the best of both worlds.
If the top is a simple exterior perimeter a quick zip with this will remove all the junk, then a quick zip with a crackhead lighter/heat gun will restore that cut edge’s finish.