My first 3D printer, the A1, proved a terrible disappointment given what I was told to expect!
The initial vibration compensation was insane–wildly resonating a very heavy dual-pedestal table on a firm even surface.
First prints were good but everything went downhill very rapidly with failure to adhere, strange uneven bottoms at times as if the level compensation was WILDLY off. Then a hideous and infamous “blob” followed by a near complete rebuild of the print head to find loose screws EVERYWHERE!!! The print head rebuild (with hardened nozzle and “improved” extrusion gear) helped for about three prints until birds’ nests, a repeatedly clogged nozzle and eventual failure of the extrusion motor led me to return the thing under extended warranty.
I found DOZENS of loose screws throughout the ENTIRE REPLACEMENT MACHINE!!! The worst by far were six of the eight that hold the Z-axis (vertical) uprights supports to the base!!! THE ENTIRE PRINT HEAD WAS FILLED WITH LOOSE SCREWS!!! The ONLY tight ones were the FAR TOO TIGHT screws that hold in the little plastic retainer just above the print nozzle.
In the EXACT SAME setup using the EXACT SAME filaments (although not again dehydrated despite a couple weeks of insanely humid, raining weather) and the SAME MODELS, I have printed more than 5 kg of filament with ZERO problems. I follow the EXACT SAME plate cleaning procedure to include a light application of hair spray after cleaning.
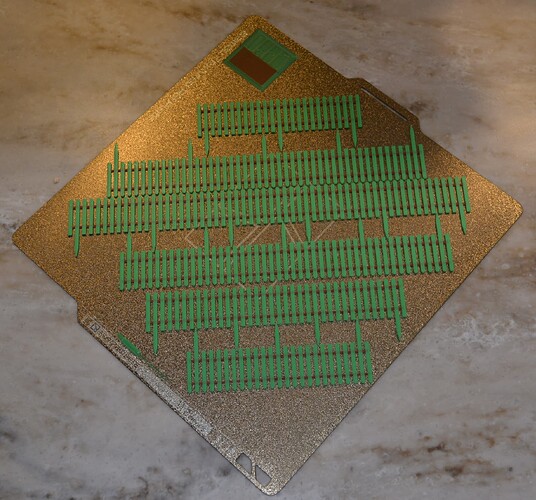
Previously I found it nearly impossible to print multiple instances of the same object no matter how small or large. The one time I attempted the “fill bed with copies” to find utter disaster I was convinced that the option was a joke! At best I could fill about a quarter of the bed with these exact same things in various arrangements. The first machine could not complete the adhesion layer on a full bed. It could not make it past the second full color switch for more than 1/4 of the bed. This utterly maximized bed printed PERFECTLY!
Great machine–now–but in my opinion some TERRIBLE quality control problems that are likely to ruin the entire 3D printing experience for a great many people and believe they purchased nothing but an overpriced toy that won’t last a year. Should this continue Bambu will follow in what seems to be a long line of promising new 3D printers that spend very little time on the market due to problems leaving the owner with an unrepairable machine after an inevitable problem requires parts no longer produced.
1 Like
No pictures. Sorry.
I’m not exaggerating when I say that not one third of the screws you find by simply looking everywhere on every side from every direction. Use a strong flashlight and inspect EVERY hole.
Then do some study regarding basic disassembly of the print head to include removing the rear cover to tighten the circuit board retaining screws all of which easily turned (using the short hex key leg for leverage) at least a quarter turn to be what I consider reasonably torqued for the size and nature. I found a couple screws loose inside the case housing the lamp and camera. The only general location I did not find loose screws were the row of large, closely spaced ones on the print head rail running between the uprights.
Pictures really won’t help. During assembly look over every screw you can find by examining each and every piece from every direction.
I did not remove the black plastic cover over the very bottom of the unit. All of the screws were nice and firm so I didn’t open.
The eight screws that retain the two tall Z (vertical) axis columns are very easy to locate by simply looking underneath before assembly.
Bambu has excellent illustrations and instructions for disassembly and repair of the print head. I did not fully disassemble as merely removing the front and rear snap-off covers reveals the great majority of the assembly screws.
I do not know nor does Bambu provide any torque specifications. I don’t have a tiny torque wrench that would work with hex keys nor do I expect to get one. I do however have two nut driver like handled hex drivers on the way for use with the machine. I consider them REQUIRED tools! When you remove the front cover, extruder turn indication wheel and silicon shield over the print head (no tools needed) you will see two very small screws slightly above the print head. These hold a small plastic piece with such a close fit you may not even notice it is a separate piece until you remove. In both instances these little screws were so tight that the first one immediately ruined the supplied hex driver. (I used my own afterwards with the first and experimented with the second when those two screws were again wildly over-tightened.)
There are two general sizes of hex head assembly screws used. The plastic cover on the very bottom uses a different size and again, I did not remove.
Also check the screws beneath the top bar that connects the two upright Z-axis posts. Be cautious as this is plastic-into-plastic. I found all but one loose. The one that wasn’t loose was already an overtightened “spinner” so I added some cement before replacing.
1 Like
