I have been making light boxes with success and then all of a sudden when I slice them they are just one color… It seems to have started after I updated the software and firmware, but that may just be coincidence.
I draw them in Fusion.
I make the box and then make the letters extend through the face as a new component.
I save it as a .step file.
When I bring it into BL studio it looks like it should. I assign colors to the body and the component (letters). It looks exactly as it should. Then when I slice it, it is just one solid color on every layer.
My computer died and I just got a new one so I reinstalled the software and was hoping it would solve it. Same thing.
I would really appreciate any help I can get on this. It has really shut me down.
Thanks!
Could the colored features be too thin to render by the printer? Try variable layer height and/or Arachne wall generator.
I had what sounds like a similar problem yesterday. I had to change the type of each of the letters to Modifier. They got loaded from Fusion 360 as parts. The print sliced properly after that.
Ks; OMG I think that worked! I can’t thank you enough. I had planned on making a lot of light boxes for Christmas gifts and that got shot down when it stopped slicing properly. Then my MacBook Pro crashed in the worst way possible… like… fell off the workbench in the shop and died. Just got a new one and was hoping that the problem would go away. It didn’t.
I really needed a win, so thank you!
I don’t understand why that worked but it seemed to have done the trick.
Thanks again!
Adding my comment in case someone has this similar issue with a different cause. I’m just putting files right from Makerworld into Bambu Studio and having the same problem, but it was being caused by flushing into the objects on the plate. When I removed that option and only left it to flash into the infill, it fixed it for me.
I come from nearly a year in the future to thank you for this one. The issue for me was that the object (not the global) setting for “flush into this object” was ticked. I’d never have thought that was the cause. Cheers.
Hey, I know I very late to the discussion but just a couple of days ago I had the same issue and these models that are multi-color and become single color are downloaded and I have tried many things like re-installing and trying different settings. Does anyone have any ideas on how to fix it?
It is usually the order one the objects in the merged object.
If you have three objects, one a main shape and two foreground objects, drag the background object t the top of the three objects, any below will have priority over those above it.
This only causes issues when the objects overlap the same physical space, it is the order which determines which colour is used when sliced.
Example:
-
Red cylinder with a 25mm diameter and 1mm thick centred against #2
-
Black cylinder with a 50mm diameter and 1mm thick centred against #3
-
White 100mm diameter cylinder a 2mm thick coaster
When listed in the merged group they should be ordered as follows:
- White
- Black
- Red
If left as described above, the white object would be only visible one.
Ok, so I understand what you mean by ordering the objects and I have been tinker with multiple models and different color orders and I am not find any progress, here are pictures of my slicer if that helps.
Screenshot 2025-04-13 110048|690x407
Screenshot 2025-04-13 110059|690x291
Your preview tab is showing the “line type” view, toggle this to “filament” view.
It seems you may simply misunderstand what you are seeing, if not, send me the 3mf (DM) if you don’t wish to make it public and I will take a look.
- DM by clicking my avatar and choosing the message button.
@MalcTheOracle Thank you for the help I printed something multicolor but was one color and it work. It’s probity just a software issue that will be resolved in the next update. Thanks again.
Thank you - This was driving me nuts for a good hour - turned out to be the layer order… Grateful for your comment.
You are welcome, it is almost always an order issue in these situations, and it took me a while to work it out.
I just had this problem and figured I’d throw in what worked for me just in case it can help someone else. In object mode my prints had a padlock next to them, clicking it removed it, and then it slliced in muliti-color as normal.
Thank you! I was losing my mind trying to figure out why a model my son wanted printed was 5 colors pre-slice and 1 color after slicing.
In my case, this was it too
I do not even have the flush options. My issue is, I had it printing multi color, but the order was all messed up, so I rearranged it renamed all the parts. Now it prints only 1 color. I have been 2 hours at it trying diffrent setting, Ai-s and forums and nothing works.
Thanks, this was it for me
1.5 years later, this was my problem! Thank you!!
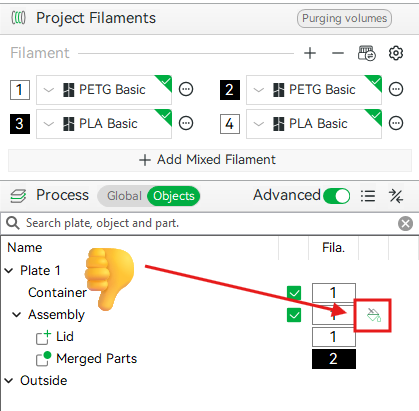
Ok, this was stressing me out. I had just created the exact same merge with a shorter object and it worked 10 times, but time did not. The fix is as follows–and I’m dong this in picture form and highlighting in Red boxes and arrows:
-
I looked for differences between the working and non working and found in Prepare > Process > “Objects” (not global) a little paint icon. But no paint icon in the working multi color sliced model. I figured out you can’t choose colors both in objects and in the top panel. And the same parts within each assembly have to be same color. If the little paint icons shows in the object panel it means that object already has a color and it must be removed for the object section color choice to work.
-
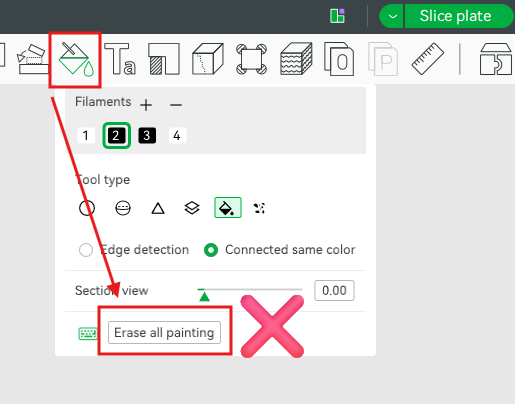
To remove and fix the paint icon: Choose the “Assembly” so you are editing the top level all at once. Choose the color you want which changes the color for the entire assembly. Click the small paint icon next to the assembly color. The top Paint manual painting window opens automatically > click “Erase All painting”. (do all the assemblies one by one to remove all the paint icons so only the assembly colors exist and not the manual paint and their icons that represent they have already been colored).
-
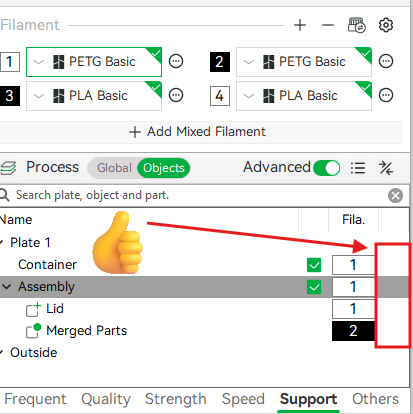
Notice now all the paint icons removed in the Process panel and your object color auto corrects and paints the entire assembly to the color you chose in the assembly in the previous step once you clicked erase all painting:
-
Done, Slice and Dice and Print baby! Colors show up as normal in slicer and colors actually print too
 .
.