There are a few other posts on this topic, but many of them appear to refer to outdated problems that no longer exist, or are otherwise confusing. I was starting to think this wasn’t possible, but I’ve found a relatively straightforward way to do multicolor prints without AMS, using the multicolor features in Bambu Studio while swapping filament manually. Even with color changes mid-layer!
Prior to this, I had been accomplishing color changes by layer the usual way: insert a pause on the desired layer while slicing and manually swap the filament before resuming. This works fairly well, but there are a couple downsides:
- You can’t swap filament mid-layer, so you can’t (for example) embed text, you have to emboss or deboss.
- You can’t (accurately) use the slicer’s color tools or the “change filament” command, so you don’t get a good preview. And if you download a 3mf with colors, you have to go reverse-engineer the layer to pause at.
- There’s no prime tower, and instead after a pause the tool will seemingly prime at a small spot on your model for a moment, so if it’s the top layer sometimes you’ll get an unsightly blemish.
Instead, with a very small amount of setup you can slice using Bambu Studio’s color functionality but still use the manual swap method during the print.
One-time setup
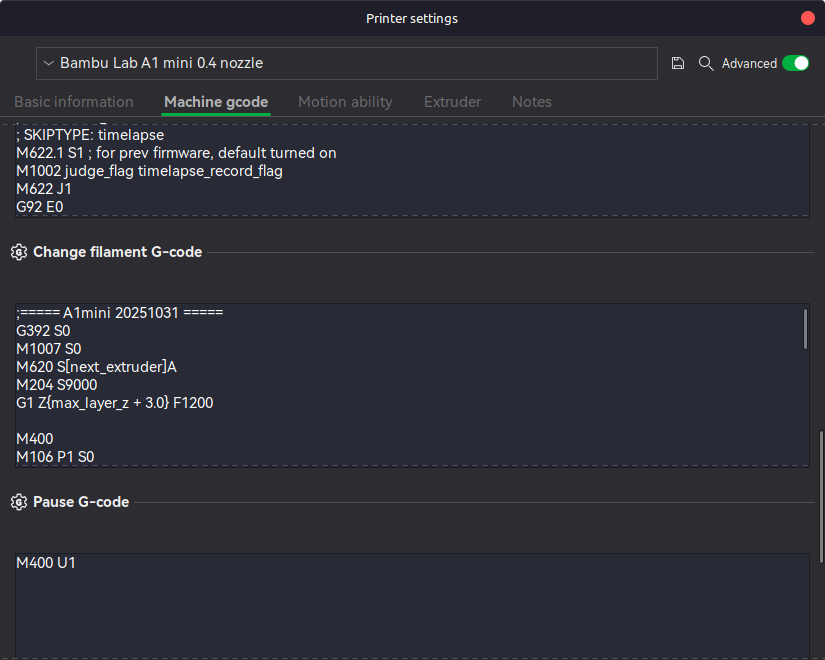
- In Bambu Studio, on the selected printer click the edit icon to bring up the “Printer settings” dialog.
- Go to the “Machine gcode” tab.
- Scroll down to find “Pause G-code”, which is probably just
M400 U1. Select everything in that box and copy it. Now scroll up to “Change filament G-code”. Clear everything in that box and paste in the code you copied for pause. - Click the Save icon and you’ll be prompted to save a new profile. Save it as a user preset and give it a name you’ll recognize like “Printer name 0.4 nozzle - No AMS”.
To print multi-color
-
Use the Bambu Studio tools to set up a multi-color print as if you were going to use AMS.
-
Make sure your “No AMS” printer preset is selected instead of the default.
-
Slice, confirm that it looks good and that there’s a prime tower if you want it, and print. It may give you a warning which you can confirm:
-
If you’re using like filaments, it probably won’t complain, but if you have unlike filaments you may get a warning that they are not all mapped to the printer.
You can simply map both of them to “Ext” and it will be satisfied with that. -
Begin your print and wait for it to pause.
-
Once paused, you’ll need to dismiss the “Resume printing” dialog on the control panel so you can get back to the filament settings. Choosing first Unload and then Load, follow the standard process for swapping filament.
-
Edit the filament to set the new filament type. I can’t tell if this actually does anything, as in my testing it didn’t seem to respect different settings for the swapped filament.
-
The “Resume printing” dialog will pop back up and you can tell it to resume.
-
That’s it! Repeat as needed for additional swaps.


Proof is in the pudding
Here’s a simple test I did while trying this out:

And here’s my first real multi-color print using this method, which came out great!

Limitations
While this seems to work very well, there are a few limitations to this method:
- I’ve only tested this on my A1, though I don’t know of any reason it wouldn’t work on the other models as well.
- It doesn’t appear to respect any filament settings (nozzle temp, cooling, speed) after the first filament, so if you’re trying to mix different filament types or have very specific needs, it might not work so well. As long as you’re combining broadly similar filaments like different PLAs, it should be just fine. I’m not sure why this limitation exists - it doesn’t seem like anything should prevent the gcode from changing these settings, unless Bambu Studio is stripping it out.
- You’ll still need to do all the unloading and loading steps yourself through the control panel - if you really want that there are more complicated solutions you could explore at your own risk.
- It’s still a pain to do more than a few manual color swaps - I don’t think we’re endangering the AMS market share here.
The filament settings is the only one that really bothers me. I’m not sure why it’s happening but experimentally that’s what I’m observing (and past forum threads had mentioned the same issue). I ran a few tests using a mix of PLA/PETG and found that it was reporting the nozzle temp from whatever filament I started with even after swapping. Likewise, I tried using two custom PLA profiles with drastically different max volumetric speeds and didn’t see it slow down after swapping. I’m curious if anyone can find a solution to this. I suspect Orca Slicer might not have this problem as it appears to have an extra configuration setting for multicolor, but I haven’t tested it myself.