New issues with P1S Prints

I am new to 3d printing, so I might be missing something obvious, but suddenly a day or two ago I have been having some printer issues.

Have a P1S (with stock hot end) for about a month now (and about 100 hours of prints), lots of good prints. Using Bambulabs filament (Mostly pla, a few PETG and one ABS print. Most is PLA Basic, one or two PLA Matte). About two days ago I had started to have mostly constant failed prints.

It started when I had a failed print with some weak stringy layers in the middle of the print (First time using PLA Basic Grey) - but I was not worried yet as the printer is installed next to the front door and I had a large delivery during the print so there might have been some shaking of the device.

Next few prints also failed using other colours I had used successfully in the past.

Tried cleaning the hot end (Poking the needle into the end to remove a clog if that is what it was). Would print the sample tests well (The calibration squares, calibration lines, and some 10mm cubes I tested in a few colours as well).

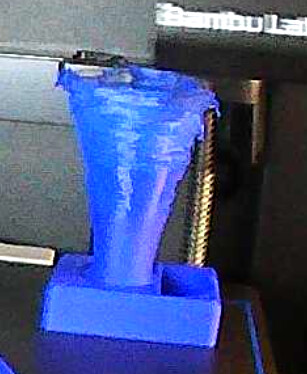
Then when I try to do longer prints they fail after the first 100 or so layers. Here is an example of what the top half looks like (I forgot to take a picture before I separated them apart). This was supposed to be the top of a funnel.


Some prints look like this (Which looks like under-extrusion?)
image

But even though it looks like under extrusion, I did run the flow rate calibration right before printing.

Ive tried cleaning the nozzle a few times. I have also partially removed the hot end to try a cold pull described here: Nozzle/Hotend Unclogging Procedure for X1/P1 | Bambu Lab Wiki

The common problem that seems to happen during cleaning is that when I manually extrude the filament it seems to curve back up towards the nozzle rather then coming straight down. I do eventually get it going straight down, but that seems to only last for a short time before going back to the irregular.

I have not tried replacing the hot end with the spare hot end that Bambu comes with.

Should I reach out to support? Or is there something that I can do to resolve the issue?

Edit, I did try another print and stopped it as the stringing started to happen - here is the shot from the top:

Edit2: I do have a time-lapse of one of the fails, but it is a large file so cant upload it here. Can find a way if it would be helpful! Here is a screen cap of it
image

Thank you for the clear photos.

What the photos don’t show is the design intent of your print. By that, I mean we see a bunch of clear photos, but without context on how they were laid out or what the end model is supposed to look like, it’s just guesswork as to what part of the output you’re unhappy with and what you were aiming for.

Here’s an example of a thread trying to diagnose a problem: {click here}. In that thread, I cite the kind of information needed to properly understand what’s going on under the hood.

I can already see one issue: you’re experiencing poor bed adhesion, along with some stringing. These can be related, or they may result from entirely different causes.

In this example, what are we looking at? Is this the top, the bottom that was in contact with the build plate, or something that was held up by supports? If you want quality feedback, these details matter.
image

In this case, again, what am I looking at? What was the model supposed to look like before it was sliced? What filament was used in this example—was it PLA, PETG, or something else?

Similarly, in this example, are these features intentional or are they artifacts? If we could see what the original model was supposed to look like before it was sliced, it would eliminate the guesswork.

Conversely, you can always upload the 3MF file of the model you’re trying to diagnose so we can directly inspect both the model and the settings. However, make sure to include at least one annotated screengrab highlighting the specific area you want reviewed. This method is the fastest and most accurate way for the community to assist you.

You’ll find that a lot of folks here are very willing to jump in and help a fellow 3D enthusiast but the more details you share the easier it is to answer and the greater likelihood of a quality reply.

One tip

Did you dry and calibrate your filament or are you relying on factory defaults. Some of what you displayed can be explained by poor filament tuning and or filament moisture. And don’t rely upon, “I just pulled it out of a factory fresh bag”. Factory filaments need drying too, even PLA sometimes even though it’s not supposed to need it.

Hello and thank you for the tips! I tried to include everything I thought was useful - will try to be more thorough in the future :slight_smile:

I will try to answer your questions.

First - your {Click here} link seems to be broken - I cannot click there.

Second, the blue hexigon print. The stringing i think is an artifact of the other issue I am seeing. I don’t think it is bed adhesion as the print was quite stuck to the bed (had to use a scraper to get it off easily). Here is the print that I did just before it (it is the 10th print of this one I have done so far)

The yellow circle thing is the top of the print from this print: Box & Bolt, 3D Printed Cardboard Crafting Tools by Valeria Momo & Mattia - MakerWorld. This was in Bambu PLA basic Yellow. I was able to print this in yellow (Same filament roll) after re-calibrating everything and doing a hot end poke with a needle. But then the next print in yellow failed. Here is a photo one before / after calibration (but then without changing anything the calibration starts slip after a small amount of printing.)

The grey one is this print: Millennium Falcon Nest Mini Holder Remixed by nweishar - MakerWorld in Bambu PLA Basic Grey. The green squares you added are part of the model.

I did thought I mentioned that I did calibrate - I ran 3 calibration tests (with the squares and numbers) and 3 or 4 calibration tests with the lines / V pattern to set the K Values.

Regarding drying the filament - I do not have a dryer. I didnt think I needed to dry them right away :frowning: I have put the filaments in a dry box (sealed cereal box with desiccant inside, maintaining 10% humidity level). AMS has desiccant inside as well and also has a 10% humidity level.

Edit: This is the funnel that has the strings at the top: Bosch 800 Series Dishwasher Rinse Aid Funnel by Boxerman - MakerWorld

1 Like

Thanks for adding additional context, this is helpful. And thanks for pointing out the defective link in the original post, I fixed it. But here it is just in case.

OK. Armed with the new data, let me go through what is worth investigating one piece of evidence at a time.

  1. You’re ruling out bed adhesion, so cross that off the list.
  2. This new image information on this information is telling. What I am seeing here can be explained by filament moisture but it could also be filament speed. The point is, you can try to calibrate out the speed portion.
  • Try running the printer in “silent Mode” which is 50% speed. This will give you a one-button experiment to see if the problem is flow related at the expense of doubling the print time. However, if it is flow related, then you can focus on filament calibration.
  • This example here that for some reason did not display the first time I read this post, is an example of speed-induced flow problems. As you change layers, the filament isn’t “setting” properly. Slowing it down can help.
  1. When I say calibrate you filament, perhaps that’s a poor choice of words. What I really mean is “filament tuning”. These are the fine adjustments one can make to each filament profile to get maximum results. However, before you go there, it’s important to diagnose the speed and temperature issues that may be the root cause. Filament tuning can cure a lot of sins but it’s always best to start with all the other issues resolved first.
  1. Filament dryer–You already have one. See this video.
  • https://www.youtube.com/watch?v=WC3jvuq-uq8

  • My first dryer. Real High tech, right? :laughing:

  • And if you intend to purchase a purpose-built dryer, here is a review I did comparing two driers and some methodology to judge what may work for you. Sunlu S2 VS Creality Space PI Bake-Off Review

  • Number 1 rule of filament drying: Make sure you weigh it before and after drying. Otherwise you’ll only be guessing if moisture was the issue. Remember 1g=1cc=1ml of water. A cheap $10 kitchen scale is more than enough accuracy for this purpose and something you’ll want in your 3D printing tool bag anyway.

  1. If we look at your Millennium Falcon model. If the Makerworld 3MF is exactly how you printed it, then it’s calling for PETG. Assuming you’re using the new PETG-HF because the old PETG is no longer available, you will want to double-check that you’re using the correct filament profile or simply test it for yourself using filament tuning techniques. Also, if you are using PETG, try PLA filament first and then repeat the experiment with dried PETG.

  2. Filament Tuning – Just employ Orca Slicer and follow the methodology in these videos:
2 Likes

Thank you very much for the wealth of information! Due to life it might take me a day or two to try them all so I will get back to you in a bit once I have time to go over it all.

This was exactly what I was looking for, some expert knowledge on what to look at next, so much appropriated.

The Internet is awash with conflicting, sponsored and often misleading information if you don’t already know what to look for so having guidance to pick the good from the bad is the best part of online forums :slight_smile:

Ok, update!

Managed to find some time today to go over most of your suggestions. I also tried to reach out to Bambu (as the printer is less then one month old. Wasnt expecting anything based on some comments I have seen here but you never know!).

Bambu said that it seems like a clog and they are going to send me a new hotend. Since the wife needs some prints tomorrow I thought that I would preemptively change out the hot end with the spare that comes with the printer and give it a shot. The spare worked perfectly with no changes (I decided to reset to factory defaults then run calibrations to remove anything I tried while attempting to debug the issue). Prints perfectly. Since I didnt change the colour, ams, settings or dry the filament - I guess this one was actually a clog! Not sure if I was improperly unclogging it or there was some other kind of foreign debris in the hotend that wont be easily removed. I will try to clean it out again when there is less holiday pressure as I do not like to waste!

  1. I see your link now - good to know for the future! Lots of screenshots with arrows + text (using slicer to help x-ray and point)
  2. yep
  3. I was going to try this on slow and see what happens, but as above wife didnt want to wait for me to play around :stuck_out_tongue:
  4. Ahh, rather then running the calibration steps you modify the default values of speed, hot end temp, bed temp, fan speed etc to affect the printing process. :+1:
  5. Interesting! Watched that video and seems good! That sent me down the rabbit hole of looking for filament dryer prices as well as the cardboard approach. Best option seems to be the weight approach (Keep going until the weight stabalizes.)
    Seems that the P1S can do filament drying too on its own - How to Dry Filament on the X1 and P1 Series Heatbed | Bambu Lab Wiki.
    In case others see this thread, I found this food dehydrator that is sub 100$ and you can just drop a 5 gallon bucket on top of it
    image
    src: https://www.reddit.com/r/3Dprinting/comments/16on0n2/what_filament_dehydrator_do_you_use/
  6. I did run it in PLA, so I guess the printer profile there was not helpful - Sorry about that!
  7. These videos are on my “To Watch” list now - will get to them eventually. I have read that Bambu slicer is just a fork of Orca Slicer (which will make all the videos quite relevant) - Should I be using the Orca Slicer or the Bambu Slicer, or are they so similar it doesnt matter?

Again - amazing help!

Edit: I meant to add a question!

In the filament dryer video there is a section that shows the rates:
image
In there is listed Dessicant - can you just add dessicant to a drybox and it will passively dry it over time? If so, that might explain why one of my dry boxes had the desiccant change color after like 3-4 days of being in there.

The extruder gear could be another possibility. Especially if you run wood, carbon fiber, marbled, or glow in the dark filaments. When the gear starts to slip it can cause a clog, which in turn makes you think that’s all that is wrong. After cleaning. The clog it will work fine for a bit, slip, and then it looks like a clog again. This may not be it, but definitely something to add to your list should the problem continue.

Good luck!

2 Likes

Note: those filaments can all be abrasive and cause the gear to wear out. This can cause ANY future filament to slip once the gear starts to wear down. I had a single roll of glow in the dark push an extruder gear over the edge before.

2 Likes

There are several ways to dry filament: using desiccants, a food dehydrator, or a purpose-built filament dryer. Here’s a breakdown of why desiccants alone are insufficient, why a food dehydrator may not be the best choice, and why a purpose-built dryer often stands out. For a more detailed analysis of the physics behind dehydration, I recommend checking out @MZip’s excellent write-up. Unfortunately, I can’t locate it at the moment, but it’s a thorough explanation worth reading.


Why Desiccants Alone Don’t Work
To answer your question: no, desiccants are not enough by themselves. While they do absorb moisture, they work passively and rely on water molecules naturally migrating from areas of high concentration (the filament) to low concentration (the desiccant). This process is extremely slow and inefficient without heat.

Think of your clothes dryer: would you expect your clothes to dry if they were tumbling without heat or air movement? Heat is necessary to drive water molecules out of the material. Desiccants lack this capability, which is why they’re insufficient for drying filament effectively. So why does everything from medicine to electronics to filament have desiccant bags? The answer is to prevent what residual moisture may be sealed inside the bag from migrating onto the product. Electronics in particular can oxidize very quickly with just a small amount of moisture so we generally include a small desiccant bag to trap the ambient water molecules. Consider that much of what we buy today is also made in areas of the world that are tropical and humid and that’s another reason.


Food Dehydrator vs. Filament Dryer
Although a food dehydrator can be used to dry filament, unless you already have one, it’s just a dumb idea. Plus, do you really want to use it for food after you have used it on filament and if it was used lets say to dry something fatty like beef jerky, you likely will impart some food molecules onto your spool. Hell… anything that can hold a spool in a warm environment will dry it, even something as simple as a $10 shoe dryer net for your clothes dryer can even work although I do not recommend it. :stuck_out_tongue_winking_eye:

However, food dehydrators typically cost around $100. A purpose-built filament dryer, on the other hand, costs less (under $65), includes features like moisture indicators, and allows you to print directly from the dryer. It’s specifically designed for drying filament, making it a more practical and better solution overall.


The Cardboard box
I initially used a DIY solution (a cardboard box) but switched to a purpose-built filament dryer because it was more convenient, efficient, and practical—especially in terms of space savings and it didn’t tie up my P1 for hours. If you’re deciding between these options, a purpose-built dryer is the best combination of value and functionality.


But the #1 thing I cannot stress enough. DO NOT BELIEVE WHAT YOU READ HERE OR ON THE INTERNET!!! Just because some of us with more experience may espouse a point of view, does not mean we are correct. I stand by that example. None of us knows your exact printing circumstances. If you really want to acquire Ninja-printing skills, then you have to be skeptical and verify everything for yourself. Above all, don’t slip into the abyss, it is all too easy to get caught up in speeds and feeds and specs. Read what you can, apply it where it works and then test it. After you’re done testing it, test it again!!! :smiling_face:


And again, for anyone looking to dig deeper into the science behind filament drying, I highly recommend @MZip’s detailed write-up when you have the chance to find it. His contributions to the forum are always insightful.

1 Like

I found myself reading through this and truly appreciate the technical and thorough assistance you provided in this matter
I finally bought a couple printers (A1, A1m) recently and won’t go back to another Brand/Mfg. and it’s awesome to read that quality is A-Z from hardware/sw to Support!

Have you reset all the slicer settings to default? The yellow piece looks like it only tried one layer for the top. Or, I’m looking at the bottom and that was printed without support.

I got mine a while back and was able to use the default settings without any issues. Once I got more comfortable and started adjusting them I ended up with some bad prints, for sure.

Welcome to the forum. Were you addressing this to me?

Since you took the time to complete your profile and add an Avatar, I’m assuming you’re no newbie to discussion forums. :+1:This forum uses “Discourse” software BTW.

If you want to gain the full benefits of this community and reply to an individual post, the best thing to do is to is to scroll to the bottom of the post of the users post that you wish to respond to. This will do two things:

  1. It will leave a navigation link back to the original post so that others can understand the context of your reply.
  2. It will create a notification back to that poster letting them know that you replied to their post. So if you have something that you want them to read, this is important.

You will know that your post was responding to the correct post when you see their Avatar in the upper right hand corner of your message.

Hopefully you did not throw the nozzle away. You may be able to ‘save it’. It looks like it was a partial clog. You will have a number over the lifespan of the printer.

The best way to resolve it is to do a ‘cold pull’. To do that you want to heat up the hot end to 250°C And run cleaning filament through it. Only run about 2 to 5 inches or 10 to 20 cmof cleaning filament through the end of the nozzle. Then turn your temperature down to 100°C And wait until the temperature actually hits 100. Then press the extruder gear up so that way the filament will be unloading. At the same time, pull up on the filament at the top of the extruder assembly. When you pull it out, you will likely find material stuck on the cleaning filament. Continue to do and tell the filament is coming out straight underneath the nozzle and not off to the side like a 45° angle or more make sure that the filament is coming out straight. When you pull the filament back out, make sure that the filament is clean and does not have any extra debris. You will likely need to do this 2 to 5 times.

I may be late here, but I did this dryer review a while back. Both bought and paid for by yours truly. I can tell you drying does work on PETG, although I have seen not noticeable difference with PLA yet, perhaps because the PLA was already dry. It seems you have figured out your main issue, but it seems curious to me that one would print clean and the next not. A clog is a clog. Make sure you don’t have a kink in the feed (boden) tubes anywhere down the line that may cause the intermittant resuts you are getting.

Dryer review - https://youtu.be/c9UPBI1Uv6s?si=3v_rQQKfQZjU6pcW

It was the top of the model, I even noticed some prints the hot end moving around 1-2mm above the print still “printing” but extruding nothing. The extruder gears were not even trying to turn (i dont think?) They are working fine now though with the new nozzle. I dont think I changed any settings as I am sitll new at this I am using defaults :slight_smile:

Well I did do it once - will try it again more in the new year :slight_smile:

I think this is the link for those who are looking. But it is over 200 posts long - lots of very interesting stuff there!

Oh goodness yea. I would never waste when I dont have to! Just expedient with some time pressures for xmas to change it out now and fiddle later :slight_smile:

Ahem cough cough HEAT CREEP cough cough
Remember: keep your top glass off OR front glass door open (printer) so chamber isn’t too hot. If you keep closed chamber will be too hot and pla will start softening inside extruder which causes this problem.

Hi Vong - Here’s a reference I found quite helpful (& still do!) for printing issues:

Print Quality Troubleshooting Guide

Hope this helps!
Ken