P1P Belt/Pulley Alignment - VFA’s,Noises?

This topic has been discussed extensively and brought up numerous times at this point since becoming a known/regular instance. I wanted to shed my insight on the subject after inspecting a P1P suffering a constant HMS: [Abnormal Motor-A resistance] error alarm :rotating_light: every start up and print job… for months now.

Reading a lot about toothed pulley versus smoothed pulleys, doesn’t seem to be a permanent fix. I’ll side with BL on their comment based from a user stating they’ve found it to be more hurtful than helpful in the long term as why the decision for smooth pulleys was made.

Now I noticed a squeaky sound from the [Rear Right Side] - <Facing @ Rear panel> and seen the belt would rub ever so slightly against the lower flange of the pulleys. Noticing how the pulley tensioners work isn’t as easy as how [BL] makes it seem when providing their video on tensioning the belts.

•This is the [Left Rear Side] photo above.

  • After an hour of tensioning again and again I finally was able to achieve the belt to ride in the middle but still shift near the top/bottom when all the way forward/back.
  • This generated a smoother flow of the toolhead without a squeaky sound as well.
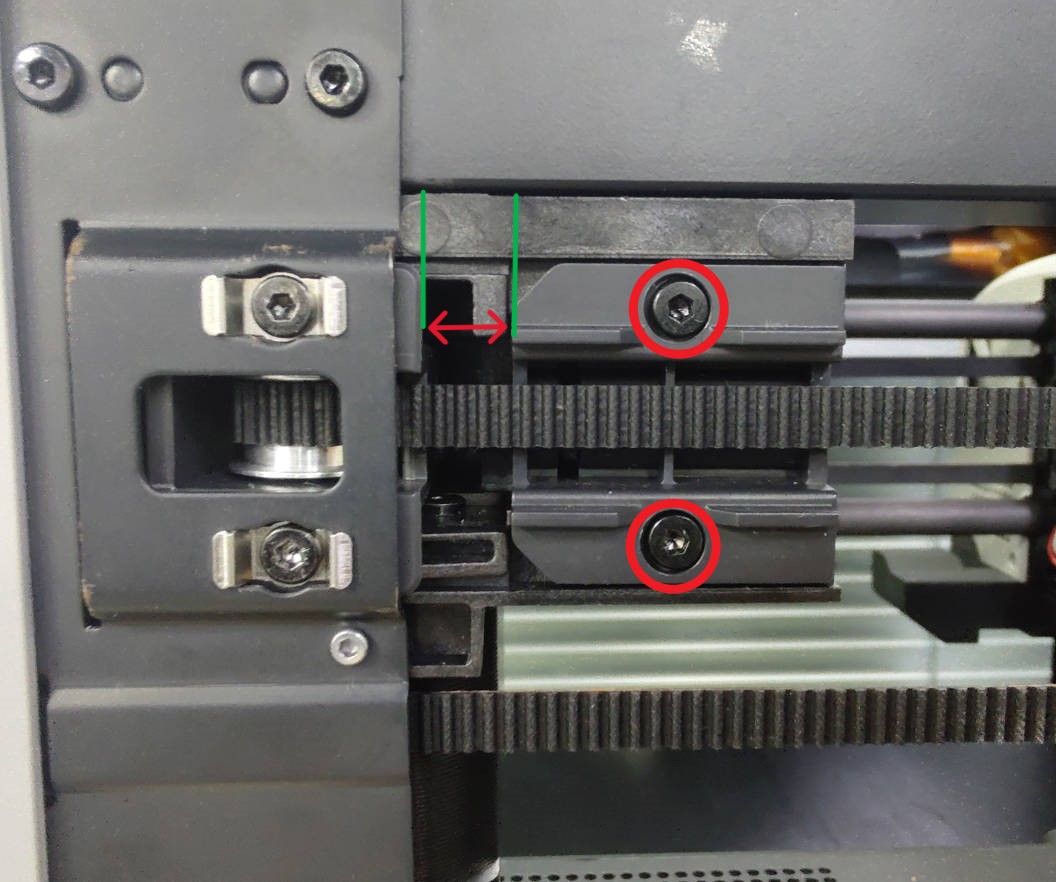
  • I measured the gaps of the [Red Arrowed Regions] of the tensioner & pulley. They obviously are very different plus shift as machine warms up & ambient temps change with the belts


This is the [Right Rear Side] photo above.

•I’ll update with comparisons of prints post alignment & aligned

Basically of all the different topics on how to resolve this due to how the machine is laid out and functions, this will vary amongst every single printer will absolutely zero standard and that’s just the way it’ll be due to how it’s designed.

My theory’s on resolutions and remedy’s

• Bambu Labs changes design to incorporate a [Taller Rear Set of Pulleys] to accommodate the travel of the belt to prevent any rubbing

• I’m going to design a “adjustable wedge”
- People in the machining industry will know something called a [MITEE-BITE] which is used to hold blocks of material with extreme force and pressure utilizing simple force of a taper on taper design.

Basically it’ll be 1 piece but have 2 rear counterbore threaded holes that’ll [pull] by thread a tapered rectangle a little bigger than the gaps in length and as it tightens it’ll [spread] the distance between the tensioner. Having [2] allows you to dial the upper and lower easily to align the belt.

This would be best suited in aluminum but I’ll attempted in FDM testing some filaments. But I find this more practical when “tensioning” your belts and not using a simple shim since none of the gaps are equal. Plus it’ll be 1 tool for the job, in/out then call it good. :+1:t3:

Another tool I was thinking would be useful is an adjustable parallel, also uses a tapered slider that’s used between 2 surfaces.

This doesn’t solve for a permanent fix but merely a faster tool for belt tensioning. Honestly Bambu Labs should make this device or a device.
Let me know what you think

1 Like

Here’s a nice video explaining the adjustments and affects:
Banding fix

1 Like

So this is actually the video that had me check out this sound and issue. I pretty much followed the exact method until it came to positioning the belt within the pulley’s… Mine being a P1P also [Not sure if that makes a whole lot of difference] but felt as if I had to really squeeze tight to get them centered best front to back…

Tool I suggested making would basically allow the aligning part of centering the belts easier and effortless.

I wondered about the system myself when adjusting my belts…
Considering the high precision printing it makes no sense to have such a tough adjustment for the belts.
Took me a while to get the belts run smooth and without rubbing there.
Ended up with both screws loose, moving the head until the belt was centred and then set the screw - a few times…
Trying to get these tiny block to move and STAY in the right position while adjusting seems impossible LOL

Definitely! I’ll be developing a tool to make this very simplistic and as ez as possible for everyone. Biggest issue is the amount of force needed and that each screw has different tension

1 Like

Way ahead of you :slight_smile:
Ok, not really…
I pondered about the issue myself, especially the tricky part of actually keeping the belt centred on those two pulleys…
Funny enough it seems IMPOSSIBLE.
At least on machine the belt moves up and down.
I can get it to not rub but can’t keep it stead at the same height on the pulley.
The X axis is a bit worse here.

What I did was to print like a half circle with a stem and handle.
Why?
Because we are not actually changing any belt tension with those pulleys at all LOL
That happens elsewhere.
At least not in a direct relation to those 4 screws…

The idea is to move the head with one hand while tilting the handle back and forth until the belt is steady enough.
Printed flat gives the best strength.

I like your idea haha I’ll commend you on that. But it’s definitely looking as if at this point an end all solution is an aluminum tool.

Ill draw up a model to post here of exactly what I’m talking about but it’ll essentially have [2] screws that’ll align perpendicular with the [belt tensioner] screws [top] & [bottom] and as you thread [each] into the device the [jaws] will fan out and [push] against the tensioner so you can individually adjust the upper and lower portion.

It’s an extreme fine balance plus I suggest doing it immediately after the machines been running so you get the best result. But I’ve had mine run since the post and it hasn’t moved back against the flanges rubbing.

Theory is as the belt warms you tension against the pulley then when it cools itll shift but once warms up again itll settle back into resting position.

Just imagine for such an expensive machine Bambu would have included some easy options …

I’ll be honest, when I first seen “auto belt tensioning” then when I first seen what that meant I felt lied to :joy: not sure how it even works as “semi-auto” tensioning…