I’ve got a bit of a challenge. My son is in an aerospace engineering class and they are building rockets that they hope to break the sound barrier with. In order to do this, the nose cones for the rocket must be made/printed from something that is extremely heat resistant. The instructor took a look at the prototype I printed out of PETG and started asking more questions about my printer setup. I have a P1S with a hardened .4mm nozzle and a hardened extruder gear set. Given the heat requirements, he asked if I could print another one out of PC-CF. I found the following PC-CF on Amazon, and bought a roll for testing purposes.
As I am working up the courage to give this a try with some somewhat expensive filament, I am running into questions.
I notice that when I load any filament into the P1S via the onboard display, it runs the nozzle temp up to ~250C before asking me to feed in the filament from the spool holder. 250C is not hot enough for this PC-CF filament, based on what I am seeing about its specifications. The label on the spool says 250-280C. Question 1 is, how do I load it without jamming?
I have read all kinds of other tips like -
Pre-heat the bed to 100C and turn on the aux fan to circulate the heat in the build chamber for 30 min prior to attempting to print with PC-CF
Use a .6MM hardened steel nozzle
Use glue stick (I have Cryogrip plates I could try)
Print slower in general
Download and save a filament profile as a starting point from one of the websites (Printables maybe, can’t recall where I got it)
Dry the PC-CF for at least 8 hours prior to printing with it.
I am really looking for validation and/or things that I am not considering here so that this nose cone print is as successful as it can be without wasting a bunch of costly filament.
Technically, it’s within spec but most other PC-CF brands have a much higher printing temperature range which creates an air of skepticism for me. Same question still applies. How do you load filament that requires a 280C printing temp. Forget the brand/specs I mentioned. I’ve searched and answers are inconsistent.
I think, when printing PC, the most important factor is sufficient ambient temperature inside the printer. I heat the bed to 100°C and at the same time use a hair dryer to blow hot air through the slightly opened door for 5-10 minutes. If you are more patient than me, you can also wait for the bed to heat the inside. You want a temperature close to 50°C at least.
I don’t know, if the cryogrip plate is a good choice. It might or might not, no experience. I use a smooth PEI plate with glue.
PC-CF should be much easier to print then pure PC.
But I’m surprised, why he suggested PC-CF when high temperature resistance is the top goal. E.g. something like PA6-CF is far more heat resistant.
Properties of PC-CF
-Thermal resistance: PC-CF has one of the highest thermal resistances of all 3D printing materials.
-Strength: PC-CF is a strong, rigid, and dimensionally stable material.
-Flame retardancy: PC-CF has passed the UL94 flame retardancy test and achieved V0 performance.
glass transition temperature of PolyMide PA6-CF is 74.2°C.
Anneal the model in the oven at 80–100°C for 6 hours after printing.
glass transition temperature (Tg) of PC-CF is between 130°C and 150°C
Nylon deflects heat well after annealing but also softens easily. It comes fairly soft in the non cf variants. Nylon is great for things that need to flex over and over and not break or for things like chain guards that have something riding against the nylon(wear resistance). Add cf and it gets even stronger without the flex but loses some wear resistance. Also self lubricating but the cf kinda ruins that and thats why you lose some wear resistance.
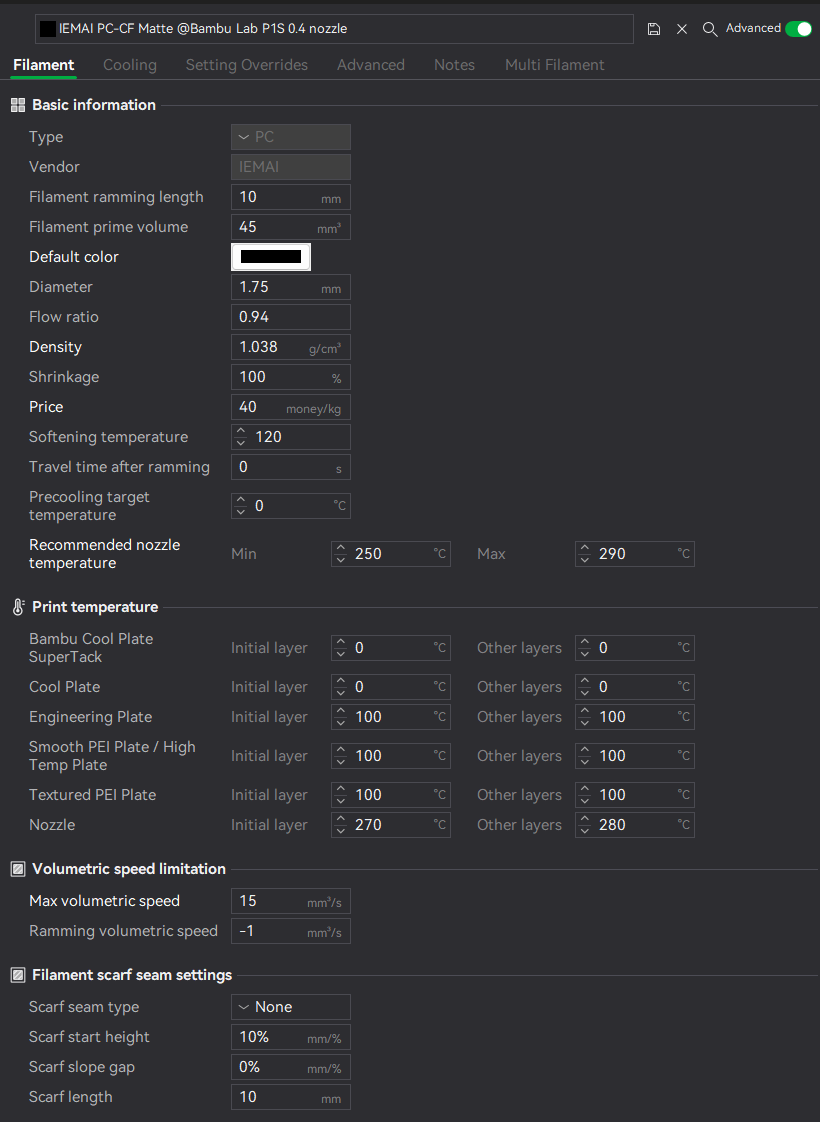
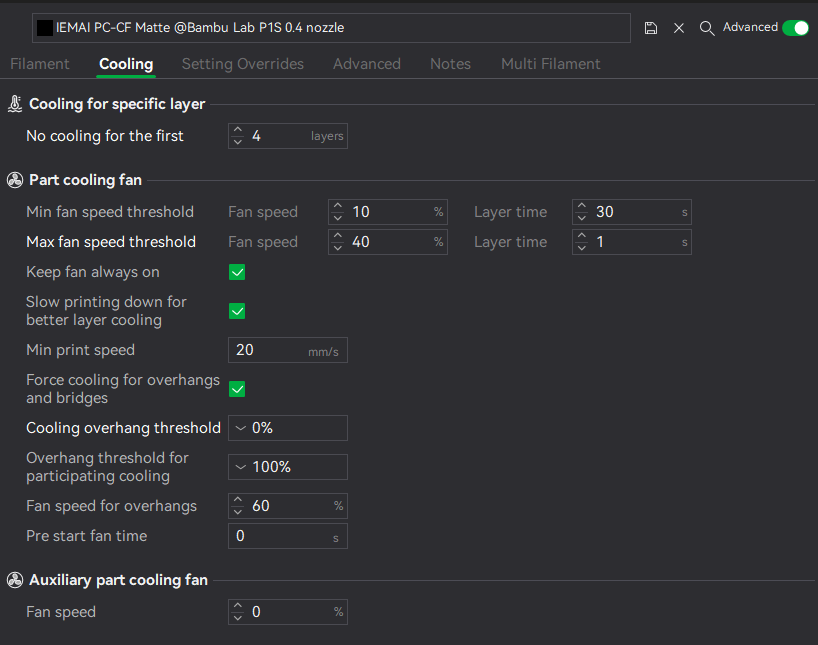
Using the TDS and MSDS sheets, I made my own profile in Bambu Lab for this specific vendor/filament. I decided to just jump in and print a benchy. So far so good.
Was this the pc-cf? What temps are you running? You may have better luck using the textured plate. Youll also want to add a brim of atleast 5mm with 0 brim to part gap. Also want to let the chamber heat soak a bit before starting by running the heater bed at a high temp. Fans off for printing. Including exhaust
Oh and as always, make sure the plate is clean. Dry with a paper towel
I used the cryogrip frostbite build plate to make the parts stick without glue. I even got the printed weight prediction pretty dialed in. The slicer said that it would be 246g as configured and it ended up being 249g.
Hi @WilliamXO – can you share your bambu studio filament profile file or share your settings… I haven’t been successful at getting PC-CF to run on my X1C. Thanks in advance for any help