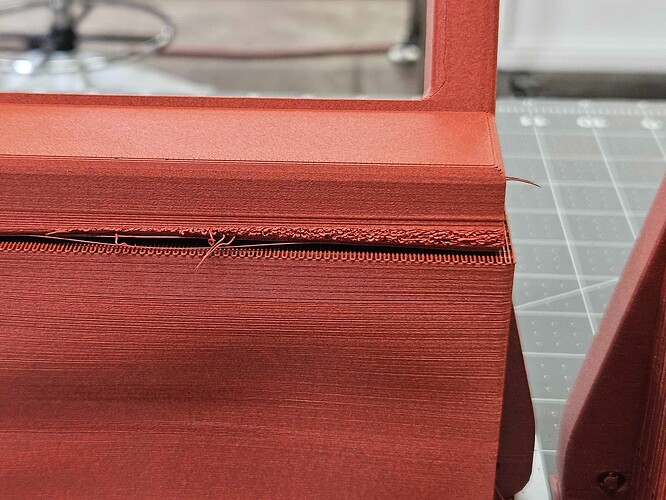
Hello, I’ve been printing with X1-c using PETG-CF black and it has been printing good for weeks. I had default setting for PETG-CF and Yesterday I changed the filament to red PETG-CF. The print fail at the middle of print, had very rough layers. I considered that as one of the random fail and wanted to move on to next print using black, but now it seems like it fails every time when I print even with a small print.
I am using 0.2mm standard @BBL X1C preset
Solid side seems a bit okay, but where the support is printed, it seems like the nozzle is under extruding. Also the speed looks a bit too fast for the supports. When I change the speed down to 50% using silence function, it seems like it does a bit better, but I have been printing parts just fine with standard speed.
I ave tried printing several times with the same model, but still the same issue. I switched to tree support, and the support started to fail after some prints. Rectangular supports looks worse.
If you guys have any similar experience or any suggestion, please let me know!
Thank you
There’s your problem.
CF and a .2 nozzle will never end well.
Assuming you speak about 0.2mmlayer heights and use a hardened 0.4mm nozzle:
Did you ever print a temp tower or such for this filament and KEPT it ?
If so then try again and compare the results.
I might be wrong but if things suddenly fail like this there is a chance the heater or temp sensor are to blame.
Sometimes the heat transfer compound dries out and with that the heating does not work as expected or the temperature reading is way off the reality.
If the hotend had some really good use get some fresh compound, take the plate and sensor out, clean properly and apply with the fresh compound.
If the stuff feels dry and crumbles it is no good any more 
Cleaning, taking the sock off and such can move the heating plate and sensor a bit, takes less than 15 minutes to do so why not try before running in circles for no reason?
2 Likes
I am under the impression he’s referring to a .2 nozzle.
If not than I apologize for the quick answer.
1 Like
Hello,
Thank you for looking into my issue and possible suggestions.
I have not printed any temp tower before, so unfortunately I could not compare the tower, but I opened the hot end, and all the compound was dry and crumbled. I just went and swapped to a new complete hot end complete set, and it was starting printing fine!
I am not sure if the dried thermal compound was the issue or not, but it makes sense to me and it is printing fine now.
I successfully printed couple more big parts. But the print has some struggling spots for some reason. Could you guys think of any reason why this is printing rough always at this position?
This one, I am using 0.4 harden nozzle tip, with PETG-CF red with modified preset of 0.2mm with increased number of wall loop to enhance the strength. It prints pretty good but it has some rough ugly surface only at this spot.
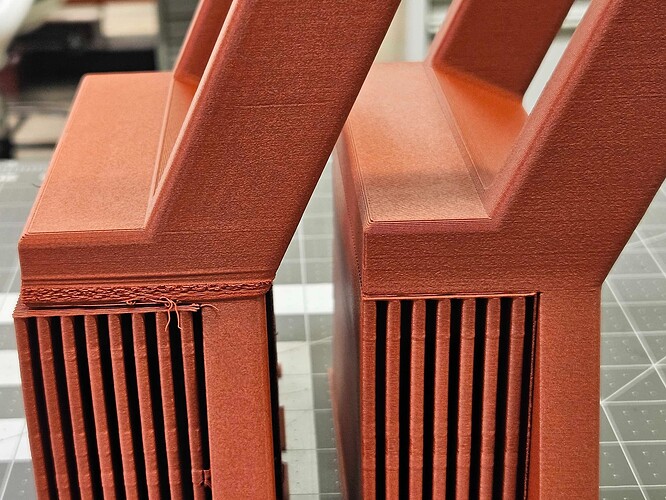
same file and setting, 0.6mm nozzle printed perfectly. 0.4mm nozzle had some rough surface issue at the specific spot, but manages to complete the print.
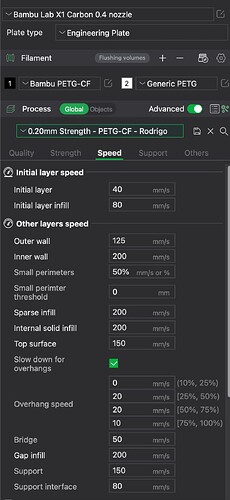
I changed all the speed to be below 200mm/s since I think that the maximum speed with PETG-CF was 200mm/s.
I printed the whole thing on 0.4mm nozzle tip with silent print speed (50% print speed wishing the slower printing speed will yield to a better print) but it printed out with the same issue.
(0.4mm nozzle standard, 0.4mm nozzle silent, 0.6mm nozzle standard)
I don’t see anything strange from slicer.
I am using 0.4 nozzle with 0.2mm height of layers preset. Sorry for the confusion and thanks for still looking into this!
What you struggle with is adhesion, specifically layer adhesion for the support interface.
Once the filament starts to lift off the following layers can only get worse until the print is stable again.
How well are your supports in terms of being able to remove them?
For some filaments is enough to provide a base, other filaments require a bond to this base so they won’t lift or curl up.
Unless in other parts of the print the support is fused to the model try to decrease the distance between support interface and model.
Changing the pattern or spacing can also sometimes help.
The later can be used in two ways.
First by providing a more density to give a better surface or bond.
And then by providing less to bond with in order to make the removal and clean up easier.
Do a small scale test print to just check the adhesion between supports and model.
Like a flat ‘roof’ sitting on 5mm poles.
First try to find the best distance that gives a good enough surface without fusing to the model too badly.
You want the underside of the roof to be as uniform and flat as possible.
After that and if required adjust the interface pattern and/or spacing.
Sometimes even the direction plays a vital roll as it can happen that the outer wall is printed right between support lines, making it very easy to lift off.
Check the bridging settings !!!
You can choose to not support bridging areas for example, which helps a lot if the supports are very hard to remove or get to.
And if the slicer preview shows it DOES apply a bridging layer on top of the supports than related adhesion issues might find a fix in the bridging section rather than the support section.
2 Likes


