PETG Surface Issues + BuildUp

Hello,
I recently got an Bamu Lab X1C and at first printed PLA with 0.08mm resolution and the basic settings from which I got amazing results. (Pretty new to 3d printing)
This week I started printing with PETG Basis Blue from Bambu Lab.
The results sadly are pretty subpar, especially for the top surfaces. The rest is ok.
At some places I have small holes in the top layer and at other there is excess filament. During print, filament is building up on the nozzle, which (I think) is scraping at the print?
I tried different resolutions, from 0.08 - 0.2, didn’t really change much.
I reduced speed and increased but I don’t have the feeling it helped much.
I did hours of reading and researching but I’m still unsure which parameter could be relevant or how to go at the problem. I read about z-distance, temperature, k-value,… .
What I found out is, small object print very nice and don’t have any major issues, but the bigger the print, the worse it gets.


I hope somone can guide a newbie like me.
PS.: Is PETG even worth the trouble? I heard ASA is very similar or even better in many areas than PETG and prints nicely like PLA.

LG Tropaion

Oue. PETG, my favorite topic.

First, Bambu PETG Basic is a bit subpar filament. While you can successfully print with it - it’s not reliable or easy to print with.

Don’t use 0.08 resolution with PETG and don’t use infill that overlaps itself. Go with gyroid infill.

1 Like

Haha yeah, I already realized, PETG is the favourite 3d printing topic :D.
Would you recommend switching to ASA?

Sadly I read about to subpar bambu petg filament after buying 3kg of it…maybe I can return it? 2kg are unopened. I heard eSun is pretty good.
I already tried every resolution from 0.08 to 0.2, didn’t change much with my issue. What is the smallest resolution you recommend?
I already read and tried gyroid infill, also didn’t change anything. I don’t think infill is the cause since it’s only the surface or am I wrong?

ASA? ASA is a different material and can be slightly toxic if used in non-ventilated areas. Also, I would not suggest printing ASA on anything but an Engineering plate with glue. ASA and ABS are challenging materials to print.

Also, a 0.6mm nozzle is way better to print with BL’s PETG. I also had numerous issues with the factory 0.4mm nozzle and BL PETG Basic and wasn’t able to resolve it consistently enough … so YMMV.
You can try what many ppl here suggest (I disagree with that, but I gotta mention) - slow down the print to grandma speeds, use a 0.6mm nozzle, and never use overlapping infill. Your issue is because PETG basic can slowly clog up on 0.4 nozzle and accumulate on the tip, which results in scratching, which in turn accumulates even more residue on the tip … and it snowballs to a failed print.

If you want the ultimate solution to the PETG problem - e3d ObXidian nozzle and something like VoxelPETG filament. Never had any issues. Higher extrusion, less clogging, less problem artifacts.

1 Like

I don’t really care about the fumes since the printer is mostly alone in a small room and I can also just get an BentoBox air filter.
I just often read that using ASA is way simpler than PETG and you can easier get good results like with PLA.

What’s so good about this Nozzle? And is it compatible with the X1C?
I want to switch to another filament anyway, but first I have to get rid of the 4kg I’m sitting on now.

Where did you read that ASA is easier :face_with_raised_eyebrow: its like @Advocado already stated a (very) difficult material. Same with ABS and Nylon (called PA6 or PA12).
PETG is only a little more difficult. Cooling needs to be adjusted to your needs. I use verly low fan sped (15% only) to have stronger parts, but due to this my overhangs are not good.
One thing you can do at first is to dry the filament. Even brand new ones can be wet, because the manufactorer cool it with water during production. PETG is recomended to dry at 60°C for at least 4 hours, better more.
There are lots of filament seller with good filaments, e.g. 3xtrudr, sunlu, redline, form futura, fiberlogy, elegoo (i use elegoo petg and high speed pla as well as extrudr pla and petg-cf). I also tried amazon basic petg which is also very okay, but needed to be dried.
Your print looks like burnt parts or residues on. At the same time, some parts look over extruded and other might be underextruded.
I suggest to print at first lot of PLA filament to learn about 3D printing and how the printer works. Test all the different settings and what they do with your model. PLA is the easiest and most forgivable filament.
Standard is 0.4mm nozzle with a 0,2mm layer height. I agree with Advocado to do not slow down. Its okay with 200mm.
Its also okay to use the bambu nozzle. Its not necessary to buy the expansive e3d set (its pretty good but usually not available). This is something for later.
I suggest to use Orca Slicer. It has more adjustments as well as very good calibration tools which will help you a lot. It is necessary to calibrate each filament to get good results. Here you can read a little about it: Calibration · SoftFever/OrcaSlicer Wiki · GitHub
After good calibration you can do some test prints to evaluate if its necessary to put in a extrusion factor for first and/or top layer.
Hopefully this was a little helpfull.

2 Likes

I read it in many forums :smiley:
I already dried my filament for about 10h in the X1 and also used the Orca Slicer from the beginning. (I’m not completely new to this stuff)
I already did flow calibration, which didn’t help much, but I have a few questions.
Is flow calibration really needed, since the printer supports automatic dynamic flow calibration, which I always do before every print (not sure if this feature is trustworty, didn’t find much about it).
Do you also do calibration for same filament type but different color?
Which calibrations do you do and in which order? Or does the order matter?

First, Kudos for posting high-res photos. Great way to start off the topic and makes it much easier to answer your question.

Second, don’t listen to what you read, trust only what you can measure and observe not what we tell you, even from me!!! None of us are standing next to you so the observations are from 50,000 feet. Take what you read and then use it as a guideline to pursue your investigation.

PETG and it’s more belligerent counterpart PC, are my go to filaments because of their superior performance with respect to machinability, precision and they just work better for making parts.

Now having said that, there is absolutely zero reason why you can’t print PETG at 0.08. I do it all the time. In fact, when printing threaded objects, it’s a must-have as it produces really smooth surfaces in which to create great threads. Just a note, Bambu PETG was one of the worst performers when it came to stringing and clumping. Drying definitely helped but filament tuning was a must. The default profiles I found to be useless, I ended up creating my own profiles from scratch which improved results so much that I was getting very similar outputs like I was with PLA.

This problem here(photo) and the gaps in extrusion are some of the early challenges I faced with PETG and the much more difficult PC, but I was able to overcome them.

If you haven’t already done so, for PETG, I find calibrating these following items in the filament are must-do.

  1. Max flow rate test is handy. It will really let you know if you have the correct settings. Also, if you have any moisture in your filament, a byproduct of the test is that you will see random artifacts in otherwise smooth walls.

  2. If you don’t want to take the time to run the max flow rate test, then simply experiment with dialing back the max flowrate.

  3. Did you try printing in quiet mode? This will reduce all movements by 50% but will allow for more even filament flow.

  4. Did you turn on ironing? While in your case I’m thinking it may not help, it also won’t hurt and will cover up a multitude of extrusion sins.

Good luck :four_leaf_clover: and let us know how you make out.

2 Likes

Hello @Olias, thanks for your extensive answer.
I didn’t to a flow rate test until now but one of the first thinks I tried was reducing flowrate to 10 and reducing speed. The layers got better/nicer, but still had the same problems with surface and nozzle build up.
I did run a few calibrations now, but what still confuses me is, in which order I should run them, I can’t find that anywhere…now I did them according to the Orca tutorial.
What I currently have/did:

  • Flow Calibration:
    Step 1 Value: 5
    Calculation: FlowRatio_old*(100 + modifier)/100
    = 0.95 * (100 + 5) / 100 = 0.9975
    Step 2 Value: -2
    = 0.9975 * (100 - ) / 100 = 0.9975
  • Pressure Advance Line Test:
    Here I got clear result and chose: 0.048
  • Pressure Advance Tower Test:
    Here I’m currently clueless, there is no usefull value I can use. Because there errors aren’t uniform and I have at every setting some good and very bad results…of the bad results, either the bottom 11mm x 0.02 = 0.02 or 31mm x 0.02 = 0.062 is the best


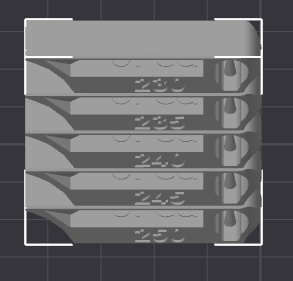
  • The last one I did just now is printing the temperature tower where think 250°C is the best temperature, with the least stringing and overhang.
    N
    But I have no idea how I should set the temperature since the nozzle temperature is an range and not an absolute value.

I tried silent mode but it only improved the layers not the surface.
I didn’t turn on ironing but I will try it.
With the last big print, I paused the printer before reaching the surface and cleaned the nozzel, then I got a pretty good result (expect for seeing at which layer I paused).

I hope you can guide my a bit :slight_smile:
I think I will also buy an filament from another company for comparison.

That is indeed alarming. Particularly this pictures. This should never happen at the beginning of a print. It really points to a filament flow problem.

While that could be the extruder slipping, I’m going to lean towards moisture in your filament. You should never have gaps at the beginning of the max flow rate test.

Always start a new project for every new test you run, this clears out all settings!

CTRL-N will always start a new project but you’ll be prompt to save the test project, just hit ESC to get past it because you don’t want to save it. Then on the blank plate start the next test.


It might help if you looked at the sliced version of the max flow rate test as the slicer sees it using speed. It should be noted that the the max flow rate test is a script which injects GCode directly into the model before it’s sent to the printer. This is not under your control which is why it’s a great test. It should also be noted that you should never save the test as it can interfere with the GCode on reload. Here’s what that looks like, you have to use the pull down menu and scroll to the bottom and click on speed.

So you can see in this example, the filament is flowing at it’s slowest speeds at the bottom, precisely where you’re seeing a gap. That obviously points to another problem which you have to correct first. I suspect moisture.

Here’s another example of a test I ran yesterday before and after drying PETG, in this case I was looking for stringing but instead I found voids similar to what you are seeing. The voids were caused by a lack of layer adhesion and the head was dragging the filament along since it wasn’t sticking. Now note I went and cleaned the plate again and moved the location just to verify that the lack of stiction was not the plate and the problem moved with the model indicating a flow issue. Now compare it to the after drying photo.

This post is already too long so once you get the filament drying issue fixed, then I can walk you through how to interpret the max flow rate tower.


Likewise on your temperature tower. This is how the slicer sees it.

image

But I can also see from your model that you may not have repaired the open manifold. Here’s what you likely saw after you sliced.

image

And at the bottom right of the screen you saw this:
image

That means you have a hole in your model that the slicer doesn’t know what to do with. We can see that in your model.


After you click repair, you model will look like this:
image

On the subject of PETG temps.

PETG likes it hotter than PLA. Don’t be afraid to go up to 265c. Your test tower parameters should look like this:
image

On the subject of drying your filament

Yes you probably want to at some point invest in a not too expensive dryer box. But did you know you already have one? Check out this video for how to turn your plate and an empty spool box into a DIY dryer. I just posted to this thread on that topic. Just watch the YouTube videos and see my comments in that thread so that you don’t make the same mistakes I made.

I can attest to the fact that you can make a really cheap dryer that works. No need to get fancy. In fact, I would say that using your print bed as a dryer when you’re first starting out will let you know what you like and don’t like. Just remember that you should not let the plastic spool come in contact with a plate over 50c for extended periods. As my post in that thread will show, the plastic spools will melt so you need to raise them a bit off the bed if you keep the bed above 50c.

Note: slow cook is better than high temp fast cook.

4 Likes

Thanks for your nice guide.
I don’t know if I already mentioned it, but drying the filament was one of the first things a tried. It’s one of the few things where everyone says the same :slight_smile: .
But I dried the filament in my printer for 8h with the drying function. Not sure if this is reliable.
Yesterday I ordered the Sunlu Filament Dryer, when it arrives I will try again.

You’re right, I didn’t repair the temperate tower since I thought it would interfere with the test.

What’s interesting is, small parts print very nice, only if they are a bit bigger do these problems occur, did you have the same pattern?

I know I’m late to the party, but I just bought a butt-load of Bambu PETG spools for my new X1C specifically so I wouldn’t have to go through the calibration process, and it appears that I’m having an identical problem. I’ve had to do more calibration with them than with other PETG brands I’ve used. In fact I’m getting better results with other brands. I tried drying the filament as per Bambu’s suggestion (on their product page). I performed the automatic dynamic flow calibration, followed by the automatic flow rate calibration, followed by the max volumetric speed test, so the filament is well tuned and dried, but the results didn’t change.
@Tropaion did you end up figuring out a solution?

I have tried attaching pictures to this post but it won’t let me. It keeps saying I can’t embed media items in a post, which makes no sense. This is my first post on this forum. Maybe that has something to do with it?

Welcome to the forum. Your inability to upload media is likely due to the “new user” anti-bot feature common to all discussion forums. During signup, you were offered a training process that, if completed, will validate your account and enable uploads. Alternatively, you can ask one of the moderators to enable you manually. Unfortunately, due to bots, this has been a necessary measure on discussion boards for at least the past 15 years. You are not being singled out.

I understand your frustration. Unfortunately, the marketing brochures make it seem like this is a print-and-go technology. Often, it is, or at least it’s better than what existed before. However, if you’re expecting a hands-free, print-and-go experience similar to a laser printer, I’m afraid this technology is still many years away from that.

I can assure you that this is purely a coincidence.

Personally, I am not a huge fan of Bambu filaments in general. I find their PLAs to be of much lower quality than what I can purchase for 40-60% less. However, I am a P1 user, so the RFID and AMS features are of no use to me.

That being said, I tested the PETG-HF spool just last week, and I have to give credit where it’s due. It is far superior to anything Bambu has made before. Is it 40% more expensive. Is it 40% better? That’s subjective, and your mileage may vary.

Two things I might suggest:

  1. Ensure you’re using the updated filament profiles. Sync your slicer. Remember, Bambu PETG and the PETG-HF that replaced it have different settings.

  2. You may want to dndure the initial pain of mastering manual calibration, and I promise you’ll be liberated from this kind of issue. Here’s my most recommended video from a YouTuber who cuts right to the chase. There are other calibration videos, but I found his the easiest to follow. You’ll need to load the Orca Slicer variant of Bambu Studio to take advantage of the baked-in calibration tools, but I promise it’ll be well worth it in the long run. https://www.youtube.com/watch?v=02mLDrxEpwQ

2 Likes

@Malek Sadly I didn’t find a solution. I wasted many days and hours but ultimately gave up. I bought the much cheaper tinmorry petg which work really good with the default profile.
A friend of mine tried printing the bambu petg with his prusa, which worked better but results were still much worse than other brands. So I would confidently say, bambu petg is trash. It’s sad because they have such a good printer.

Yeah, I figured as much… I got a message earlier saying my trust level has been upped a notch as I’ve been browsing the forums quite a bit. :grin:

This is good to know. I’m not new to the scene. I’ve been 3D printing since the time when 3D printers were made from laser cut wood instead of aluminum (think the very first PrintrBot model in 2013), but I am new to PETG and Bambu Labs. I’ve always used PLA.

Yeah, manual calibrations are the only thing I’m good at since that’s all that’s ever existed back in the day. Calibrating my first PrintrBot was a nightmare, before they even invented auto bed levelling! That was when hairspray was flying off the shelves :grin:
I was using Orca Slicer with my Anycubic Kobra 3 Combo (which I returned and purchased an X1C instead), and I got quite acquainted with the built-in calibrations. I may use them again, although I found a much quicker max volumetric speed test on Thingiverse.
Thanks for the Youtube link. I’ll check it out.

Let’s see if the forum trusts me enough to post pics now…


…Hallelujah!

That’s too bad… I’m going to keep trying for a while and see what I come up with, as I have 7 other Bambu PETG HF spools to get through!