This is how I connected two AMS units to my X1C. Uses a minimum amount of space in the corner and works smooth for more than 1100 hours of printing already.

3 Likes
Mind sharing what shelves those are?
Welcome to the forum!
I believe it’s these:
https://www.homedepot.com/p/Dolle-ARA-0-24-in-1-in-White-Adjustable-Shelf-Bracket-16672/203485110
I bought the glass shelfs (35 x 35 cm) through Amazon and the mounting hardware at a local department store (Europe).
I found and am using this one that uses 2020 extrusions and is simple to make. It allows my 2 AMS units to sit on the left side of my X1C as I wanted it placed that way on my desk. You have to read and download the correct files for your particular AMS unit as there are more variations that I never knew about. Also, one guy remixed it for one of the versions (the one I have) and is linked on the page.
And here is the link for the V6 AMS rib spacing like mine was.
One of my X1Cs only has room on the left - the most awkward way to load them, so I’ve made a left hand angled bracket for the back.
I don’t think it matters as long as the ptfe tubes aren’t kinked


You’ll want to ensure the buffer has enough room to expand properly. The PTFE tube from the hub to the printer must be able to adjust its effective length—a straight run won’t work; you need a bow.
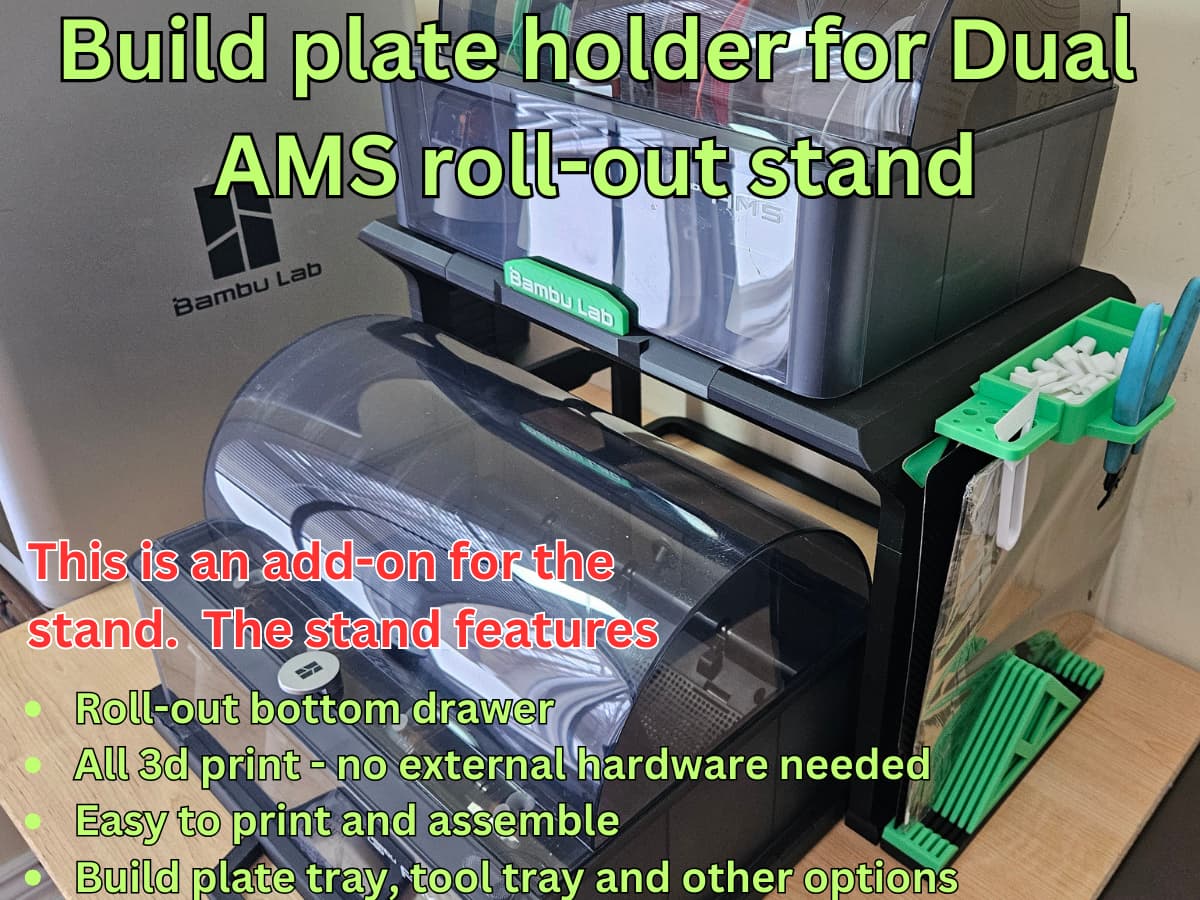
If anyone is interested I have designed a roll-out stand for dual AMS units including a tool tray and build plate holder add-on. BUILD PLATE HOLDER FOR DUAL AMS STAND by Darren - MakerWorld
.


1 Like
Some good advice in this thread!
I’ve finally got round to adding the the second AMS I purchased early December in the BF Sale and would say the optimum place to position them would be to the right hand side of the printer especially when using the standard PTFE tubing that they come fitted with.
In my case the space to the right of my X1C is taken up by a laminator and my original AMS is on a shelf just above the printer itself so the logical place in my setup would be to the right hand side of the existing one.
Initially I thought placing them equidistant side-by-side on the shelf directly above the printer with the gap between them directly above the centreline of the printer would be aesthetically pleasing and would satisfy my OCD but if using the pre-fitted PTFE tubing then the left AMS doesn’t really have enough ‘loop’ in the tubing so leaving the original AMS directly above and positioning the new one to the right solved that for me.

Of course using the longer length of PTFE tubing supplied with the AMS would have enabled me to do just that and in fact solve most placement issues but in my situation would have impacted where my filament dryer would go.
I printed this 4-colour jigsaw puzzle piece to give the original AMS a good workout as it has 31 filament changes;
Figured it that worked correctly then it would cope with pretty much anything I threw at it!
As I only have two rolls of filament in AMS 2 I just printed a couple of single-colour Benchy models and will print the same Multicolor AMS test pieces when I am able to finally add the two colours I have been waiting months for.
Now if only the Bambu UK store would get more of the PLA Basic filament on spools I could fill the second AMS up! ![]()
I’ve been waiting since last November for PLA Basic Yellow & Orange on spools and shortly thereafter for my most used additional Black & Grey but still out of stock. ![]()
In fact if you are looking to purchase Bambu PLA Basic on spools from the UK store you only have a choice of 3 out of 30 colours on spools; White, Red & Blue to choose from the rest being out of stock. It is showing in stock in the EU store but I can’t get it shipped to the UK from there… ![]()
My biggest concern when adding the second AMS was messing with the ID as I am so used to having the original AMS 1 with its regularly used White, Black, Grey & Green filament in that order I didn’t want the new one ending up as AMS 1.
The Bambu Wiki was somewhat confusing with the video showing all connections being made with power switched off where the written instruction specifically states plugging in the second AMS with the power on to assign the next free ID which was how I done it with the new one being assigned AMS 2 which was just what I wanted.
-=Glyn=-