Stringing and clearly visible layer problems on underside/Support-Interface side

Hello :slight_smile:
I’m pretty new to the hobby, got my X2D about a week ago and I’m overall very happy with the results;
However I cant get the underside of prints to not be a horrible mess unless I print them directly on the buildplate.
I’m trying to print miniature sized stuff mainly and the quality is honestly great, except on the underside (even where no supports directly interface with the model).

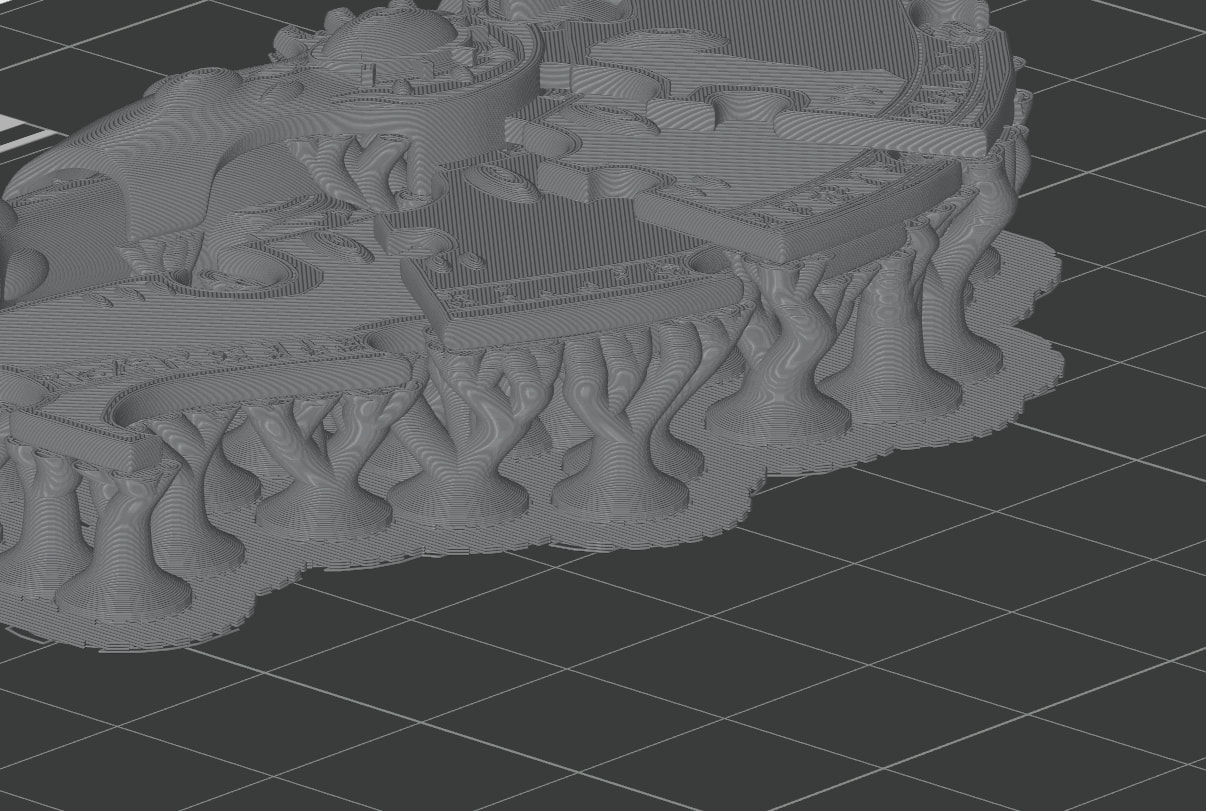
Picture of print’s upper side and underside and the sliced model as an visual example of my main issue

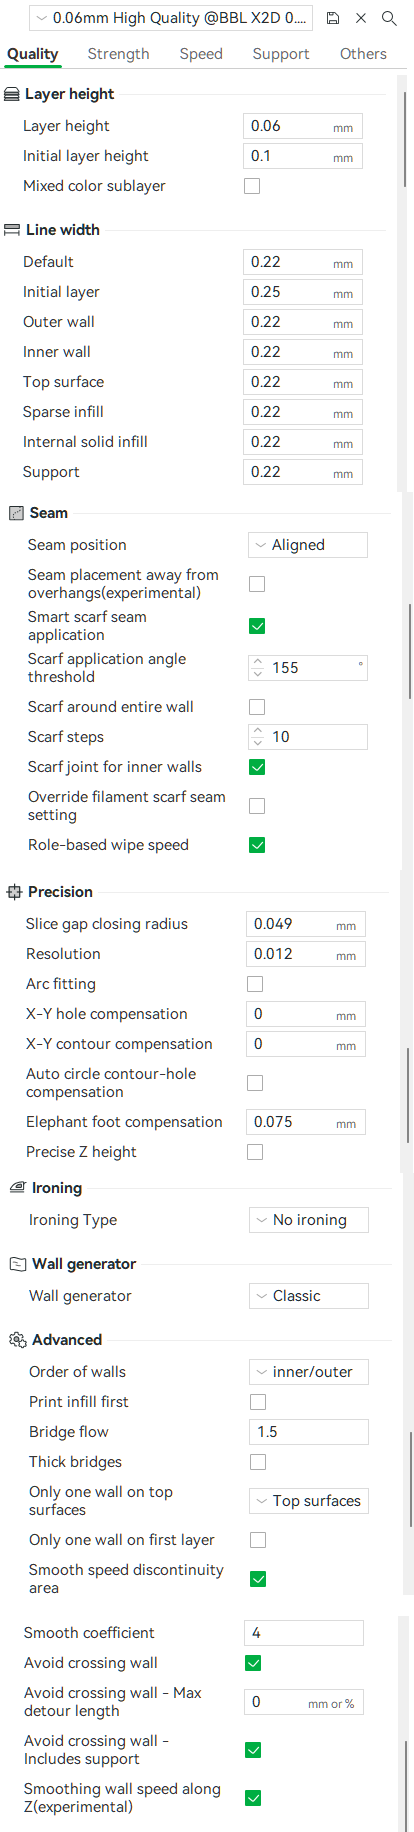
I’m using the X2D High Quality BBL profile, just with 0,06 layer height instead of 0,08 and I’ve installed 0,2 nozzles.

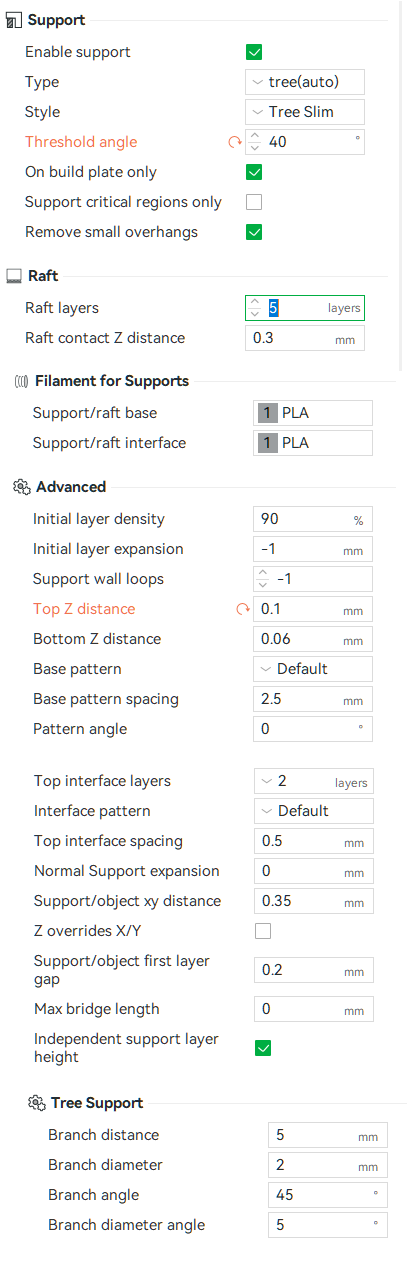
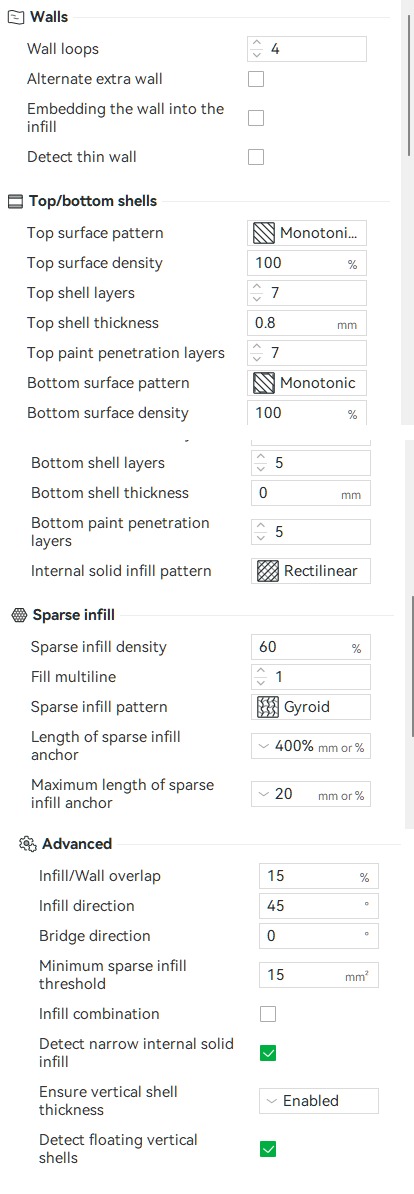
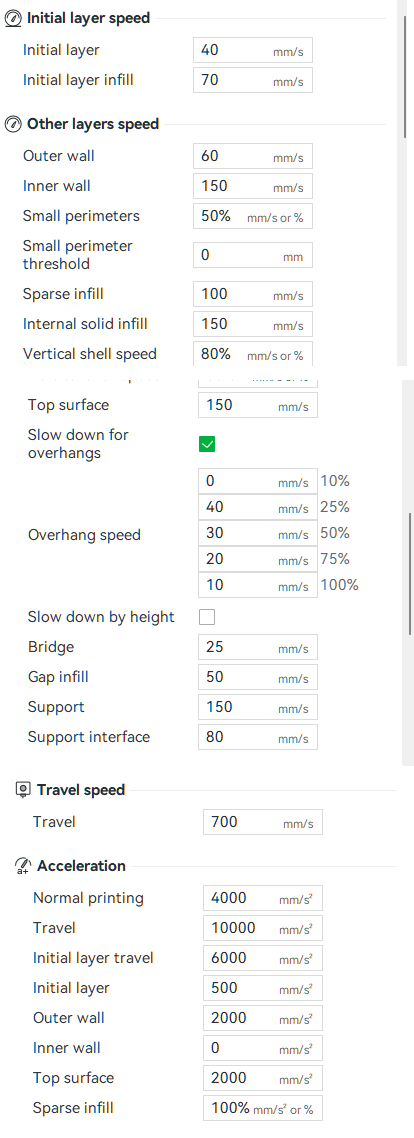
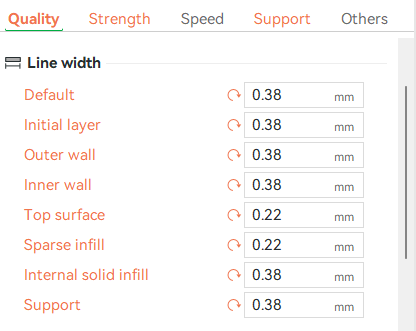
Here’s the my current settings (if there’s a better way to share settings, I have yet to find it)..

Is there anything obvious I’m missing?
Uneducated guess is that the filament gets cold too quickly in the first few layers after the supports, but I truly have no idea.
I havent touched the fan settings for the X2D yet, as there seems to be little info out there on that, so I was hesitant so far.
Any hints and feedback would be very much appreciated.

Nope. You are just diving in at the deep end.

You’ll want to make sure that your filament is really dry. I.e. dry it yourself as new filament has frequently picked up moisture during its voyage across the seven seas.

Next, for smooth support, you’ll want a 0mm top z-distance for the support. But then, you’ll not be able to remove it (easily). So you’ll want to get into dissimilar material printing like PETG support interfaces for PLA or even PVA or BVOH. All three need to be absolutely bone dry for this work though and it takes a few false starts.

As for fan settings, don’t play with them (yet). I have found them to be akin to opening Pandoras box. A much easier way to play with cooling is to first reduce printing speeds. Better a slow, good print a day than two fast, bad prints a day…

Hang in there. It’s a bit of a learning curve, lots of trial and error, but can be very rewarding.

:crossed_fingers: & :four_leaf_clover:

1 Like

I’ve dried my PLA and by “Support for PLA” filaments as per guide in my AMS HT’s, they’re currently sitting at 30% moisture as per AMS HT display.
What confuses me is that even after the prescribed 12h 50°C is wasnt much lower than it is now.

I’m pausing on using the Support for PLA stuff right now as it ends up in an instant spaghetti explosion in the whole printer, even though seemingly correct settings are used (but for example the slicer just wont allow deactivation of the prime tower and there the support filament spaghettifies everything Oo.

2 Likes

There’s lot’s of stuff to learn with FDM :heart: :wink:

This should have covered the basics. But I have used “Support for PLA” myself exactly once before switching to dissimilar support materials.

The 12h at 50°C should have indeed taken care of moisture although increased temps may shorten drying times.

This stops being confusing once we realize that the moisture indicator only reads the relative air himidity inside the AMS-HT rather than the Filament moisture. As it heats up, the air can hold more water, decreasing relative air humidity while the heat excites the trapped water in the filament to release into the air. Once the drying cycle is complete, the air cools, is no longer able to hold as much water and the relative air humidity increases again. Unfortunately, the AMS-HT is not quite as well sealed as the AMS2.

As for the “Support for PLA”, there have been issues reported but the majority of reports here in the forum do give me the perception of a good or at least agreeable overall performance. However, it may be helpful to take a closer look at the setting video on the product page of the Bambu Shop. Settings given there use a top z-distance of 0mm. A larger z-distance could lead to the support material not adhering properly with the new formulation.
Support for PLA (New Version) | Bambu Lab EU Shop

Or, look up the Bambu wiki for “Support”. It also recommends a 0mm top z-distance for the new “Support for PLA”.
Support | Bambu Lab Wiki

Before jumping right back in though, there is an easy to overlook caveat. A tiny link points to the PETG/PLA dissimilar support material page of the wiki.
Printing guide for using PLA Basic and PETG HF/PETG Basic for support | Bambu Lab Wiki
And right at the very bottom, we do find a potentially quite important notice:


=> I’d recommend to take it one step at a time. First, you may want to try to get a good print with the “Support for PLA” using a 0.4mm nozzle. The objective is not to get a perfect print but rather to learn about the material combination in practice and, most importantly, gain confidence.

=> Once you have that covered, take the step to the 0.2mm nozzle. At least you’ll then know that any newly arising issues are down to the nozzle diameter (and knock-on effects) rather than a bunch of parameters.

:four_leaf_clover: & :crossed_fingers:

4 Likes

The different support generation strategies might reroll to a nicer base. In general some of those don’t generate “support interfaces” they instead rest on the tip of the tree, and I find those ONLY good at edges, if the big supported area is on those tips it tends to turn into a mess. If you can get it to set “0 Top Interface Spacing”, 3-4 interfaces, and get it to actually print them, that interface turns into one big thick chunk of plastic that is easy to plier off.

Currently I’m mostly using the slender tree supports with good success;
But it’s not the actual support interfaces that are the issue for me but rather the whole underside of the print, even in the places where it does not connect to the interfaces at all.
But I will try you suggestion as well, thanks :+1:

To get the most possible quality with interface material in theory, you need to have 0 space, 100% fill for the interface lines and 3-4 layers for the interface. So the main layer will sit on completely flat area. Bambu Studio is notorious for delay over the latest algorithms with overhangs, which are basically all lines in the air, without any support from below. This is why many people would like to use Orca or other slicers.

I was able to achieve very good bottom surfaces when the interface material get properly extruded and properly contacted to the main layer. But I have also many cases in which it failed and got even more mess and failures. So for me in theory AUX nozzle for interface is good, in practice it depends from many things.

Could you elaborate on what settings to change to get the full interface as you describe?
And wouldnt that interface be terribly hard to remove?

The moment you change to different interface material in the support section ( as by default is the same material ) you will get one pop up dialog window asking you if you like to have the optimized settings and show you a list with like 10 things it will change. Then you can go add some more. I need to make some screen shot to show you, maybe a bit later.

But basically top Z distance and bottom Z distance to zero

top interface layers - 3 or 4 - to get mor even surface

top interface spacing - 0 - this will make the top solid, so in theory you should be able to get the smoothest surface like this

This is only for using separate support material. If you set this for the same material you will get support and the object glued like solid :smiley: .

1 Like

Yeah that dialog I am familiar with (although I have made little if any changes to the settings that are present after that) - interestingly when I print anything after that dialog, even the normal filament prints horribly (I end up with more or less instant failures due to super bad layer adhesion after the raft / first support layers), haven’t been able to figure it out yet :confused:

Are you increasing the purge volume or purge multiplier? I learned the hard way, failed 17hr print, using pla/petg that I needed to increase the purge volume. I use 2.5-3 for the multiplier now and a different color for the interface.

I’m using the X2D, so support filament uses the Aux Nozzle;
As far as I’m aware there should be not need to increase the purge volume with that setup - or am I missing something? (I tried it once, but saw no change what so ever).

Try to accept this dialog box by accepting the automatic changes and not changing anything else. I have excellent support prints in this mode with a separation layer. And be sure to leave the tower

Absolutely should not be like this, it has no power or change over the main extrusion process should affect only the support stuff. Something is very strange here.

Maybe you can load some project from fresh, then do save as as project-2, then make changes on the support and try to figure out what is changed in the process settings. You have option to enable multiple bambu studio processes so you can switch between them or even make them on one screen and compare it real quick.

Yes when you are using support on AUX purge volumes should not affect you.

Maybe make sure you changing the material only for the support/raft INETRFACE and not for the support/raft BASE.

As far as I’m aware the SupportForPLA filament is supposed to be only used for the interface and not for the supports themselves as it doesnt stick to itself either.
But I’m in contact with BBL support regarding the SupportForPLA filament.
What I’m not quite convinced of is that the issues I have on the underside of the prints is caused by not having a supportFilament or PETG - as a buddy of mine with a BBL A1 can print better quality minis with the same profile as I used and with just PLA tree supports; but when I do that, the undersides look awful.