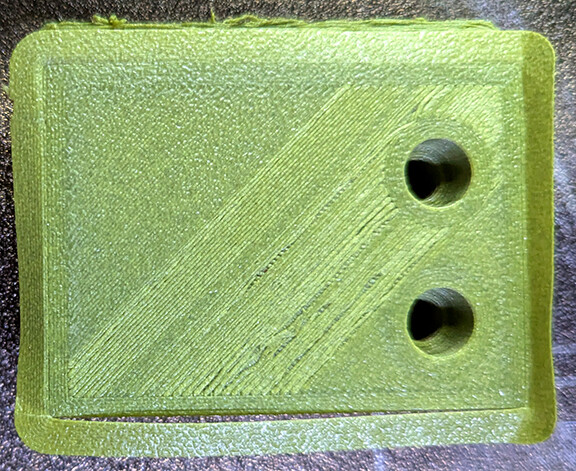
New P1P owner. I have had the printer for a week and have gotten 55 hours of really great quality prints from it. However, 2 days ago, I started having problems with the first layers not going down properly.
Not sure what has happened. I have tried doing a calibration, first through the Bambu Studio interface and then through the panel on the machine, but nothing seems to work. I also tried switching the 0.4 nozzle with a 0.2, but the problem persists. The machine has also started having problems with simple overhangs:
Your first layer pics gave the vibe that maybe you need to clean the plate (plain dishwashing soap, HOT water, clean nonabrasive pad - it cant hurt, just do it anyways) but that last pic is really off. That overhang looks to be only like 45degrees and its a horrorshow! Dry the filament, clean the plate, do a machine calibration (menu → settings → maintenance) and give it another try. Perhaps flow RATE calibration too.
The heatsink fan is working, but I found the parts cooling fan disconnected. Not sure if that happened while I was stripping down the extruder.
The green filament is Eryone CF-PETG. I have tried other filaments with the same results. One element of the print will have a bad first layer, all of the others elements will be fine.
One of the things that I dislike about the Bambu interface is that with klipper, you can cancel a part of the print if it’s not printing out properly. It would be a nice feature to add to Bambu Studio.
I’ll drop the filament into my dryer, but I’m not sure that is the problem, all of the other parts printed out properly.
As for the bed, I have been cleaning it regularly, what you see is me trying some glue stick to try and see if I was having an adhesion problem. Usually, I clean the build plate after every print with some IPA and then occasionally I’ll go at it with some hot water and some dish soap, followed with an IPA wipe down to remove any soap residue.
If that’s CF-PETG, it needs drying. And after that, you should do a temp tower test, and think about making a selection that is lower than your current temp.
CF PETG should be able to take those overhangs like a CHAMPION. Something is wrong!
Also just cuz CF - you have replaced your stock P1 nozzle with a hardened one, right?
This is classic contaminated plate. Those voids are fingerprints.
For a comprehensive explanation and a set of diagnostic methods to prove to yourself where and how badly your build plate is contaminated, reference this link:
Textured build plates are great but the conceal dirt. Here is an example of fingerprints and their effect on a smooth plate where it is much more obvious.
I’m still waiting for my hardened steel nozzle to arrive, Bambu’s shipping in Canada sucks! Should be here on Monday. Having said that, I’ve only put about 6m through the stainless steel nozzle, so I “shouldn’t” be having any problems there, (yet).
Thanks for the tips. I’ll reclean the build surface, but like I said earlier, I do clean my build surface well. This problem happens when I use glue stick on the plate, so I’m not sure if that is the problem.
Having said that, I’ll take your advice and try cleaning my plate again. Maybe I inadvertently touched the surface when I was putting the plate in.
I think he meant just cancel an object on the plate while continue printing the rest.
As John has pointed out, the handy bambu app does have that function. For P1S and P1P, it is exclusively only on handy app.
Suck if you are like me using lan only mode + old firmware + orca slicer + no handy app. It’s quite helpful sometime if you have bed adhesive problem. I don’t really miss it.
partial clog because of chopped carbon fibre, when it retracted or released the pressure at nozzle when changing print direction, that piece carbon fibre chop rearranged itself and this time went through the nozzle and clear the clog.
dirty build plate and/or bed temp not hot enough, or maybe a bit too fast on first layer, PETG wants to print slow
part cooling fan may not work or not enough cooling → bad over hang
I personally don’t use glue stick at all, hair spay works better for me. I use hair spay as release agent, not adhesion helper, whenever I print PETG.
Normally, the plate I use for PETG will get a thin layer of hair spray after cleaning. After a few prints, the part starts to stick too well to the plate, then I just spray a bit on the area of previous prints. I do sometime have problem with large print at the edge of the plate where my fingers touch to flex the plate to remove the previous print.
BTW, nice setup you got there, I love the sound absorbing/reflecting foams (or felts), like an accoustic room of audiophile.
Yeah, I’m used to klipper, which I think is better to Marlin/Octoprint, although I was using Octoprint for my Sovol before I converted it to klipper. As for hair spray, I can’t find one without perfume and the ones with perfume triggers my allergies.
As for my print cabinet, it was a matter of necessity. My printer is in my bedroom and about 1m from my bed! I need my beauty rest!
Thanks for the tip and the link. I washed down my build plate with dish soap, (can’t find Dawn in Canada), and then again with IPA. My prints are adhering properly now.
I did the temp tower as you suggested, (and as I should have done with a new printer!), and I increased my temperatures based on the tower results. Getting really great prints now. Thanks!