I bought some PETG-HF for my P1P and I’ve tried cleaning and leveling and it continues to warp
I have dried it in a Creatily dryer for 8hrs @ 60 Deg celcius
I have tried cleaning bed with Isopropl alcohol and dish soap and water ( one with each, and once with both )
My latest print had:
Cleaned with dish soap and water, then isoproply alchohol
5mm outside brim
Being heated again by creatily heater
Fairly generous layer of magigoo adhesive
Warping off of bed
P1P
Default settings, bar adding brims and changing infil to gyroid
Ensure your wall count is <3. Add brim width 10mm or use tabs at the corners alone. Also turn off your aux fan on the filament setting window. Looks like it could be wall count issue or the fan is rapidly cooling your print.
When cleaning the build plate, it is usually a good idea to get deep into the grooves of the textured plate. So dishwashing liquid + warm water is good, but you may want to add a stiff, clean brush and plenty of muscle grease. You really want to get everything out of the grooves. Literally, rinse and repeat a few times for best effect.
As @JonRaymond noted, reducing the brim-object gap will have a big effect. In my experience, it makes more of a difference than increasing the brim size beyond 5mm.
You could also increase 1st layer (only!) bed and nozzle temps by 5 and 10°C respectively, but
PETG will usually stick extremely well to a really clean build plate. So much so that a part as large as this can easily lift the build plate off the heat bed when warping.
In that case, you can address the root cause by keeping the build chamber warm (while avoiding heat creep!) and slowing down and/or decreasing the layer height. It’ll take longer to print, but I prefer a single slow successful print to two fast but failed prints.
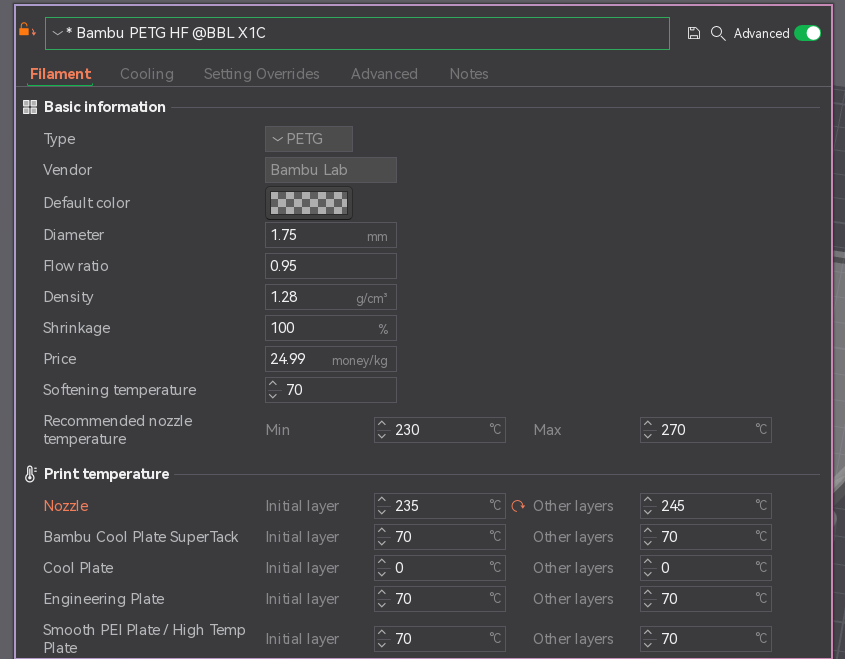
The aux fan appears to be off, but I have increase them temp by 5
Weirdly enough it says @ BBL X1C when i select the only petg-hf on the slicer, though I assume the filaments settings are the same regardless of pritner
Tomorrow will try with:
Very very cleaned bed with dish soap and then isopropl
5 degree higher first layer
Brims with 0 gaps
Rest will be kept same as my original post
That is indeed a start. I did do exatly that for initial PETG prints on the ancient Tarantula back in 2016. If it is not enough, people tend to get creative and put the printer in a cabinet, buid a tent, build an initial enclosure,… at least until the sidewall panels available for download are printed.
But the 1st issue seems to be build plate adhesion. On a really clean plate, a large flat but warping PETG print is very likely to pull the build plate off the heat bed. If you have printed PLA on that plate previously, it can be a bit tedious to get into the valleys of the textured plate. But you really want to get any residues out: PETG is frequently used as a support interface for PLA because they really do not like to bond.
How much of this could be due to the surface the printer is on ?
I’m not quite sure how the calibration of these machines work, but I do bed leveling on every single print, but I moved it from a cabinet to on top of my server, so is there a “full calibration” I need to do ?
Edit:
Oh… I had no idea I had to re-do the full calibration whenever I change the surface…
I thought the 5-7min startup sequence included the full calibration…
I’ll run one now
Second edit:
The surface I moved it from was a rickety chest of drawers, to on top of a 20kg+ server as it was much faster than my old printer it started opening the draws whilst printing…
It is rare that failed prints can be attributed to vibration. But it does happen. By going to a heavier surface, you have done the right thing
Indeed doing the printer calibration is neccessary when moving it or tensioning the belts. In general, it certainly doesn’t harm to run through the recommended maintenance and subsequent calibration on a monthly basis (more frequent when using it heavily).
Did I mention yet that I have made better experiences with PETG when slowing down in the slicer? It may just be me, though. Slowing down of course also reduces vibration excitation forces.
Cleaned with dish soap, then isoproply and I’ll add magigoo !
( I am aware the part is in a weird place, I had both sides of this keyboard case, and the other side printed perfectly, I didn’t want to move it incase that area of my bed is bad
Pre-me making this post:
Dried for 8hrs @ 60 degrees cel
Added 5mm outside brim ( with 0.5mm gap, as the default)
Cleaned with dish soap then isopropl
Tried with and without magigoo adhesive
15% infill, gyroid
PTFE tube goes from tube 1 ( from p1p ) to creatily dryer
+10 on nozzle initial layer
+5 on bed temp initial layer
5mm brim with no gap
skirt loop
magigoo
dish soap then isopropl
(gyroid, 15% infill, default walls (2) )
Pic 2 looks like a very different problem than Pic 1.
I get that kind of underextrusion and tearing when I have a nozzle or extruder clog. Other root causes can be more benign (PTFE tube end not sitting properly, bound filament, unlucky filament calibration, wrong plate setting, thermal paste degraded) or more serious (faulty pins/board/extruder,…).
Since you just moved your printer, it may also be rather benign and you just need to push in all PTFE tubes again and try from the rear spool holder rather than the drier to minimize friction.
Usually however, it occurs due to a nozzle clog. Since you printed with PETG initially, is pic 2 also PETG? If it is not, it is quite likely that there’s a partial clog.
The “Simple clog” method does not work well in my experience as it just pushes contaminant up. I usually go straight for the “hex key” method and do that a few times in a row.
It is very evident that there is something on your build plate. In my opinion, I wouldn’t use Isopropyl after washing the plate. There are differences of opinion on this forum about the use of it but I have always found that it introduced more adhesion issues than it solved. When you wash it, really scrub it with a brush.