Bad prints with new Obxidian 0.4 Nozzle / oozing pre-print (Solved)

I have just installed the my new nozzle and I am having serious issues with it. I am guessing I am one of the few since I can’t see any similar issues that have been posted on the forum.

  1. During the preparation stage e.g. levellings, nozzle wipe etc. the nozzle is oozing a hell of a lot of filament, then what happens is during the bed levelling it is sticking to the nozzle and doesn’t get wiped off prior to the print stage.

  2. As with #1 during the print stage as the nozzle is trying to print and the filament being collected prior to the print stage is now landing on the print bed and messing up the print.

  3. I am using Bambu Lab’s print configuration setting taken directly from the website.

  4. Currently using Bambu branded PLA matte but also having issues with PLA Basic. Not tried PETG yet.

What I’ve tried so far:

  1. Turning the temperature down to 200, no joy.
  2. Amended the override settings for retraction based on other reseach. This reduced the nozzle oozing a little but not much.
  3. Filament humidity is sitting around 35% which I understand is acceptable for PLA.

Attached photo of the latest failed print when trying to print gridfinity boxes.

Any suggestions?

Your nozzle issue notwithstanding, you may want to rethink your choice of filament for Gridfinity.

Two questions. First, how did you determine that the filament humidity is 35%? At that level, it would be a slurry. Second, be aware that both Bambu Matte and Silk filaments are notoriously sensitive to moisture and, even when factory sealed, should be dried despite what the website claims.

If you’re using autocalibration or the original filament profiles, keep in mind those profiles are over two years old and were never properly updated. That’s a recipe for bad results. Manually calibrate the filament instead. To rule out moisture as a factor, weigh your filament, dry it, and weigh it again.

Here’s an example of Bambu factory-sealed Silk PLA from a year ago when it was still offered. This is why you should never assume “factory-sealed” means safe from moisture:

Guess which one was dried and which one was wet? I’ve seen similar issues with Matte, which is why I rarely use either.

One more note: if you’re making a Gridfinity grid, you need stronger, more durable filament such as PETG, ASA, or ABS. Silk and Matte are appearance filaments; they don’t wear well. For Gridfinity, you want a base grid that holds up under use. Even regular PLA would be a better choice.

Thanks for the reply. FIrst of all, I get that matte is not first choice for gridfinity but it is a one off thing rather than long term solution, and PETG is usually my go to for it.

Regarding the humidity, this is the reading I get from the AMS2 where the filament is housed. Granted, I don’t expect it to be accurate and on checking again just now, the humidity level is hovering closer to 40% now.

I do plan on getting a separate dryer in due course but I’d printered a number of matte models a couple of days ago and no issues at all with extrusion or oozing save for the usual small amount of oozing of filament pre-print.

Can you expand on the point around the filament profiles? I took the profiles directly from the Bambu store page for Obxidian which I would have thought would have been more recent than 2 years old, or have I misunderstood?

As for manual calibration, I did run through the calibration process in Bambu Studio (if that’s what you mean) but didn’t make a difference and in fact when I re-tried prints, it seemed to get worse.

Not that I think it is going to matter, but I think I am going to work back from the start taking apart the nozzle re-clean, apply grease, tighten up etc. as well as calibration again and see whether that makes a difference.

The only other theory is that I upgraded the firmware on my P1S before I upgraded the nozzle. I may try a test print using the original nozzle and see if I am experiencing the same issues. Failing that I may well just raise a support ticket as it’s an expensive nozzle and unless I am doing something wrong, I don’t want to pay for something that is of no use to me.

In my experience, OEM filament profiles are unreliable. Just last week I downloaded a profile for a new TINMORRY filament and the flow rate was way off - it showed immediately in the calibration. This is common across the industry. Bambu is no different. They changed their filament contract manufacturer last summer, and soon after, reports of bad filament surfaced in this community. Eventually people realized the profiles needed updating. In many cases, manual calibration still outperforms factory profiles.

This is a common pitfall: trying everything at once and losing track of what actually made a difference. One of my earliest mentors drilled this into me: “Rule #1 of troubleshooting: change one variable at a time.”

In your case, revert the printer to the last known good state, then move forward step by step. I had to do this recently when I bought my first 0.2 and 0.8 nozzles. None of my profiles - including Bambu’s factory ones - worked well until I tweaked them. It was a good reminder not to assume that what worked last week will work this week. :wink:

1 Like

I had the same problem as you and asked very similar questions here: Adjustments for E3D Obxidian nozzle

It seems like we have to live with the extra oozing during preparation. To prevent the poop from ruining the print you could enable skirt with some distance, hoping that any stuff sticking to the nozzle will stick to the skirt instead if the print.

I also found some covers that you can put on the purge area that could prevent poop from jumping out onto the build plate. Still didn’t manage to print and mount one :joy:

But in summary I was a bit upset that the outcome of a “collaboration product” at that price has such drawbacks.

Actually I have the feeling that poop ruining my prints has become less. But it could be imagination.

Btw, I used my previous profiles, reduced temperature by 10°C, increased max flow to 35 mm³/s and repeated K-factor calibration. When I bought mine, the official profiles were not available.

1 Like

To hot, decrease the temp. Mostly the min temp of filament works fine. I‘m printing ABS/ASA ->35 mm3/s 240 deg, PA66 25mm3/s 260 deg, PETG 25mm3/s 230 deg, PLA not in use

It’s important not to use the standard filament profiles. Make a profile for any filament and hotend and calibrate the material careful.

Point taken, I am just too used to the P1S being a reliable workhorse on the standard settings. I am in the process of testing but so far having printed using PLA, PLA Matte and PETG-HF I am having the same issues to varying degrees. The main culprit seems to be that there is a sufficient filament string to hurt the print and it’s a case of russian roulette whethe the print is successful.

I am going to persevere with it until I have exhausted all possible options.

Thank you, interesting. I will try the skirt option and see how that goes but I just need to make sure the excess stringing is wiped off on the last wipe. I’m going to try and print a new nozzle wiper and see if that works… or perhaps design a version of my own and compare results.

Once I’ve tried all the usual options, I will report back for further assistance or if I manage to get it working, I will let you know what did it (hopefully).

1 Like

Alas, I may have found a solution that solves the issue of filament clinging to the nozzle… need to do some more testing to make sure it’s not a lucky print or two but I will report back later this evening with an update either way.

1 Like

Now I’m curious what you have found :grin:

So over the last 24 hours I have tried numerous settings and options in Bambu Studio including nozzle temp but to no avail. It turns out that any real changes need to be made in the Machine G code printer settings.

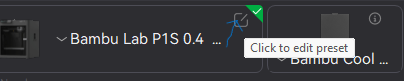
Apologies if you know how to access the G code but just in case others read this, it can be done by clicking the edit preset button > Machine gcode.

Screenshot 2025-07-29 235632

I’m still an utter newbie at 3d printing and have only learned from what I have researched, so anyone wishing to modify the gcode does so at their own risk! I suggest you save a separate test preset and keep the original settings in case you need to revert back to them

@Alex_vG If you are going to modify anything, I think the following settings are the ones you probably want to fiddle around with:

;===== wipe nozzle ===============================
M109 S{nozzle_temperature_initial_layer[initial_extruder]-20}

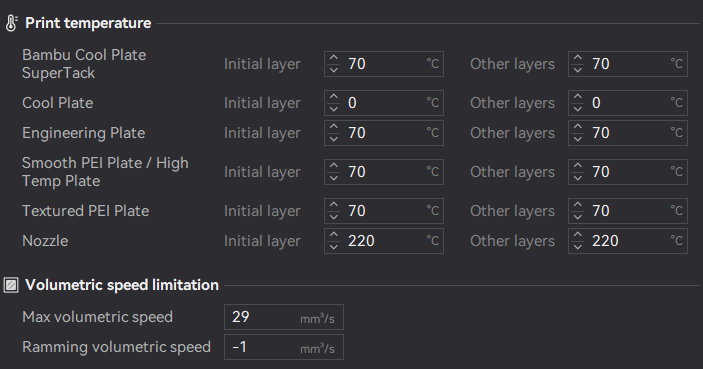
This is where the temp drops after the initial purge of the poop. To alter the temperature amend the “-20” to whatever you consider. So if the nozzle temp is set at 230, at this stage it will be heating up/down to 210.

M104 S140 ; set temp down to heatbed acceptable

This is the temperature that occurs before the nozzle head cleaning which is the temp you mentioned in your own post. To amend the temp just change the 140 up or down.

M109 S140 ; wait nozzle temp down to heatbed acceptable

This temp follows the nozzle head cleaning. Change as above.

;===== nozzle load line ===============================
M975 S1
G90
M83
T1000
G1 X18.0 Y1.0 Z0.8 F18000;Move to start position
M109 S{nozzle_temperature_initial_layer[initial_extruder]}
G1 Z0.2
G0 E2 F300
G0 X240 E15 F{outer_wall_volumetric_speed/(0.3*0.5)     * 60}
G0 Y11 E0.700 F{outer_wall_volumetric_speed/(0.3*0.5)/ 4 * 60}
G0 X239.5
G0 E0.2
G0 Y1.5 E0.700
G0 X18 E15 F{outer_wall_volumetric_speed/(0.3*0.5)     * 60}
M400

This section of the code relates to the two purge lines before the printing begins.

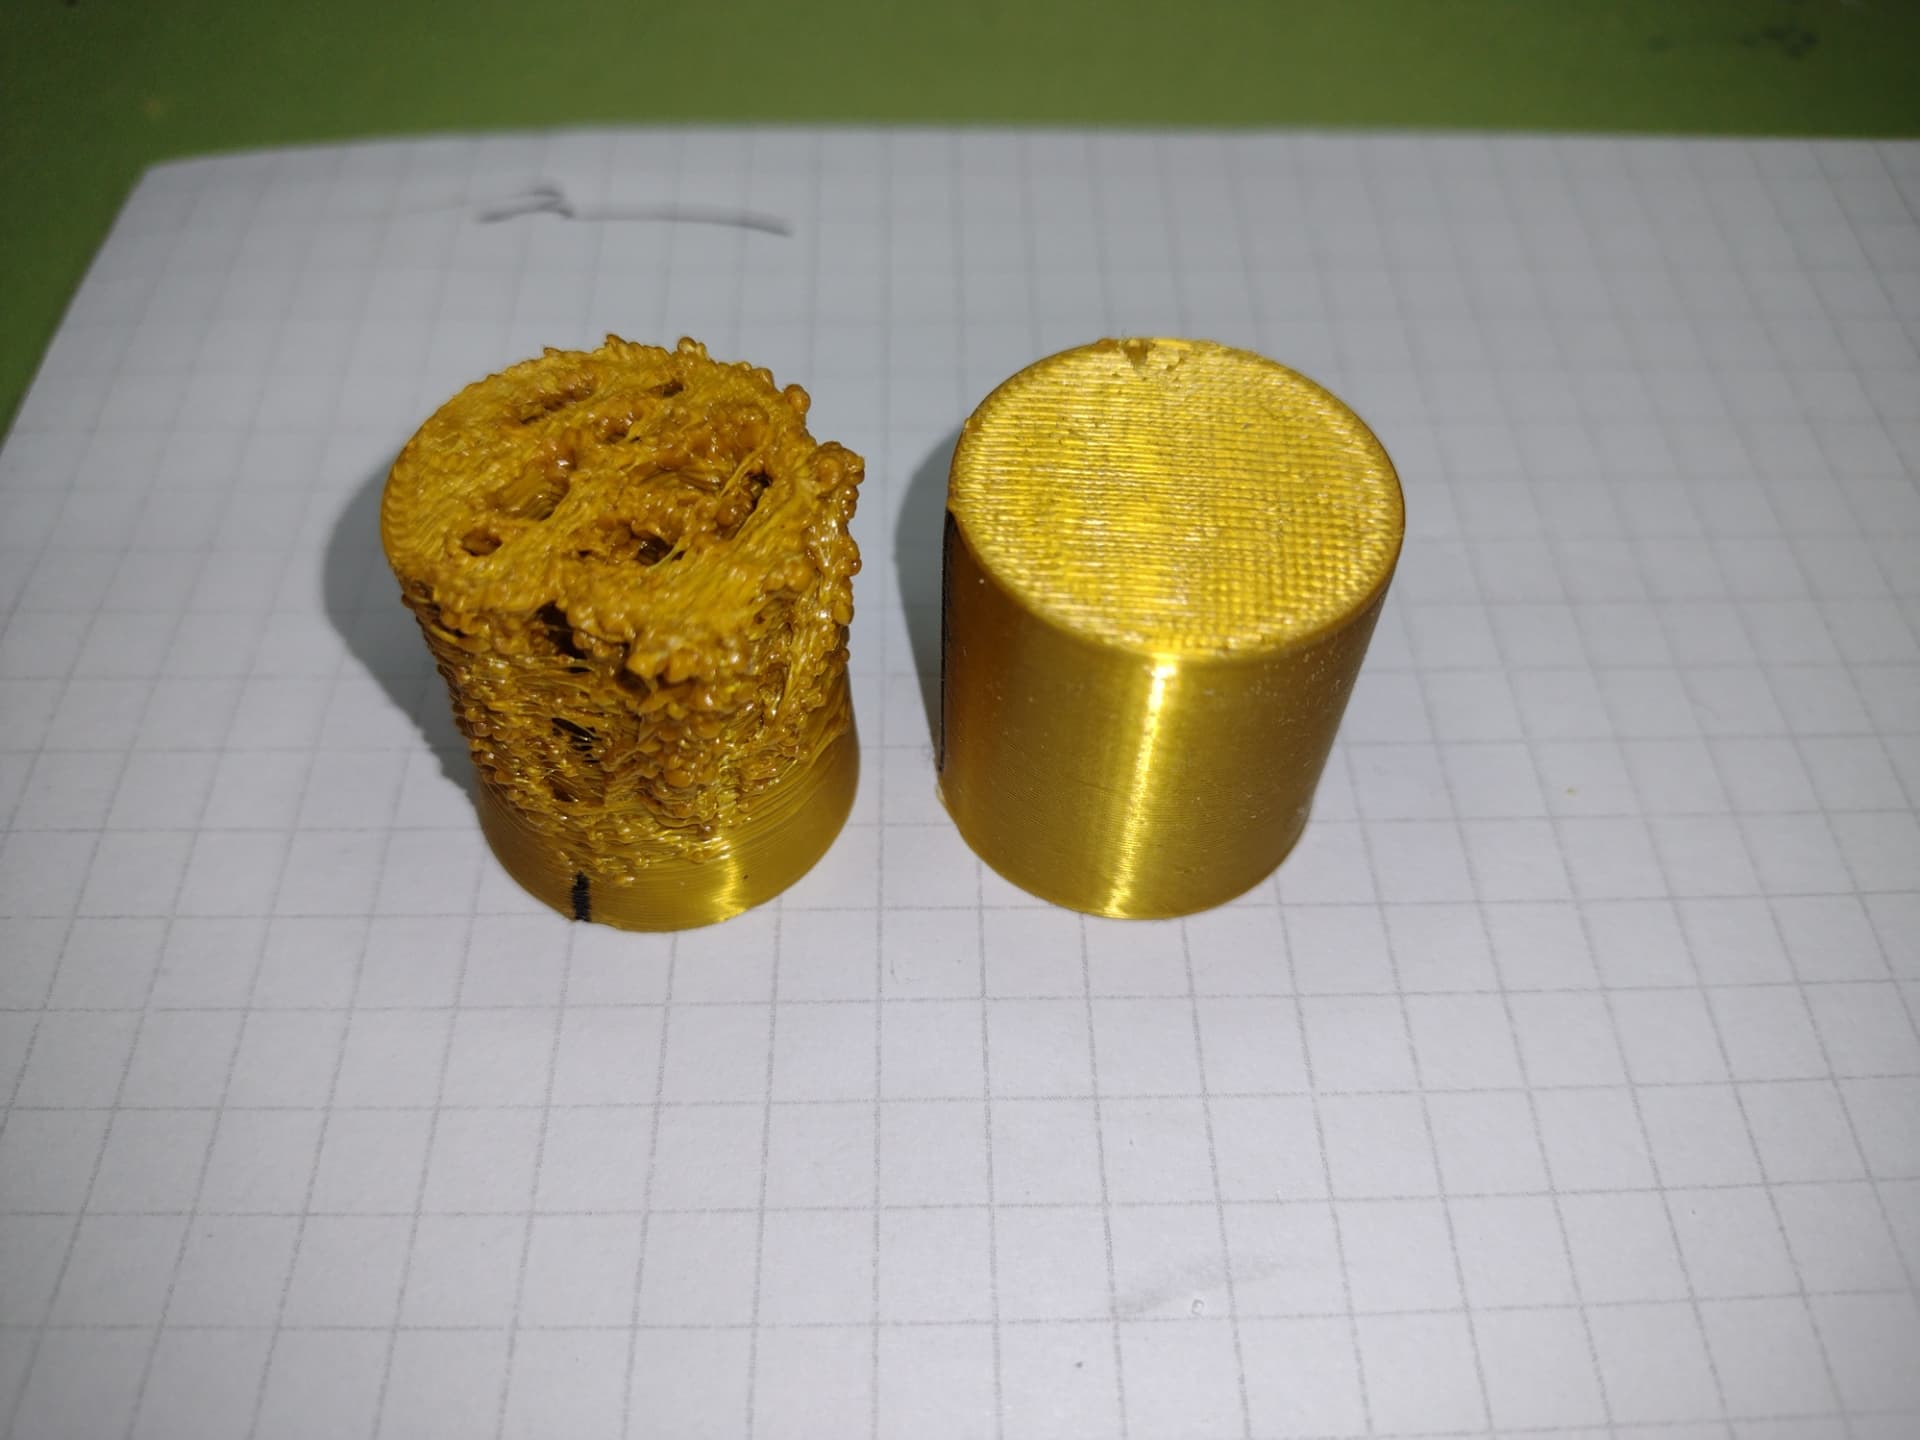
My overall findings so far is that the I have largely been able to reduce any blobs or stringy filament stuck to the nozzle although not always, but having much larger success than before and I am not sure if there are the perfect settings but I will keep trying although I might have to settle for just ok.

If it helps, here are some of the things I have done so far:

  1. In the Nozzle Wipe section, the “M109 S140 ; wait nozzle temp down to heatbed acceptable” reduced to 100 degrees I feel is too low. Somewhere around 120 degrees seems appropriate to reduce any excess oozing.

  2. To help minimise excess oozing, you should also consider retracting the filament so that as the nozzle starts to heat up and get into position for the purge lines there is minimal oozing. To do this, before (or after) the line mentioned in #1 insert:

G1 E-X F300

Where “E” refers to the extruder, “X” refers to the mm you wish to retract and “F300” being the speed of retraction in milliseconds. I can’t remember what setting I had as Ive messed around too much but somehwere between 5mm-10mm reduces oozing by the time the nozzle hits the purge lines. You can also retract in decimal such as 1.5, 0.5 etc. Be careful not to retract too far back it ends up out of the nozzle itself.

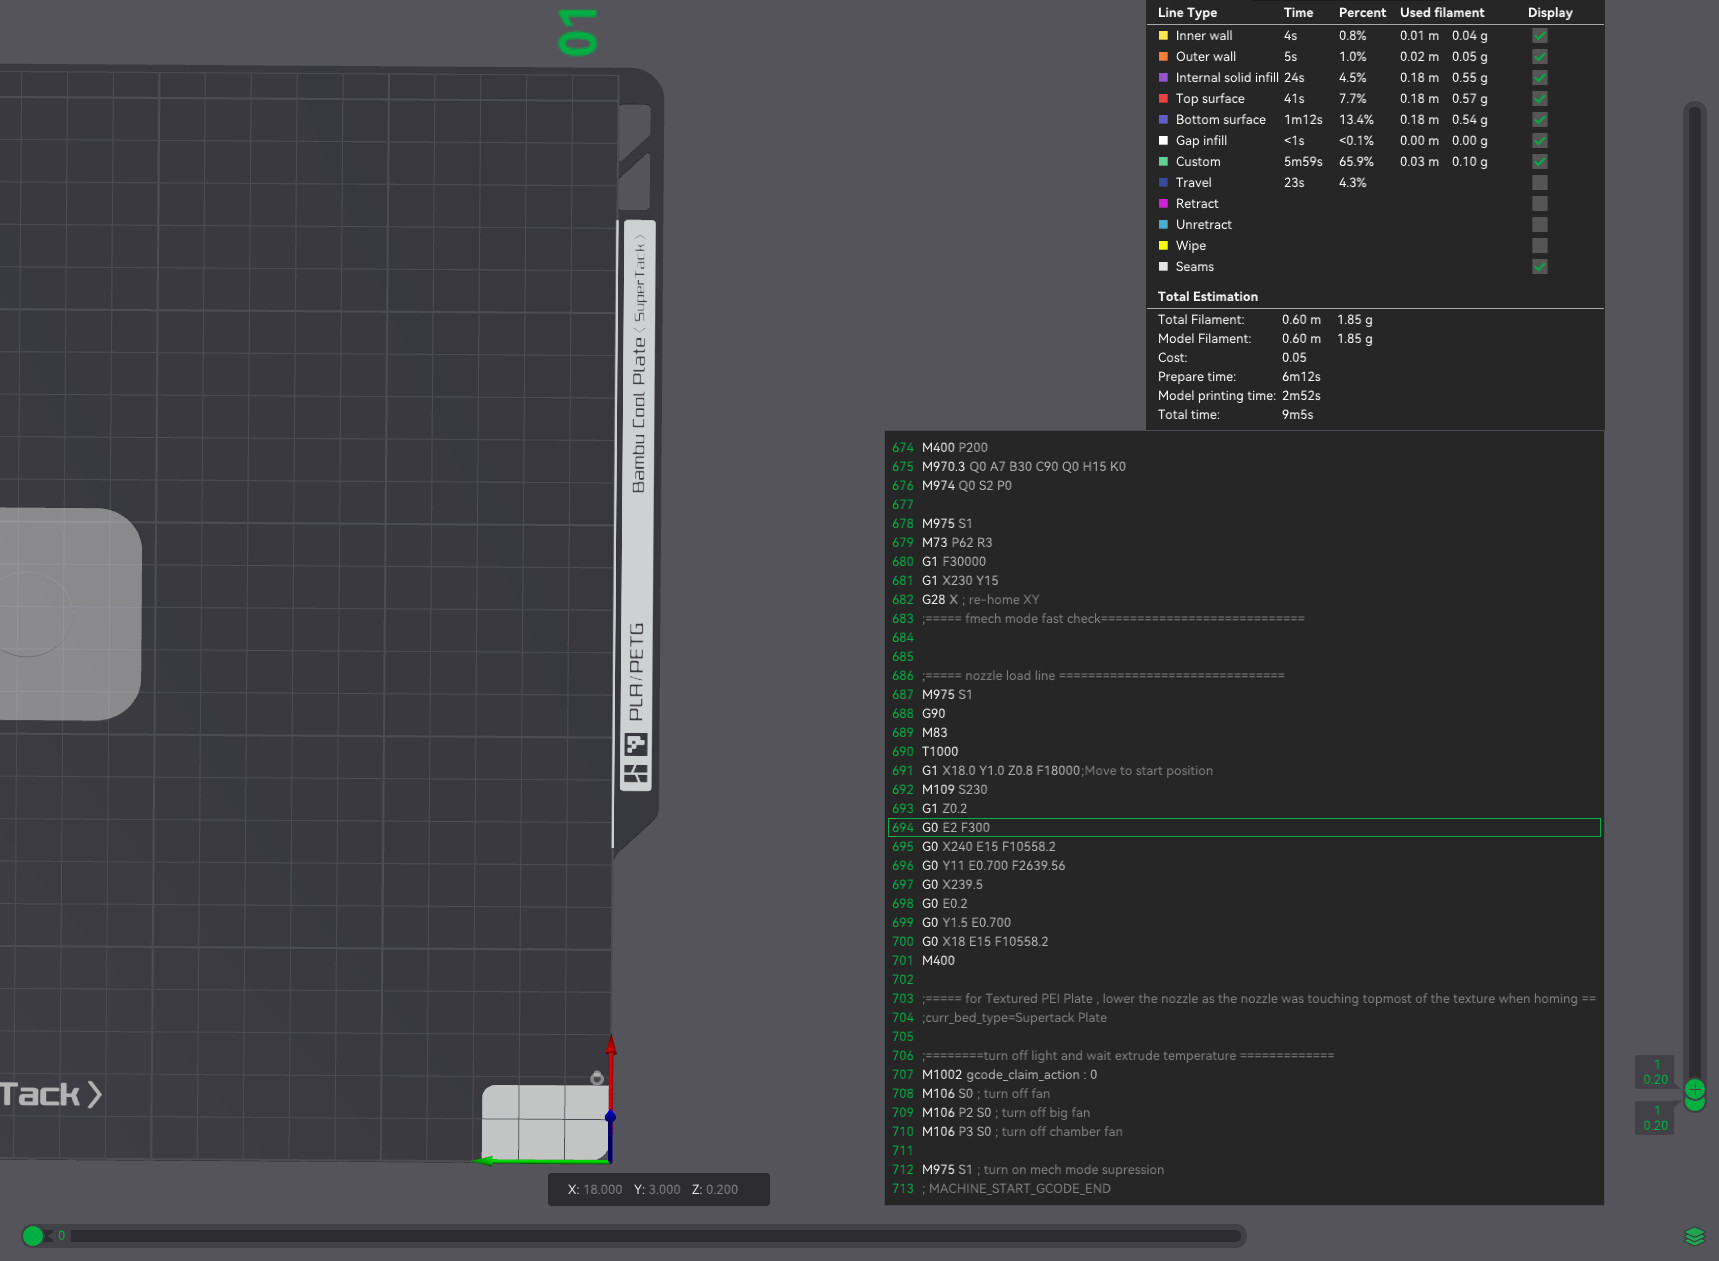
  1. In the nozzle load line section I have discovered that “G0 E2 F300” is the culprit for creating the blob at the start of the purge lines. You could set that instruction to ignore by using the semi-colon “;” and it should start extruding the purge line as usual. Be careful because if you set this to ignore, the printer may run at the last known speed and have unexpected results so to counter that you coud add the F300 to the next line.

A little tip is that if you slice the model you are using in Bambu Studio and set both green bars to 0 (sorry I don’t know what these are called , you can use the bottom bar to cycle through each line of code of the purge lines that is being applied. This is helpful if you want to add more purge lines or space them out (see my next point).

  1. To help reduction of blobs or filament sticking to the nozzle after the purge lines, I have set the initial extrude blob to ignore (G0 E3 F300), widened the purge lines, added 1 purge line more and set the speed to 300ms for the first purge line using the code below. This along with/without retraction settings has helped me with good testing success as the slow speed eventually cuts off any sticking filament prior to printing. You may want to increase or decrease the speeds for one or more lines depending on your successes. The bold section is the modified part for and additional purge line.

;===== nozzle load line ===============================
M975 S1
G90
M83
T1000
G1 X18.0 Y1.0 Z0.8 F18000;Move to start position
M109 S{nozzle_temperature_initial_layer[initial_extruder]}
G1 Z0.2
;G0 E3 F300
G0 X240 E15 F{outer_wall_volumetric_speed/(0.30.5) * 60} F300
G0 Y11 E0.700 F{outer_wall_volumetric_speed/(0.3
0.5)/ 4 * 60}
G0 X237
G0 E0.2
G0 Y5 E1
G0 X18 E15 F{outer_wall_volumetric_speed/(0.3*0.5) * 60}
G0 Y11 E1
G0 X230 E15 F{outer_wall_volumetric_speed/(0.3*0.5) * 60}
M400

  1. I accidently discovered that I could ignore the code for the poop purge altogether. As I only use one color for priting at the moment, this means I am able to skip this step entirely and has worked without issue (so far). If you want to reduce the amount of poop this can be done by modifying the highlighted code and reducing the number - remember the E number refers to how much in mm the nozzle will extrude. To purge no poop, just add a semi colon to each line so the instruction is ignored.

M109 S250 ;set nozzle to common flush temp
M106 P1 S0
G92 E0
G1 E50 F200
M400
M104 S[nozzle_temperature_initial_layer]
G92 E0
G1 E50 F200
M400
M106 P1 S255
G92 E0
G1 E5 F300
M109 S{nozzle_temperature_initial_layer[initial_extruder]-20} ; drop nozzle temp, make filament shink a bit
G92 E0
G1 E-0.5 F300

  1. When I have been testing the sticky filament of the purge lines, I have skipped all the prvious steps by deleted the code and only keep the Nozzle load line code in the machine g code start box. It means that when I print the model, it goes straight to the purge line process - may or may not help.
1 Like

Quick update, and I think I’ve cracked it with minimal changes to the settings!

By setting the temperature after poop purge to to 160 degrees throughout is sufficient to stop the oozing of the filament until the purge line stage and give a clean break to start the print process. I’ve ran this test at least 15 times on the bounce alternating between PETG and PLA Matte both with success every single time. Here’s a few short vids to verify.


Poop Purge (online-video-cutter.com) - Watch Video


Nozzle Clean Stage (online-video-cutter.com) - Watch Video


Purge Line Stage (online-video-cutter.com) - Watch Video

Some points to note:

  • Highly recommend that any oozing exess filament stuck to the tip after previous prints is snipped off and (if necessary) the nozzle tip area is cleaner before starting the print. I’ve noticed a couple of times that the purging of the filament mixed with the leftover filament that was stuck ot the nozzle has caused some to stick, although thankfully not enough to create a printing issue.

  • During the purge process, on two occasions the nozzle tip failed to cut the poop after the first wipe meaning the poop clung on to the nozzle tip, but it did clean the tip on the second wipe although at least one time the poop fell onto the print bed and not into the bucket as a result. I suspect this is because the fan kicks in at 100% prior to the initial wipes and so the filament shrinks and hardens making it harder to cut off from the nozzle. Might not be a problem if you are using a non-standard Bambu nozzle wiper but i you’re worried, you could try setting the fan speed from 100% to something like 80% which might help, however I am yet to test that. Alternatively, try increase the speed of the wipes to make the cut.

  • In my G-Code I have set the nozzle temperature at key stages of the pre-print process to 160 degrees but there seems to be an anomaly with the printer setting the nozzle to 140 degrees just before it performs the homing stage. I am not sure if this is the printer overriding the G-Code because I can’t find any setting in my code that sets the nozzle to 140 degrees at the homing stage. That said, I’ve found it has not affected any oozing but it does cause around 5-10 second delay to move on to the next stage as the nozzle temp drops from 160 to 140 before going up to the preferred nozzle temp to start the purge line step.

I’m sharing my G-Code and filament settings below if anyone wants to give it a go and confirm it works for you as well. I’ve also added some additional comment lines to explain important stages of the print process and where I have changed the temperatur settings to 160/150 degrees.

;===== MACHINE: P1S =====

; ==== START OF PRINT PROCESS ====

;===== turn on the HB fan & MC board fan ====
M104 S75 ; set extruder temp to turn on the HB fan and prevent filament oozing from nozzle
M710 A1 S255 ; turn on MC fan by default(P1S)
;===== reset machine status ====
M290 X40 Y40 Z2.6666666
G91
M17 Z0.4 ; lower the z-motor current
G380 S2 Z30 F300 ; G380 is same as G38; lower the hotbed , to prevent the nozzle is below the hotbed
G380 S2 Z-25 F300 ;
G1 Z5 F300;
G90
M17 X1.2 Y1.2 Z0.75 ; reset motor current to default
M960 S5 P1 ; turn on logo lamp
G90
M220 S100 ;Reset Feedrate
M221 S100 ;Reset Flowrate
M73.2   R1.0 ;Reset left time magnitude
M1002 set_gcode_claim_speed_level : 5
M221 X0 Y0 Z0 ; turn off soft endstop to prevent protential logic problem
G29.1 Z{+0.0} ; clear z-trim value first
M204 S10000 ; init ACC set to 10m/s^2

;===== PREHEAT BED =====
M1002 gcode_claim_action : 2
M140 S[bed_temperature_initial_layer_single] ;set bed temp
M190 S[bed_temperature_initial_layer_single] ;wait for bed temp

;===== turn on fans to prevent PLA jamming =====
{if filament_type[initial_extruder]=="PLA"}
    {if (bed_temperature[initial_extruder] >45)||(bed_temperature_initial_layer[initial_extruder] >45)}
    M106 P3 S180
    {endif};Prevent PLA from jamming
{endif}
M106 P2 S100 ; turn on big fan ,to cool down toolhead

;===== prepare print temperature and material =====
M104 S[nozzle_temperature_initial_layer] ;set extruder temp
G91
G0 Z10 F1200
G90
G28 X
M975 S1 ; turn on
G1 X60 F12000
G1 Y245
G1 Y265 F3000
M620 M
M620 S[initial_extruder]A   ; switch material if AMS exist
    M109 S[nozzle_temperature_initial_layer]
    G1 X120 F12000

    G1 X20 Y50 F12000
    G1 Y-3
    T[initial_extruder]
    G1 X54 F12000
    G1 Y265
    M400
M621 S[initial_extruder]A
M620.1 E F{filament_max_volumetric_speed[initial_extruder]/2.4053*60} T{nozzle_temperature_range_high[initial_extruder]}


M412 S1 ; turn on filament runout detection

; ===== POOP PURGE PROCESS =====
M109 S250 ; set nozzle temperature to 250 degrees to flush filament from nozzle
M106 P1 S0
G92 E0
G1 E50 F200
M400
M104 S[nozzle_temperature_initial_layer]; set nozzle temperature to initial layer temperature in filament settings
G92 E0
G1 E50 F200
M400
M106 P1 S255
G92 E0
G1 E5 F300
M109 S{nozzle_temperature_initial_layer[initial_extruder]-60} ; Reduces initial layer nozzle temperature by 60 degrees
G92 E0
G1 E-0.5 F300

; ===== NOZZLE WIPE AND SHAKE TOOLHEAD TO REDUCE STICKING FILAMENT =====
G1 X70 F9000
G1 X76 F15000
G1 X65 F15000
G1 X76 F15000
G1 X65 F15000
G1 X80 F6000
G1 X95 F15000
G1 X80 F15000
G1 X165 F15000
M400
M106 P1 S0

;==== FIRST STAGE NOZZLE WIPE ====
M1002 gcode_claim_action : 14
M975 S1
M106 S255
G1 X65 Y230 F18000
G1 Y264 F6000
M109 S{nozzle_temperature_initial_layer[initial_extruder]-60}; Reduces initial layer nozzle temperature by 60 degrees
G1 X100 F18000 ; first nozzle wipe

G0 X135 Y253 F20000; move nozzle to exposed steel surface edge for cleaning
G28 Z P0 T300; home z with low precision,permit 300deg temperature
G29.2 S0 ; turn off ABL
G0 Z5 F20000

;==== FIRST STAGE NOZZLE WIPE ====
G1 X60 Y265
G92 E0
G1 E-0.5 F300 ; retrack more
G1 X100 F5000; second wipe mouth
G1 X70 F15000
G1 X100 F5000
G1 X70 F15000
G1 X100 F5000
G1 X70 F15000
G1 X100 F5000
G1 X70 F15000
G1 X90 F5000
G0 X128 Y261 Z-1.5 F20000  ; move to exposed steel surface and stop the nozzle
M104 S160 ; Sets nozzle temperature to 160 degrees and proceeds to next instruction
M106 S255 ; turn on fan (G28 has turn off fan)

;==== CLEAN NOZZLE USING EXPOSED STEEL PLATE AT BACK OF PRINT BED ====
M221 S; push soft endstop status
M221 Z0 ;turn off Z axis endstop
G0 Z0.5 F20000
G0 X125 Y259.5 Z-1.01
G0 X131 F211
G0 X124
G0 Z0.5 F20000
G0 X125 Y262.5
G0 Z-1.01
G0 X131 F211
G0 X124
G0 Z0.5 F20000
G0 X125 Y260.0
G0 Z-1.01
G0 X131 F211
G0 X124
G0 Z0.5 F20000
G0 X125 Y262.0
G0 Z-1.01
G0 X131 F211
G0 X124
G0 Z0.5 F20000
G0 X125 Y260.5
G0 Z-1.01
G0 X131 F211
G0 X124
G0 Z0.5 F20000
G0 X125 Y261.5
G0 Z-1.01
G0 X131 F211
G0 X124
G0 Z0.5 F20000
G0 X125 Y261.0
G0 Z-1.01
G0 X131 F211
G0 X124
G0 X128
G2 I0.5 J0 F300
G2 I0.5 J0 F300
G2 I0.5 J0 F300
G2 I0.5 J0 F300

M109 S150 ; Set nozzle temperature to 150 degrees and wait until it reaches this temperature before proceeding to next instruction.
G2 I0.5 J0 F3000
G2 I0.5 J0 F3000
G2 I0.5 J0 F3000
G2 I0.5 J0 F3000

M221 R; pop softend status
G1 Z10 F1200
M400
G1 Z10
G1 F30000
G1 X230 Y15
G29.2 S1 ; turn on ABL
;G28 ; home again after hard wipe mouth
M106 S0 ; turn off fan, too noisy
;===== wipe nozzle end ================================


;===== BED LEVELLING ==================================
M1002 judge_flag g29_before_print_flag
M622 J1

    M1002 gcode_claim_action : 1
    G29 A X{first_layer_print_min[0]} Y{first_layer_print_min[1]} I{first_layer_print_size[0]} J{first_layer_print_size[1]}
    M400
    M500 ; save cali data

M623
;===== END OF BED LEVELLING =====

;===== WIPE NOZZLE AND START HOMING PROCESS =====
M1002 judge_flag g29_before_print_flag
M622 J0

    M1002 gcode_claim_action : 13
    G28

M623
;===== END OF HOME PROCESS =====

M975 S1 ; turn on vibration supression


;===== turn on fans to prevent PLA jamming =====
{if filament_type[initial_extruder]=="PLA"}
    {if (bed_temperature[initial_extruder] >45)||(bed_temperature_initial_layer[initial_extruder] >45)}
    M106 P3 S180
    {endif};Prevent PLA from jamming
{endif}
M106 P2 S100 ; turn on big fan ,to cool down toolhead


M104 S{nozzle_temperature_initial_layer[initial_extruder]} ; Start the nozzle initial layer temperature to reduce wait time

;===== mech mode fast check =====
G1 X128 Y128 Z10 F20000
M400 P200
M970.3 Q1 A7 B30 C80  H15 K0
M974 Q1 S2 P0

G1 X128 Y128 Z10 F20000
M400 P200
M970.3 Q0 A7 B30 C90 Q0 H15 K0
M974 Q0 S2 P0

M975 S1
G1 F30000
G1 X230 Y15
G28 X ; re-home XY
;===== fmech mode fast check =====


;===== PRIME THE NOZZLE WITH TWO LINES BEFORE PRINTING MODEL =====
M975 S1
G90
M83
T1000
G1 X18.0 Y1.0 Z0.8 F18000;Move to start position
M109 S{nozzle_temperature_initial_layer[initial_extruder]}
G1 Z0.2
G0 E2 F300
G0 X240 E15 F{outer_wall_volumetric_speed/(0.3*0.5)     * 60}
G0 Y11 E0.700 F{outer_wall_volumetric_speed/(0.3*0.5)/ 4 * 60}
G0 X239.5
G0 E0.2
G0 Y1.5 E0.700
G0 X18 E15 F{outer_wall_volumetric_speed/(0.3*0.5)     * 60}
M400

;===== for Textured PEI Plate , lower the nozzle as the nozzle was touching topmost of the texture when homing ==
;curr_bed_type={curr_bed_type}
{if curr_bed_type=="Textured PEI Plate"}
G29.1 Z{-0.04} ; for Textured PEI Plate
{endif}
;===== turn off light and wait extrude temperature =====
M1002 gcode_claim_action : 0
M106 S0 ; turn off fan
M106 P2 S0 ; turn off big fan
M106 P3 S0 ; turn off chamber fan

M975 S1 ; turn on mech mode supression

Temp settings below. Mainly tested at 220 degrees for PETG but have tried 230 degrees and appear to be no issues either after several attempts. For PLA Matte I also tested at 220 degrees with no issue.

3 Likes

wow, those are very good findings. When i asked for these settings, everyone said that this is buried in the firmware. And instead it all sits neatly in the machine gcode.
Thank you very much for taking the effort. I have aleady bookmarked your post!

And even greater that you managed to reduce those problems. :grin:

Nice contribution to the community. Thank you. I’ve also bookmarked this.

Cheers both, I was ready to throw in the towel and already raised a support ticket prepared to send the thing back. It so happened that my last few attempts focused on finding a temperature to stop the initial oozing once the fan kicks in at various points and working out from there.

Now I can finally start the calibration process and hopefully my testing is not just a one-off so I don’t have to watch the printer like a hawk :rofl:

If I discover any more useful findings I will edit and update my post.

1 Like