Bambu Lab P2S print starts after 1.5 minutes!

Hello
Have you ever been frustrated by the fact that printing something small and quick takes several times longer just to prepare the printer? I searched half the internet for an answer and found nothing for the P2S. So I decided to solve the problem myself. The solution to this issue is the modified start G-code sequence below. I tested it on a P2S without AMS so I do not know how it will behave with an AMS. In the code I kept the essential steps such as homing and a quick nozzle wipe without the wiper at a slightly elevated temperature. For Z axis leveling the temperature is slightly lowered. Of course the optional bed leveling and flow calibration remain available which adds another 1 to 2 minutes when enabled but it is not a big issue. For longer prints I recommend using the full original profile. Feel free to comment :slight_smile:

https://www.youtube.com/watch?v=oMAselih00Q

;======== P2S quick start printing GCODE (V5.7 - FINAL) ==========
;
; Author of the modification: SylwekK
;
; G-code start sequence tested with a non-AMS printer
; Quick start: Printing begins around 1.5 minutes after selecting the model
; Features: Optional flow calibration and bed leveling active
; Verified and tested but use at your own responsibility

M140 S[bed_temperature_initial_layer_single]
M993 A0 B0 C0
M17
M620 M
G389

;===== reset machine status =================
M204 S10000
M630 S0 P1
G90
M17 D
M960 S5 P1
M220 S100
M1002 set_gcode_claim_speed_level: 5
G29.1 Z{+0.0}
M982.2 S1

;==== Initial nozzle heating for cleaning ====
M1002 gcode_claim_action : 2
M104 S175 A
G29.2 S0

;===== X/Y Homing and CLEANING =====
M1002 gcode_claim_action : 13
G28 X T300
G150.3 ; Position above the cutter
M109 S175 A ; Wait for 175C

G150.1 F8000 ; Wipe standard
G150.1 F8000 ; Repeat
M400

;===== ACCELERATED COOLING ABOVE THE CUTTER =====
G150.3
M106 P1 S255 ; Front fan ON
M104 S140 A
M109 S140 A ; Cooling to 140C
M106 P1 S0 ; Front fan OFF
M400

;===== Z HOMING AND RETRACTION =====
G1 X128 Y128 F30000
G28 Z P0 T400
G1 Z10 F1200 ; Safe move away immediately after Z homing
M400

;===== OPTIONAL AUTO BED LEVELING (ABL)=====
M1002 judge_flag g29_before_print_flag
M622 J1
M1002 gcode_claim_action : 1
M190 S[bed_temperature_initial_layer_single]
G29 A1 X{first_layer_print_min[0]} Y{first_layer_print_min[1]} I{first_layer_print_size[0]} J{first_layer_print_size[1]}
M400
M500
G1 Z10 F1200 ; Safe lowering after ABL
M623

;===== OPTIONAL FLOW CALIBRATION =====
M1002 judge_flag extrude_cali_flag
M622 J1
M1002 gcode_claim_action : 8
G150.3
M109 S{nozzle_temperature[initial_no_support_extruder]}
G90
M83
M106 P1 S255
M983.3 F{filament_max_volumetric_speed[initial_no_support_extruder]/2.4} A0.4
M400 S5
M106 P1 S0
G1 Z10 F1200 ; Safe lowering after Flow
M623

;===== Final heating before printing ==========
G150.3 ; Return above the cutter
M1002 gcode_claim_action : 14
M190 S[bed_temperature_initial_layer_single]
M109 S{nozzle_temperature_initial_layer[initial_no_support_extruder]}

;===== Z-OFFSET correction =====
{if curr_bed_type==“Textured PEI Plate”}
G29.1 Z{0.01}
{else}
G29.1 Z{0.03}
{endif}

;===== Start line =================
M1002 gcode_claim_action : 51
G90
M83
G0 X100 Y0 F24000
G130 O0 X100 Y-0.2 Z0.6 F{filament_max_volumetric_speed[initial_no_support_extruder]/2/2.4053} L40 E10 D4
G1 Z0.5
M400

M1015.3 S1 H[nozzle_diameter]
M1002 gcode_claim_action : 0
G29.99
;======== END GCODE ==========

10 Likes

I don’t have a p2s and I absolutely appreciate your efforts. Maybe you could change the comments to English so we might use it for other machines or fragments or your changes. Just saying, thanks for sharing/caring

I missed the fact that the comments were in my native language, now translated :slight_smile:

3 Likes

Thank you. I’ll look into this at some point next week and might get back with feedback. Anyways, appreciate your work and time you put into this (incl. your super quick translation) :+1:

1 Like

After optimizing my A1 Mini with this, the P2S default start time feels like forever :joy:

Dude, thanks — I watched your video and it’s super fast, especially when you print many tasks in a row.
Tomorrow I’ll try using your code.

2 Likes

Saving and testing soon. Thanks.

I removed the additional heating to 170C before nozzle cleaning. The original Bambu Lab setting was 140C, so I decided that is enough, which sped up the start even more. Currently, it takes only 70 seconds(!) from receiving the object to printing the calibration line :slight_smile:

I also added an optional vibration test (remove semicolons in the code). Recommended to perform once in a while. You can also leave it permanently - 5 seconds won’t hurt anyone :slight_smile:

;======== P2S quick start printing GCODE (V6.0) ==========
;
; Author of the modification: SylwekK
;
; G-code start sequence tested with a non-AMS printer
; Quick start: Printing begins around 1.5 minutes after selecting the model
; Features: Optional flow calibration and bed leveling active
; Verified and tested but use at your own responsibility
;

M140 S[bed_temperature_initial_layer_single]
M993 A0 B0 C0
M17
M620 M
G389

;===== initial safety Z-axis drop =====
G91 ; relative mode
G1 Z10 F1200 ; drop bed by 10mm for safety before XY homing
G90 ; back to absolute mode

;===== reset machine status =================
M204 S10000
M630 S0 P1
G90
M17 D
M960 S5 P1
M220 S100
M1002 set_gcode_claim_speed_level: 5
G29.1 Z{+0.0}
M982.2 S1

;==== heating to 140C and XY homing ====
M1002 gcode_claim_action : 2
M104 S140 A
G28 X T300 ; homing XY while heating up to 140C
G29.2 S0

;===== nozzle cleaning at 140C =====
M1002 gcode_claim_action : 13
G150.3 ; position above the cutter
M109 S140 A ; wait for 140C target to soften residue
G150.1 F8000 ; wipe standard
G150.1 F8000 ; repeat
M400

;===== Z homing and retraction =====
G1 X128 Y128 F30000
G28 Z P0 T400
G1 Z10 F1200 ; safe move away immediately after Z homing
M400

;===== optional mech mode resonance sweep (Input Shaper) =====
; Recommended if the printer was moved. To enable, remove semicolons below:
; M1002 gcode_claim_action : 3
; G90
; G1 X128 Y128 F20000
; G1 Z5 F1200
; M400 P200
; M970.3 Q1 A5 K0 O1
; M970.2 Q1 K1 W74 Z0.01
; M974 Q1 S2 P0
; M970.3 Q0 A7 K0 O1
; M970.2 Q0 K1 W74 Z0.01
; M974 Q0 S2 P0
; M400

;===== optional auto bed leveling (ABL) =====
M1002 judge_flag g29_before_print_flag
M622 J1
M1002 gcode_claim_action : 1
M190 S[bed_temperature_initial_layer_single]
G29 A1 X{first_layer_print_min[0]} Y{first_layer_print_min[1]} I{first_layer_print_size[0]} J{first_layer_print_size[1]}
M400
M500
G1 Z10 F1200 ; safe lowering after ABL
M623

;===== optional Flow calibration =====
M1002 judge_flag extrude_cali_flag
M622 J1
M1002 gcode_claim_action : 8
G150.3
M109 S{nozzle_temperature[initial_no_support_extruder]}
G90
M83
M106 P1 S255
M983.3 F{filament_max_volumetric_speed[initial_no_support_extruder]/2.4} A0.4
M400 S5
M106 P1 S0
G1 Z10 F1200 ; safe lowering after Flow calibration
M623

;===== final heating before printing ==========
G150.3 ; return above the cutter
M1002 gcode_claim_action : 14
M190 S[bed_temperature_initial_layer_single]
M109 S{nozzle_temperature_initial_layer[initial_no_support_extruder]}
M400

;===== Z-OFFSET correction (User Verified) =====
{if curr_bed_type==“Textured PEI Plate”}
G29.1 Z{0.01}
{else}
G29.1 Z{0.03}
{endif}

;===== final vibration check and purge line start =====
M975 S1 ; ensure mech mode vibration suppression is active before extrusion
M1002 gcode_claim_action : 51
G90
M83
G0 X100 Y0 F24000
G130 O0 X100 Y-0.2 Z0.6 F{filament_max_volumetric_speed[initial_no_support_extruder]/2/2.4053} L40 E10 D4
G1 Z0.5
M400
M1015.3 S1 H[nozzle_diameter]
M1002 gcode_claim_action : 0
G29.99
;======== END GCODE ==========

2 Likes

During printing, it turned out that version 6.0 has an issue with filament detection. Version 6.1 resolves this inconvenience; when the filament runs out, the printer will wait for a new roll to be loaded.
Sorry for the inconvenience, but Bambu Lab G-code involves rather complex processes, and without original documentation, many things must be tested manually, making it easy to miss something.

Currently, I have already completed several prints, and all of them went through without any issues.

;======== P2S quick start printing GCODE (V6.1) ==========
;
; Author of the modification: SylwekK
;
; G-code start sequence tested with a non-AMS printer
; Quick start: Printing begins around 1.5 minutes after selecting the model
; Features: Optional flow calibration and bed leveling active
; Verified and tested but use at your own responsibility
;

M140 S[bed_temperature_initial_layer_single] ; heat heatbed first
M993 A0 B0 C0 ; nozzle cam detection not allowed.
M17
M620 M ; enable remap/monitoring
G389

;===== initial safety Z-axis drop =====
G91 ; relative mode
G1 Z10 F1200 ; drop bed by 10mm for safety before XY homing
G90 ; back to absolute mode

;===== reset machine status =================
M204 S10000
M630 S0 P1
G90
M17 D ; reset motor current to default
M960 S5 P1 ; turn on logo lamp
M220 S100 ; Reset Feedrate
M1002 set_gcode_claim_speed_level: 5
G29.1 Z{+0.0} ; clear z-trim value first
M983.1 M1
M982.2 S1 ; turn on cog noise reduction
M983.4 S0
;===== reset machine status =================

;==== heating to 140C and XY homing ====
M1002 gcode_claim_action : 2
M104 S140 A
G28 X T300 ; homing XY while heating up to 140C
G29.2 S0 ; avoid invalid abl data

;===== filament sensor arming (now it won’t block heating) =====
M620 S[initial_no_support_extruder]A ; switch material
T[initial_no_support_extruder]
M621 S[initial_no_support_extruder]A ; arm runout sensor
G389 ; collision detection

;===== nozzle cleaning at 140C =====
M1002 gcode_claim_action : 13
G150.3 ; position above the cutter
M109 S140 A ; wait for 140C target to soften residue
G150.1 F8000 ; wipe standard
G150.1 F8000 ; repeat
M400

;===== Z homing and retraction =====
G1 X128 Y128 F30000
G28 Z P0 T400
G1 Z10 F1200 ; safe move away immediately after Z homing
M400

;===== optional mech mode resonance sweep (Input Shaper) =====
; Recommended if the printer was moved. To enable, remove semicolons below:
; M1002 gcode_claim_action : 3
; G90
; G1 X128 Y128 F20000
; G1 Z5 F1200
; M400 P200
; M970.3 Q1 A5 K0 O1
; M970.2 Q1 K1 W74 Z0.01
; M974 Q1 S2 P0
; M970.3 Q0 A7 K0 O1
; M970.2 Q0 K1 W74 Z0.01
; M974 Q0 S2 P0
; M400

;===== optional auto bed leveling (ABL) =====
M1002 judge_flag g29_before_print_flag
M622 J1
M1002 gcode_claim_action : 1
M190 S[bed_temperature_initial_layer_single]
G29 A1 X{first_layer_print_min[0]} Y{first_layer_print_min[1]} I{first_layer_print_size[0]} J{first_layer_print_size[1]}
M400
M500 ; save cali data
G1 Z10 F1200 ; safe lowering after ABL
M623

;===== optional Flow calibration =====
M1002 judge_flag extrude_cali_flag
M622 J1
M1002 gcode_claim_action : 8
G150.3
M109 S{nozzle_temperature[initial_no_support_extruder]}
G90
M83
M106 P1 S255
M983.3 F{filament_max_volumetric_speed[initial_no_support_extruder]/2.4} A0.4
M400 S5
M106 P1 S0
G1 Z10 F1200 ; safe lowering after Flow calibration
M623

;===== final heating before printing ==========
G150.3 ; return above the cutter
M1002 gcode_claim_action : 14
M190 S[bed_temperature_initial_layer_single]
M109 S{nozzle_temperature_initial_layer[initial_no_support_extruder]}
M400

;===== Z-OFFSET correction (User Verified) =====
{if curr_bed_type==“Textured PEI Plate”}
G29.1 Z{0.01} ; user updated for Textured PEI
{else}
G29.1 Z{0.04}
{endif}

;===== final vibration check and purge line start =====
M975 S1 ; ensure mech mode vibration suppression is active
M1002 gcode_claim_action : 51
G90
M83
G0 X100 Y0 F24000
G130 O0 X100 Y-0.2 Z0.6 F{filament_max_volumetric_speed[initial_no_support_extruder]/2/2.4053} L40 E12 D4
G1 Z0.5
M400

;===== ACTIVATE ALL SENSORS (FIX FOR DRY PRINTING) =====
M1015.3 S1 H[nozzle_diameter] ; enable clog detection
M1015.4 S1 K1 H[nozzle_diameter] ; enable air printing detect
M620.6 I[initial_no_support_extruder] W1 ; enable ams air printing detect
;=======================================================

M1002 gcode_claim_action : 0
G29.99
;======== END GCODE ==========

2 Likes

Great, thanks for sharing.

I was just wondering why it was doing so many steps again and again, and that it should be possible to drop a whole load of them..

Will try at next print.

Yep. It homes 3 times and wiped the nozzle 5 times.

2 Likes

The machine spends the most time loading new filament (I’m not sure, but presumably in the AMS version, the printer retracts the filament after the print is finished), even though only one filament is connected (without AMS). Consequently, there is an entire nozzle cleaning sequence. Bambu Lab markets the printer as a high-quality, maintenance-free machine, which is likely the reason for all this fuss. I deliberately skipped the nozzle tip wiper in the code, accepting the risk that something might still be stuck there, but the wiping process took quite a while, and as experience has shown, the prints are still good. Besides, I previously had a Prusa MK3s which didn’t have a wiper, and the prints weren’t bad either—just printed much slower. Regarding the X/Y homing, I have no idea why the printer performs it several times.

1 Like

Some details regarding the calibration were bothering me, as it seemed to pass through them a bit too quickly. I looked into it again and introduced some changes that I believe turned out to be very useful. In the process, I tidied up the program a bit, and overall, I am very satisfied with the result. Currently, for the first print with a new filament, I run the flow calibration option (which takes about 2-3 minutes in total), and subsequent copies are printed without calibration, allowing them to start in about 1.5 minutes.

;======== P2S quick start printing GCODE (V7.1) ==========
;
; Author of the modification: SylwekK
;
; G-code start sequence tested with a non-AMS printer
; Quick start: Printing begins around 1,5 minutes after selecting the model
; Features: Optional flow calibration and bed leveling active
; Verified and tested but use at your own responsibility
;

M140 S[bed_temperature_initial_layer_single] ; heat heatbed first
M993 A0 B0 C0 ; nozzle cam detection not allowed.
M17
M620 M ; enable remap/monitoring
G389

;===== initial safety Z-axis drop =====
G91 ; relative mode
G1 Z10 F1200 ; drop bed by 10mm for safety before XY homing
G90 ; back to absolute mode

;===== reset machine status =================
M204 S10000
M630 S0 P1
G90
M17 D ; reset motor current to default
M220 S100 ; Reset Feedrate
M1002 set_gcode_claim_speed_level: 5
G29.1 Z{+0.0} ; clear z-trim value first
M983.1 M1
M982.2 S1 ; turn on cog noise reduction
M983.4 S0
;===== reset machine status =================

;==== heating to 140C and XY homing ====
M1002 gcode_claim_action : 2
M104 S140 A
G28 X T300 ; homing XY while heating up to 140C
G29.2 S0 ; avoid invalid abl data

;===== filament sensor arming (now it won’t block heating) =====
M620 S[initial_no_support_extruder]A ; switch material
T[initial_no_support_extruder]
M621 S[initial_no_support_extruder]A ; arm runout sensor
G389 ; collision detection

;===== nozzle cleaning at 140C =====
M1002 gcode_claim_action : 13
G150.3 ; position above the cutter
M109 S140 A ; wait for 140C target to soften residue
G150.1 F8000 ; wipe standard
G150.1 F8000 ; repeat
M400

;===== Z homing =====
G1 X128 Y128 F30000
G28 Z P0 T400
;G150.3 ; Return to purge bucket immediately
M400

;===== optional auto bed leveling (ABL) (NOW AFTER FLOW) =====
M1002 judge_flag g29_before_print_flag
M622 J1
M1002 gcode_claim_action : 1
; G150.3
M190 S[bed_temperature_initial_layer_single]
M109 S140 A ; Cool down to 140 for safe ABL
G29 A1 X{first_layer_print_min[0]} Y{first_layer_print_min[1]} I{first_layer_print_size[0]} J{first_layer_print_size[1]}
M400
M500 ; save cali data
; G150.3 ; Return to purge bucket after ABL
G1 Z10 F1200
M623

;===== mech mode resonance sweep =====
M1002 gcode_claim_action : 3
G90
G1 X128 Y128 F20000
G1 Z5 F1200
M400 P200
M970.3 Q1 A5 K0 O1
M970.2 Q1 K1 W74 Z0.01
M974 Q1 S2 P0
M970.3 Q0 A7 K0 O1
M970.2 Q0 K1 W74 Z0.01
M974 Q0 S2 P0
M400

;===== optional Flow calibration =====
M975 S1
M1002 judge_flag extrude_cali_flag
M622 J1
M400
M211 X0 Y0 Z0 ;turn off soft endstop
M975 S1 ; turn on input shaping

G29.2 S0 ; avoid invalid abl data
G150.3
{if ((filament_type[initial_no_support_extruder] == “PLA”) || (filament_type[initial_no_support_extruder] == “PLA-CF”) || (filament_type[initial_no_support_extruder] == “PETG”)) && (nozzle_diameter[initial_no_support_extruder] == 0.2)}
M620.10 A0 F74.8347 H{nozzle_diameter[initial_no_support_extruder]} T{flush_temperatures[initial_no_support_extruder]} P{nozzle_temperature_initial_layer[initial_no_support_extruder]} S1
M620.10 A1 F74.8347 H{nozzle_diameter[initial_no_support_extruder]} T{flush_temperatures[initial_no_support_extruder]} P{nozzle_temperature_initial_layer[initial_no_support_extruder]} S1
{else}
M620.10 A0 F{flush_volumetric_speeds[initial_no_support_extruder]/2.405360} H{nozzle_diameter[initial_no_support_extruder]} T{flush_temperatures[initial_no_support_extruder]} P{nozzle_temperature_initial_layer[initial_no_support_extruder]} S1
M620.10 A1 F{flush_volumetric_speeds[initial_no_support_extruder]/2.4053
60} H{nozzle_diameter[initial_no_support_extruder]} T{flush_temperatures[initial_no_support_extruder]} P{nozzle_temperature_initial_layer[initial_no_support_extruder]} S1
{endif}

M620.11 P0 L0 I[initial_no_support_extruder] E0
M620.11 K0 I[initial_no_support_extruder] R0

M620 S[initial_no_support_extruder]A ; switch material
M1002 gcode_claim_action : 8 ; Cali action
M1002 set_filament_type:UNKNOWN
M400
T[initial_no_support_extruder]
M400
M628 S0
M629 ; Cutter
M400
M1002 set_filament_type:{filament_type[initial_no_support_extruder]}
M621 S[initial_no_support_extruder]A
M104 S{nozzle_temperature_initial_layer[initial_no_support_extruder]}
M400
M106 P1 S0
M400
G29.2 S1

M1002 set_filament_type:{filament_type[initial_no_support_extruder]}
M1002 gcode_claim_action : 8
G150.3
M109 S{nozzle_temperature[initial_no_support_extruder]}
G90
M83
M400 ; sync buffer
M983.3 F{filament_max_volumetric_speed[initial_no_support_extruder]/2.4} A0.4 ; cali dynamic extrusion
M400
M106 P1 S255
M400 S5
M106 P1 S0
G150.3

M623

;===== final heating before printing ==========
G150.3 ; return above the cutter
M1002 gcode_claim_action : 14
M190 S[bed_temperature_initial_layer_single]
M109 S{nozzle_temperature_initial_layer[initial_no_support_extruder]}
M400

;===== DOUBLE CUT AND WIPE BEFORE PURGE LINE =====
M629 ; First cut
M400 P200
M629 ; Second cut
M400 P200
G150.1 F8000 ; Wipe residue after cuts
M211 S1 ; restore soft endstops
G29.2 S1 ; activate ABL compensation
M400

;===== Z-OFFSET correction (User Verified) =====
{if curr_bed_type==“Textured PEI Plate”}
G29.1 Z{0.01}
{else}
G29.1 Z{0.03}
{endif}

;===== final vibration check and purge line start =====
M975 S1
M1002 gcode_claim_action : 51
G90
M83
G0 X100 Y0 F24000
G130 O0 X100 Y-0.2 Z0.6 F{filament_max_volumetric_speed[initial_no_support_extruder]/2/2.4053} L40 E12 D4
G1 Z0.5
M400

;===== ACTIVATE ALL SENSORS (FIX FOR DRY PRINTING) =====
M1015.3 S1 H[nozzle_diameter]
M1015.4 S1 K1 H[nozzle_diameter]
M620.6 I[initial_no_support_extruder] W1

M1002 gcode_claim_action : 0
G29.99

;— Load Cell Sensitivity & Monitoring —
M1010 Q0 B0.023 S0.01
M1010 Q1 B0.005 S0.01
M1010.1 S1

;======== END GCODE ==========

3 Likes

Only three minutes? You’re very lucky.
With an H2D, the average time to start printing is between 5 and 7 minutes.
It’s simply terrible.

I’ll try applying your changes to the H2D, in case it helps.

May you get every green light when driving :face_holding_back_tears: I look forward to testing this on my P2S combo.
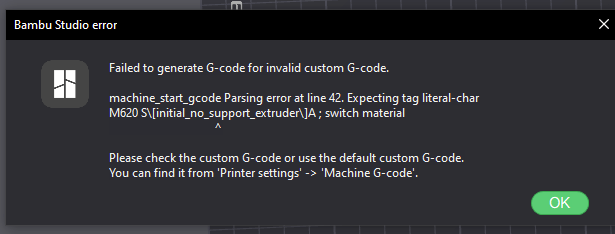
Bummed that you don’t have an AMS. The P2S change filament g-code also has a seemingly arbitrary (?) yet mandatory purge process with every filament change (yes, even when the purge volumes are at ‘0’) that I’m looking to remove. How long did it take you to familiarise yourself with the P2S start g-code and test changes?

It doesn’t actually bother me about the slow startups. Thought it was normal as this is my first printer P2S. But loooove the fact that you bring this to my attention. I may test it out. Where did you find all this Ai? And where do you edit g-code this file? Ah, ou have a video. I’ll check it. I’m sure it’s easy. Thanks for sharing and if I test I’ll add more feedback. Brilliant just to know this was even possible and thanks for sharing it :folded_hands:

I used to work on CNC machines, which is where the desire to tinker with G-code came from :slight_smile: I know the general principles of G-code programming, but with 3D printers, it was a harsh reality check. Printer codes are very specific and often unique to a single manufacturer. While analyzing unknown commands, ChatGPT and Google were helpful, but I still had to test most things “live.” Fortunately, during the testing and continuous refinement/testing—which took several evenings in total—nothing bad happened, other than the fact that sometimes things simply didn’t work because some complementary commands were missing.

As I mentioned before, I check and test as much as possible to ensure everything is in order before publishing anything. Should I have missed something, your feedback is very valuable to me.

In the case of AMS and the recurring purging of large amounts of filament, it is due to the fact that the printer retracts the filament back to the spool after the print is finished. Presumably, it would be enough to block the filament retraction in the END G-code (I haven’t done this myself as I don’t have an AMS), and with my START G-code, the print would start instantly—provided the spool from the previous print is selected. Otherwise, the cleaning/purging/etc. process would occur again, which would be perfectly logical in that situation.

2 Likes

Curiosity got the better of me—I took a look at the END G-code, and right at the beginning, the sequence responsible for retracting the filament is visible. I assume that it is enough to disable it; simply insert a semicolon “;” before all the commands shown below (you will find them at the start of the program) so the printer stops interpreting them. From now on, in combination with my START G-code, everything should happen faster after each part printed consecutively from the same AMS slot. I have no way to test this, but looking at the rest of the program, all that remains is the handling of other peripherals, such as the camera, fans, bed, etc.

; pull back filament to AMS
M620 S65535
T65535
G150.2
M621 S65535

Well, it looks like it might not be that simple for the AMS. The machine inherently expects the filament to be retracted, so the slicer does not allow a situation where the filament could remain in the nozzle. One could still try to trick the M620 command by passing a system variable parameter about the last used filament and not executing G150.2 (filament retraction). Alternatively, a probably better solution would be to simply replace G150.2 with G1 Z5 F1200 (lowering the bed by 5mm to safely move the nozzle over the waste bin with the subsequent G150.3 command). Well, I have no way to verify this.

*this was trying it via the external spool (ams still connected) on beta 2.5.1.52