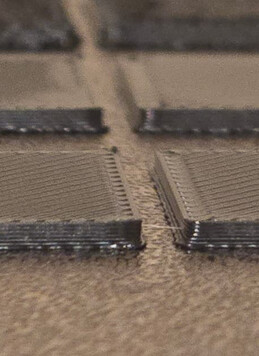
for some unknown reason, my first layer is coming out really poorly. If the print survives the first layer, everything else is usually fine, but it’s starting to become an issue. I can even hear the nozzle scraping the layer because it’s so uneven.
For small prints, it’s “okay” (and I say that in quotes because the layer is hot enough that the nozzle can push through it). But for larger prints, some parts cool off and harden, and if the nozzle touches those spots, it can lift the whole layer off the bed.
I don’t understand why this is happening. My filament is bambu PLA, properly dried, and at 21% humidity—well within the recommended 20–40% range.
What can I do to check what’s wrong? Is there a way to test the first layer on the printer?
wouldn’t a clog also affect the rest of the print ? i got perfect layer after the first one like i say, i don’t think a clog would stop at first layer, so i ruled that out for sur.
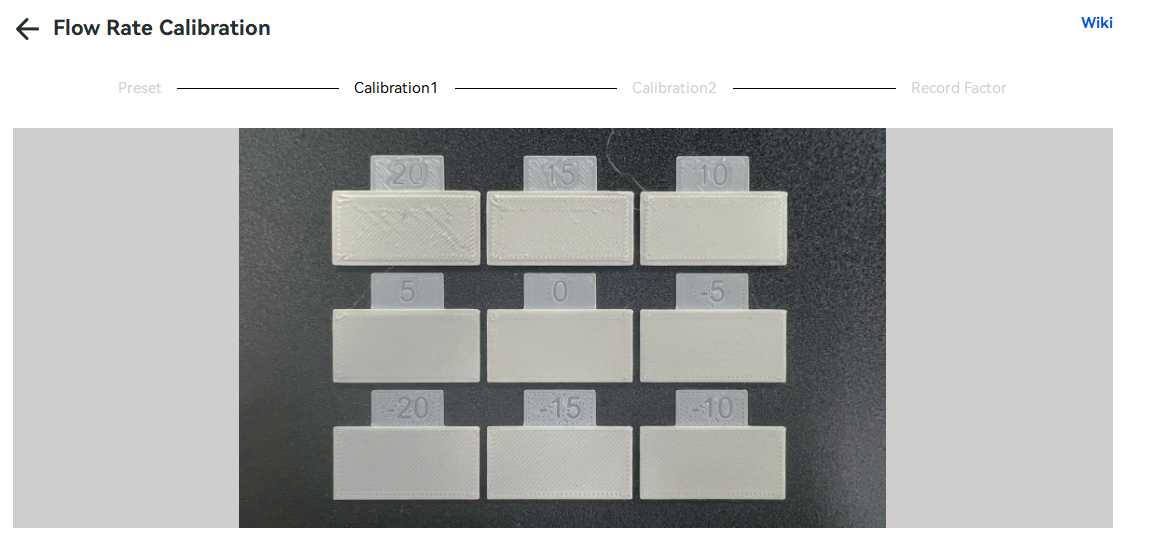
right now i am redoing a flow calibration test, and by the sound i hear and what i see, two of them are going to be horrible
question they say to find the test that is the smoothest, i count also the side of the print correct ? because i can feel some bump for example on 0, but not on -15 or -20, what am i supposed to get ? because feel is one thing but i would appreciate an example in studio
so here is what i got, we all agree that top line is bad, no need to feel, then you move to the other 2, now 0 seem smooth but the extremity are bad you can feel the bump on the wall of the print
If I understood that correctly the print lift up from the bed? Turn off the AUX fan (in filament profile) and turn down the chamber fan on larger PLA/PETG prints, and if it is in a cool room turn it off completely as well. Both my fans are shut off for most of my PLA/PETG prints as its cold over here in Canada.
If its an adhesion issue try to wash the bed with soap or use some nano polymer adhesive. The real long term solution to adhesion issues is a Kdavi/Frosbite plate.
The wiki has lots of info if you are still having a problem after that, for me loosening the bed bottom transportation screw fixed my small first layer problem.
Bambu’s wiki says to ignore the perimeter on these calibration prints. From your image of the white print it looks like 5, 0, or -5 are going to be your best. I drag my fingernail across the prints feeling for the least “bumps” in various directions. You want the print with the least peaks (over-extrusion) and valleys (under-extrusion) I find this better than using the skin of my fingertip.
Repeating for clarity:
1. First, approximate a near-correct Pressure Advance ( PA ).
2. Print a hollow calibration cube: no infill, no top layers.
3. Measure the wall thickness. If the measured thickness ≠ (number of perimeters × line width), update Flow Ratio:
FlowRatio_new = FlowRatio_current × (Target_thickness / Measured_thickness)
4. Reprint and repeat until the wall thickness is within your tolerance.
5. Once flow is correct, calibrate PA. Note that changing nozzle temperature can shift the optimal PA value.
This process calibrates the filament (flow) but won’t address unrelated issues.
I don’t personally own an H2D, but I saw CNC Kitchen mention that when the auto bed leveling is set to auto it checks tolerances and if they are OK it skips the bed probing and uses previous measurements. Perhaps try to set the bed leveling to on?
I am trying to understand what are those black line i am getting too, and where you see crevass those seem to be blob i got that i could ear being touch by the nozzle like it was scrapping stuff.
Idu use nano polymer and i though this was good for at least a 100 print, i think i did like maybe 30-40, so it that ?
Since you can’t do that on these, I’d check everything that could foul the autocalibration. no stray plastic under the plate, consistent heatbed target temp for both print + calibrate, loose nozzles, etc.
No its bambu metalic pla, no dual color, i do not know what those black line are because i have none anywhere else, its first layer only, and again, rest of the print is flawless
Ex: Z happened to be calibrated 0.15 too low on a 0.20 layer height print.
toolhead moves to its calibrated “too low” setpoint to start
layer 1: toolhead moves up 0.20. Begins a layer. Trying to push .20 height worth of plastic [prescribed from slicer] into a 0.05 space. It grinds into the plate, mushes, tears out the side walls, etc. There’s a small amount that is pushed up into the airspace of the next layer, usually by “bottom surface” linetype, as the walls tend to blow out laterally.
layer 2: toolhead moves up 0.20. This new layer’s “airspace” is mostly clear, except for the rough spots that squeezed upwards. That extra overflow becomes added to the plastic in this layer, and its still overflowing a little extra, but not nearly as bad.
repeat until you hit infill voids (relieves this overextrusion) or all the overflow has worked itself out into the natural gaps from stacked cylindrical extrusions.