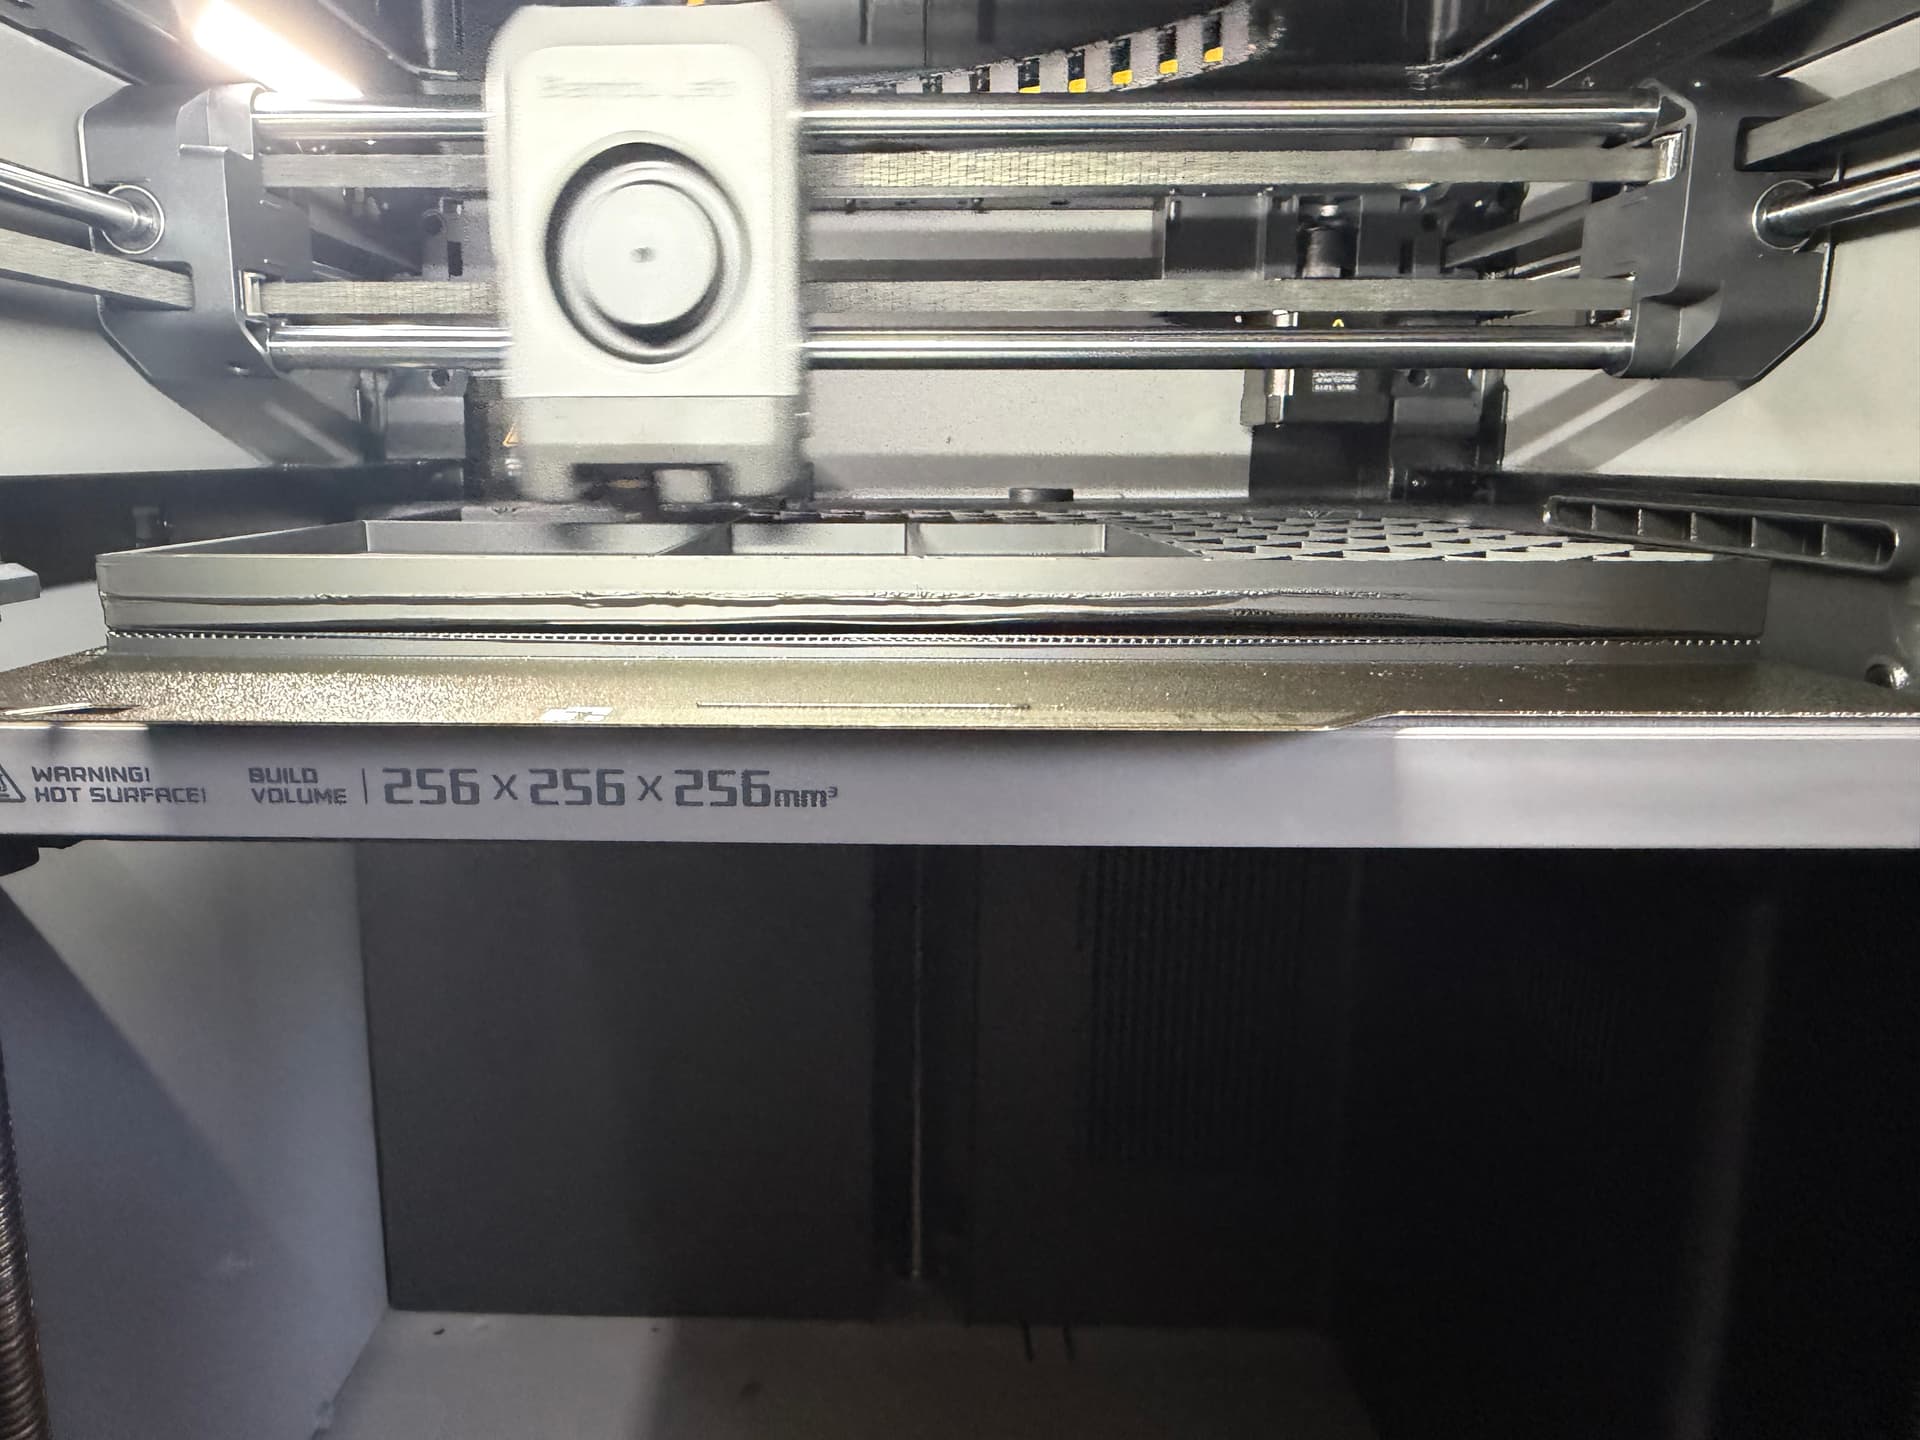
I’m new to 3D printing and I’m working on my first large scale project. Currently I’m working on working on printing V4 of this. Basically I’m making a tray that has a magnetized base. Everything is working fine until I got to printing the large side of the tray. The tray has 4 feet that stick down 3mm that contain the magnets. Do to effectively print this I used the normal style supports. I had to use the snug version as the normal just barely hung over the plate on the sides. But I’m having a issue with where two times now the very front of tray failed to adhere to the supports which resulted in very bad warping and multiple extrusion head overload warnings before it began printing the rest. On the second attempt I slowed it down to 50% speed when it was doing the adhesion levels. This made no difference.
As far as specs I’m using a P2S with AMS.
I’m using all default slicer setting besides sparse infill density is set to 5%, supports are enabled set to normal snug and on build plate only.
I’m printing with BambuLabs PLA Tough+ it’s brand new filament out of the package. I haven’t tried drying it yet as I felt like this problem was probably bigger then that
Any help would be greatly appreciated and I know this is probably a super simple solution but I’m trying to learn and have looked and looked an now found a solution
Best regards,
Jacob
Drying the filament does help against warping. So definitely do that first.
If the tray is self-designed, consider replacing a round edge with a chamfer. This can eliminate the need for specific supports.
Also monitor your build chamber temp. Not sure about PLA Tough. For other types of PLA, I aim for 30-35°C (warm chamber but still just below usual heat creep temps).
There are further options, but do the drying and chamber temp monitoring first.
 &
& 
PS: Large Prints: Say Goodbye to Warping!
Okay I will try drying it. Temp has remained between 30-35C. It’s meant to be just a straight 90 degree edge but it curled up from the warping. Thanks for the reply
PLA T+ does like to warp during that initial cooling during a print, from my experience so far. Gone through a few rolls of it on H2C. If it sticks to the plate for the whole print, it’s fine after that (doesn’t change shape later). But larger flat chunks will curl up quick w/out proper mitigation techniques (as in the post Eno linked to). I’ve never tried it on top of a raft like that. When using it with something more warp-prone I usually turn up the plate temperature a bit (on the textured PEI anyway). W/out that “stick” I dunno what would happen… probably nothing good.
That could be a good printing “challenge” – design and print something typically warp-prone but w/out any bed adhesion at all to help. 
Odd that it only happens in the front? (Are you keeping the door closed?) Or is it warped on the other sides also?
If that aux fan is running, I’d try disabling it (in filament settings).
Also, using it as supports for itself kinda sucks, in my experience… it bonds real good and leaves a crap surface (after much scraping). When I need to support it I use BL’s “Support for PLA/PETG” filament. It even sticks to PETG a little too well. How it it looking on yours?
I do always dry it, though I’ve yet to see a fresh roll loose any measurable weight. But why not.
-Max
I have printed probably about 6-8 rolls worth at this point working on this tray. This is my first iteration with the magnets and having to print it on top of the supports. The smaller pieces have worked pretty well with only very minor warping.
from what I have seen it’s completely isolated to the front. No corner warping it’s that exact spot on both of them. Door is closed. I will also try turning the fan off for this next one.
As far as using it as support material for its self i haven’t had any issues with removing it. The only weird thing is the final layer before it prints the actual part is a a weird sparsely filled set of lines that go left to right and do not appear to to adhere to the final support mesh layer very well. Which I think might be part of the problem but I don’t have a picture nor do I know how to properly explain it. But I will include a picture of it when I get to that point on the next print.
I’m going to try changing the infill design as well.
I appreciate your guys help I will keep yall updated
I admit that I have not fully understood the feet.
I presume that they neccessitate the support?
It would help a lot if you could separate them from the large tray print as requirements conflict. You want a very good adhesion between supports and the part against warping but a bad adhesion to be able to remove them.
Additional things that come to mind:
- design the feet as separate parts that slot/click/screw/glue into the tray
- use a different support strategy (BVOH interface for PLA)
&
Wow that’s a lot of filament. Is that why it’s been hard to get recently? 
Now I wonder even more if it’s a warping issue… seeing those loose strands along the front (just noticed one hangs down in front of the support/raft), and if it’s not doing that anywhere else. And yea I’d expect the corners to curl first. The horizontal line across the face after which it starts getting better could be from warping, but it could also be the filament finally able to get a grip enough to maintain a flat surface and support the rest.
I’m also not really clear on the feet, or the magnets. If there is any possible way to get rid of bottom protrusions (as Eno suggests), I’d do it.
-Max
I’m currently away from my desktop with the CAD file but basically the “feet” Are just the magnets. The tray is being designed to go in the back of an ambulance and has to be easily removable but also can’t go flying around. So to limit the sheer force the magnet would experience from a side to side or front to back I made an extrusion in the base plate where it mechanically slots in then magnetically is held there.
Basically this but the bottom of the tray is thin so the orange is the “feet” in my print, except there is a layer of filament overtop of the magnets. But also now that I’m sitting here thinking about it, if it continues to be problem I might just make the bottom of the tray thicker and flip them so the orange would be the base plate and the green is the tray.
Yeah sometimes I forget that I am the one designing this and I can change things. I think it would probably be best if I switched the orientation around so they are on top of the base plate rather than under the tray. Which means time to order more filament (get it while you can before I buy it all up lol)
Beginner here not sure if I should make a new post of it’s fine to tag onto this one. Been having issues lately with my new p2s printing larger prints corners are warping and lifting up of the plate. I’ve printed the auxiliary deflector and tried turning it off but still seem to keep wanting to pop off the bed at a corner. Any more experienced printers got any idea would be greatly appreciated as I may just be being stupid. Thanks
Eno brought this link to my attention. It’s got some helpful tips and tricks Large Prints: Say Goodbye to Warping
This is sound reasoning.
If you flip it around you should enable an easier print.
There was also a good “design for magents” post by MakerWorld a little while ago…
Got it: Ways to Optimise a Magnet Socket
There are further links in there.
Hope this helps, &
Best to open a new post with pic’s for specific troubleshooting.
Also, dry the filament first and note the environmental/chamber temps. Chances are, this’ll already help in many cases.
&
Addendum: I never understood the reasoning behind aux-fan deflectors. It is controlled in the filament settings.
that’s too much air. It happens on that side because the exhaust is back there.
deactivate the exhaust and let the top lid open with a couple of spacers (3 cm tall)
and don’t open the door during printing
So I just printed the other half. The only change was drying the filament and turning off the exhaust fan. It looks a lot better. I already changed the design I just needed something to present so I finished printing the current design and I didn’t have time to wait for more filament to come in. I appreciate everyone’s help.
An excessive part fan can also ruin the print, you have to find an acceptable minimum. for huge parts like that shouldn’t be difficult.
On the contrary If you’re going to print a model like the luffy diorama (I name it just because I recently printed it) you probably can’t just use same settings due to all the tiny details like the shark’s teeth