I watched a video on it too, you have to replace the PTFT tube with a slightly larger one. It also has a valve by the AMS that prevents the cool air from going in there. They thought it out but it’s probably not needed.
After thinking about it, the chilled air may be just a gimmick. I bet regular ambient air is cool enough compared to the heat of where it is getting pumped into.
Here is what may be a cheap alternative: Take a regular sealed drybox with filament inside on a ball bearing hub (easy enough to make these or buy one). Hook up as per usual using the usual PTFE tube. Now add a 1/4" bulkhead quick-connect to the drybox and pump air into it with an aquarium pump. That will pressurize the drybox, and unless there are leaks, at least some amount of air should flow to the hotend. See what happens. I’d wager it may be just as good, or nearly as good, and maybe “good enough.” If need be, switch to the larger PTFE tube, as they suggest. to accomodate more air flow.
You can get about 7psi without much trouble on a $20-$40 aquarium air compressor that’s quiet. PM me if you want a recommendation on a good one to buy.
2 Likes
Well thanks for noting ![]() Somehow Interessting but i don`t have any heat creep issues.
Somehow Interessting but i don`t have any heat creep issues.

@Hank Isn’t it obvious? Print with your door and lid closed, and you will have a heat creep issue. At least with PLA. But with this, maybe you wouldn’t. If you don’t care about keeping the door and lid closed, then, sure, move along, nothing to see here.
But the advantage of closed door and lid are:
- helps keep out dust
- quieter.
That’s not nothing.
2 Likes
We are pretty close already, at least in z. Out of curiosity I ran a small, rudimentary test series recently. Turns out the real limit for FDM is minimal flow controllabity.
0.02mm3/s were still doable. I feel very confident about a 0.03mm layer height with a .4 nozzle on an X1. Lower is possible, but it does get tricky.
Interestingly, at such low layer heights, a smaller nozzle makes us hit the flow control limit sooner.
It would be interesting to see if the improved extruder motor of the H2D enables better flow control at such low flows.
1 Like
What filament type were you using for your rudimentary tests? I don’t know if it’s exactly what you’re referring to or not, but, as an experiment, when I tried printing my first layer with PETG on my X1C at a ridiculously low speed (for other reasons) I got all kinds of stringing that I didn’t get at all when I sped things up again. For that reason probably PETG would be the wrong filament for printing ultra thin layer heights at low flow, as you’d be getting all that oozing ejected in addition. Likewise, it follows that maybe some filament types would be better suited than others. Which would be the best? I don’t know. Maybe one with very little shrinkage? CoPA perhaps? Or, better yet, maybe one that requires a lot of force to squeeze out of the nozzle?
1 Like
I wanted to start with something simple so I went for white BBL PLA Basic.
PETG would be very interesting, but with the nozzle so close to the prior layers, I expect it to be able to cause a mess quite abruptly.
As you mention, that ultra low flow together with an oozing prone material could be problematic.
Out of the materials I have printed over the years, PLA would be my first choice since it is the most forgiving.
Second would probably be carbon filled materials. I was really impressed with the PA6-CF and PPS-CF (on a Plus 4) but have not yet printed the PETG-CF or PC-CF. But then again, with those, layer lines are hidden much earlier. Still, their stiffness gives good extruder flow control, they are more forgiving thermally and rheology appeared very good. Gotta watch out for heat creep though as there are a lot of large solid infill areas to print when using low layer heights where they are most useful: Shallow angled top surfaces needing a minimum thickness.
PC is something I have not had much luck with. I only tried the transparent variety but felt it being pretty tricky to control due to stringing and oozing. I got workable results but still. It may just be my little experience with it though.
TPU I find impossible to predict in this scenario. In my experience it tends to ooze somewhat, so probably a bit problematic.
1 Like
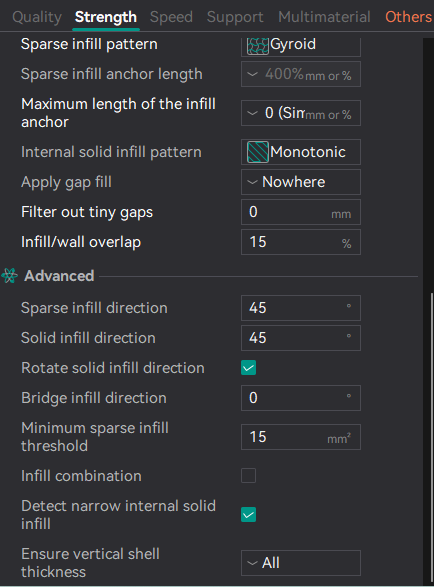
I wonder whether the “Infill combination” slicer setting might help with that:
I could be wrong, but having played with it a little bit, I got the impression that it combined infill layers by printing those infill layers thicker while keeping the prescribed wall layer height. The reason I say that is from observation: it seemed to print at least a couple of wall layers per each infill layer, and that’s the only way I can imagine how it might do that.
[Edit: oops. I missed reading the “shallow angled top surface” part. I was thinking of sparse infil, where you don’t really care about layer thickness as it won’t be seen. So, maybe useful for that, but not for the concern you raised. Oh, well. Maybe there’s some other slicer setting for that. ]
")
It does sound interesting. When I run my X1C in my garage, I would like something which could do this, because I want to keep the dust out by keeping the lid and door closed. And furthermore I like to keep my X1C in a state of being ready to print at the drop of a hat, so I don’t want to have to go to the garage to open the lid and door whenever I want to print. I’d rather just send off the print and later pick up the finished print after it’s all done.
One possible caveat though: when I tried running a water separator off even a more powerful compressor, but at extremely low air flow, it didn’t separate any water at all. None. Zip. Nada. I don’t know what their flow is, but I’m guessing fairly low flow. I think the reason is that with a high flow, you get a big temperature drop, which causes the humidity in the compressed air to condense out. But at low flow you don’t get that big temperature drop, and furthermore the ambient air provides some amount of reheating, which prevents what small temperature drop there may be from compounding.
Anyway, it doesn’t matter, because there is an alternative solution, which is to simply run the air through desiccant, and that will dry it out just fine. I’m already doing this when I pump dry air into my drybox to keep it at a very dry positive pressure inside it. Matter of fact, I could fairly easily adapt my existing setup to do exactly this.
The only thing is: I don’t particularly want to risk a Blob of Death to test how well it works or not. I guess I’d need to put a temperature sensor on the hotend heatsink to see how much, if any, effect it was having first rather than just hook it up and hope it works.
In the case of the H2D, it’s supposed to auto-vent to avoid the problem entirely. So, this would be for a legacy enclosed printer, like my X1C, which lacks that native capability.
For anybody else, it might be worth the money just to see how good it is.
1 Like
my .02 cents. I print PLA all day long in my P1P (with ARC Enclosure) and I never remove any panels or anything. Never had issues. The pla i printed on my P1S i havent had issues but i usually dedicate that to PETG
1 Like
Well, even better! Which build plate do you use, and what temperature do you run it at? Maybe it becomes a non-issue with the artic glacier plate, or whatever it’s called., because that build plate doesn’t require much temperature to work effectively for PLA.
As for me, the only Blob of Death experience I’ve had on my X1C was with printing PLA with the door and lid closed. It didn’t happen right away, but eventually it did. Unfortunately, I don’t remember the details, but I may have been printing to a G10 build plate, which needs to run hotter to get proper adhesion, and if that was the case, it may have increased the interior chamber temperature enough to result in the problem. Not sure. If it were to happen again, I’d note more carefully the conditions under which it happened. Anyhow, after restoring to new condition, I haven’t had any recurrence, maybe because I’m now careful to keep the door and lid open while printing PLA, or maybe because I no longer print PLA on G10, and so the heated bed temperature is lower, which results in lower chamber temperature, which helps the hotend heatsink to work better, which in turn helps avoid the Blob of Death. Who knows? I’m generally more proficient now than at the time it happened, so perhaps that’s as factor as well.
I’ve used the gold textured and AliExpress patterned plates. I run at the preset for Bambu Lab PLA and Generic PLA (depending on what im using). I do have the glacier plate but I havent used it yet. I literally never open my printers to print anything and havent had issues. I did noticed my P1S was setup a hair closer to the bed than the P1P cuz some PETGs will grab the nozzle and have gaps (cuz maybe too close) but thats a whole different issue lol. I think i have to retram my bed (with the manual knobs) but I’ve found that some PETGs like Kingroon and Giant Arm have ZERO issues so I’ve been sticking to them exclusively instead of solving the issue lol! I’ve noticed the issue with Bambu Lab HF PETG and Prusament Jet Black. Printing my other printers like the A1, it was fine so I think Bambu Lab just set it up a hair closer. Sometimes it works in my favor tho cuz i never have warping with the filaments i mentioned that do work.
If I understand correctly, you’re saying that the layer height for infill is a multiple of the layer height for walls, but you’re not sure?
This seems like a cool time-saving feature which reduces some of the heartburn from not being able to use two different nozzle sizes.
I was thinking that there might be a layer adhesion issue for the infill from there being more cooling time, but maybe not because it’s compensated for by the fact that the greater amount of material per layer would needs longer to cool.
That’s right. I’ve only observed it casually, but that’s the impression I got. Give it a try and let us know what you think. If I had more time, I’d RTFM. Maybe later. Just passing along the thought before I hit the road for some travelling.
It would be cool if we could print FDM with as much detail, or even nearly as much detail, as a resin printer, and thereby avoid all the nasty toxic chemistry associated with resin printing. FDM certainly has its health issues, but resin looks like more of a mess.
I tried looking for the Lost in Tech video you reference in the quote here about 0.03mm layer height printing, and… which one is it? I’m in a bit of rush preparing for travel, but I didn’t find it. It’s not jumping out at me.
Can’t; don’t have my H2D yet.
But google AI thinks so:
“Yes, Bambu Studio allows for different layer heights for infill compared to walls through the “Infill Combination” setting, which effectively prints infill every X layers, allowing for a larger layer height for infill”
Beats me, you must be mixing me up with someone else.
You don’t need an H2D. It’s in regular orca slicer. I showed the clipping where it’s located (under “Strength”). I ran it on my X1C, and I presume it works on the other bambu printers equally well.
I’m not sure yet what the slicer situation is with respect to H2D. Haven’t tried it yet. At least for now, it’s not enitrely in sync with Orca Slicer any more, and the way things are going it’s not clear if they may be parting company, which would be a real shame if that’s what happens. There’s no mention of Orca Slicer in Bambu’s marketing materials for H2D. Let’s just say it’s conspicuously absent.
Do we need to care if Bambu Studio has it?
Iin all likelihood it’s the same. If you prefer Bambu Studio, use that instead.
Most often features first appear in Orca slicer and later get ported to Bambu slicer. Sometimes it’s the reverse.
1 Like
Jups, and then we’ll talk about whether a closed printer (printer with Chambers) are better for each material - I just want both printers. And than we add. Automate air circulation with even more automatic air flaps so that if something breaks, there are 10 more screws to loosen or even something more which can break, even if you miss the time to lose one of the screws and so on ![]()
Not that my way is the right one, but there are always 100 ways that work – the important thing is that you find the way that works for you. One of my sayings that I repeat over and over again: It’s not a question if it breaks, it’s a question when it breaks and how much money you’ve made with until it breaks.
I used “Combine Infill” extensively in both large prints (85% Venus de Milo, somewhere between 25 and 30kg of PLA Marble) and the minimum layer height trials. Unfortunately, it is still limited to the to the sparse infill and is not used for solid infill. Nevertheless, it can really help to reduce the total print times.
There’s a big caveat though: With adaptive layer height it works perfectly well in Orca, but not in Studio.
In Orca, we can set a maximum combined infill height. In Studio on the other hand, it can not handle just assing the adaptive layer heights. Instead, it multiplies the default layer height. Which Studio can not do when using different layer heights (yet). So it defaults to a percentage if the nozzle diameter. Unfortunately, the value chosen is far too high (100%). With this, infill tends to get messy with the occasional issue being visible in thin top surfaces.
I do hope that this 100% value is dropped to 60-66% in Studio at some point. Or they just take over the way Orca handles it ![]()
So far, my concern regarding low flow prints with carbon filled filaments is pretty theoretical. I dare say I’d need to try it out to see what the real issues are and which issue arises first ![]()
It’ll be a while though. Work, family, Easter egg stuff,…
Note: All of my experiences were with pre-2.0 Studio. I’ll wait a few weeks with that update as there are many reports in the forum…
2 Likes